• When you click on links to various merchants on this site and make a purchase, this can result in this site earning a commission. Affiliate programs and affiliations include, but are not limited to, the eBay Partner Network.

Looking for pointers on installing bucket seats in B-body Belvedere

Paul Cotton

Well-Known Member
Local time
5:05 PM
Joined
Jul 19, 2016
Messages
114
Reaction score
129
Location
Marion, Ohio
O.K.

Here we go. I have a 1965 Belvedere II, two door with bench seats. I have purchased a set of 67 Plymouth Fury bucket seats that I want to install in my car.

I pick the seats up tomorrow so I am looking for pointers/tips on making the bench to bucket change out. I figure any information I can gather ahead of actually starting the project is worthwhile.

Have any of you done this, if so, what am I looking at in the way of obstacles? The seats are complete so there isn't any problem with the frame or the sliding mechanism.

Any advise or tips would be appreciated.
 
First off, they go in the front half of the car...:D Second, the thing you need to watch for is that the mounting studs go through reinforcement plates as they originally would. If you don't you might be kissing the windshield in a panic stop, with the weight of the seat pushing you on. If the new seats don't line up with said plates, assuming you have them, you will have to either move them, or fab some and install them. As far as the shape of the floor pan versus the bottom of the seat, it may be wildly different, or not. If so, you will need some brackets to even it up. I don't remember seeing any for sale so you will likely be making them. I have this same issue ahead of me with 2006 Volvo buckets going in a 67 Coronet. Wildly different.
 
Not sure but I think the C-body seats are wider! Different floor pans for sure! I'd look for some early B buckets or early A body seats (same seats just different upholstery) Also you'll have to install the reinforcing plates on the floor next to the d shaft tunnel!
 
First off, they go in the front half of the car...:D Second, the thing you need to watch for is that the mounting studs go through reinforcement plates as they originally would. If you don't you might be kissing the windshield in a panic stop, with the weight of the seat pushing you on. If the new seats don't line up with said plates, assuming you have them, you will have to either move them, or fab some and install them. As far as the shape of the floor pan versus the bottom of the seat, it may be wildly different, or not. If so, you will need some brackets to even it up. I don't remember seeing any for sale so you will likely be making them. I have this same issue ahead of me with 2006 Volvo buckets going in a 67 Coronet. Wildly different.

UPDATE:
I got the seats installed. I had to cut about an inch and a quarter out of the middle of the center seat runner on each seat. The hump in the floor pan caused them to set to high on the inside. Since the car wasn't an original bucket seat car, I had to drill two holes in the floor for each seat on the side next to the transmission tunnel. I also had to increase the diameter of one of the door side floor holes. Once this was done the seats fit perfectly.

As you mentioned these seats are wider than the original Satellite/Belvedere seats were, so there isn't room now for the console. As you can see from the pictures, I think they look just fine with the B&M shifter.

I did use three inch washers on the bottom side of the floor pan for each of the four bolt holes. These really firmed up the seats.

My only advice for someone doing this is to really take the time to think out what you are doing and make sure you do it right the first time. I came close to screwing up a couple of times, but caught both of the problems before they were made.

All in all, it was a pretty easy installation.

The first two photo's show the real color of the seats, the other photo's turned out lighter than they really are.

eekw0HMUSVe10rhvyNm2xw.jpg

.
SmUjQR%kQSi1uml9R+UIZA.jpg
rI0Gd7mmQ2eDxI9RqwWVSw.jpg
ny+Sa9w6R9+ge7GepWk5mA.jpg

wPeRNK0cR0W23U1NfrNIdw.jpg
 
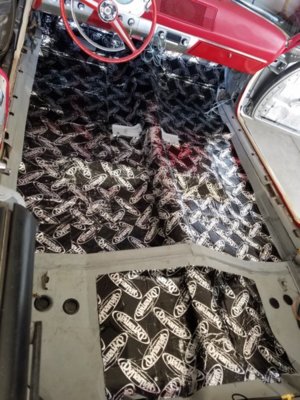
When I installed buckets in my b-body they were b-body buckets. They needed to have heavy gauge brackets installed (spot welded) for the inner seat bolts as are visible in the photo when I was dyno-matting my car. I got the oem brackets with the seats. In any case the seats need some beef for mounting.

20170701_161930.jpg
 
UPDATE:
I got the seats installed. I had to cut about an inch and a quarter out of the middle of the center seat runner on each seat. The hump in the floor pan caused them to set to high on the inside. Since the car wasn't an original bucket seat car, I had to drill two holes in the floor for each seat on the side next to the transmission tunnel. I also had to increase the diameter of one of the door side floor holes. Once this was done the seats fit perfectly.

As you mentioned these seats are wider than the original Satellite/Belvedere seats were, so there isn't room now for the console. As you can see from the pictures, I think they look just fine with the B&M shifter.

I did use three inch washers on the bottom side of the floor pan for each of the four bolt holes. These really firmed up the seats.

My only advice for someone doing this is to really take the time to think out what you are doing and make sure you do it right the first time. I came close to screwing up a couple of times, but caught both of the problems before they were made.

All in all, it was a pretty easy installation.

The first two photo's show the real color of the seats, the other photo's turned out lighter than they really are.

View attachment 598006
.
View attachment 598008 View attachment 598010 View attachment 598011
View attachment 598012
P.M. sent
 
Looks real good :thumbsup:

How did you get everything to match? Original rear seat?
Had the seats all reupholstered. I picked up the bucket seats at the Mopar Nationals in Columbus, Ohio last summer. They were completely rotted out. I had the upholstery shop strip the seats down to the bare metal and start from scratch. The back seat was original and i had it reupholstered as well to match the buckets.
 
Looks real good :thumbsup:

How did you get everything to match? Original rear seat?

When I had the bucket seats re-upholstered I had the original back seat upholstered to match the buckets. It cost a little more but having the buckets and the back seat match is worth the cost.

Just as a fyi, look at the photo's closely, the door panels are a darker color than the seats. The color of the door panels matched the old bench front seat and the old back seat. I tried to get as close to the old color as I could, but that shade isn't available any more from the fabric suppliers my upholstery guy used.

All things considered, I think it turned out well and I am very happy.

I think it looks great Paul! I've experienced the same thing, matching up interrior colors. Hell my car is 56 years old so big deal if something is off a shade. Finding the right materials/colors is a challenge. Those seats look comfortable.
 
i like the offset color gives the seats some real eyeball appeal. the interior looks great overall.
 
Auto Transport Service
Back
Top