• When you click on links to various merchants on this site and make a purchase, this can result in this site earning a commission. Affiliate programs and affiliations include, but are not limited to, the eBay Partner Network.

Oil on intake mating surface- is this normal?

Frankb

Well-Known Member
Local time
4:03 AM
Joined
Jul 14, 2012
Messages
229
Reaction score
92
Location
Tucson
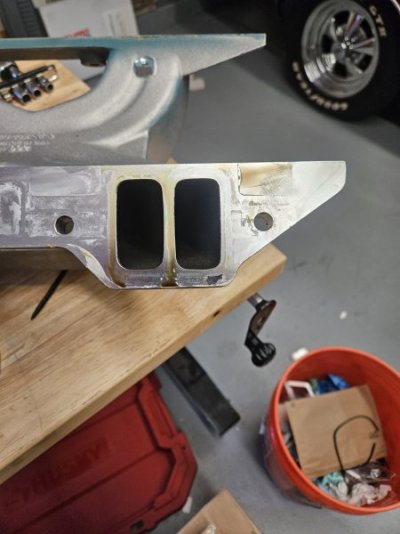
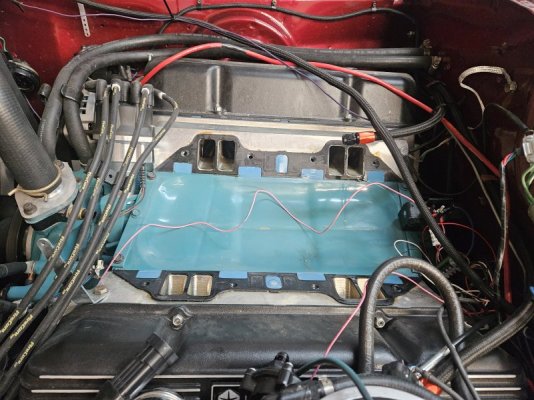
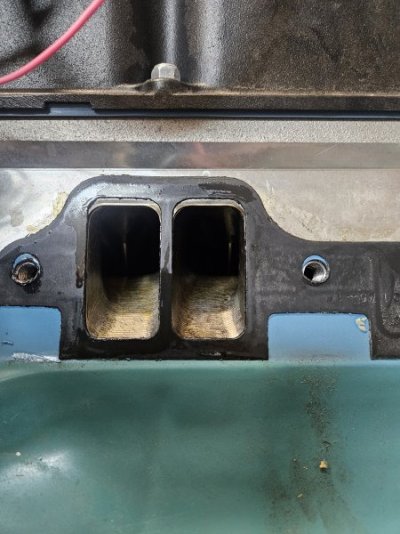
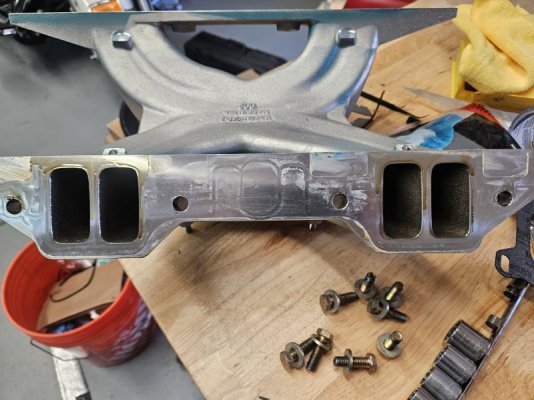
400/512, Trick Flow intake, Trick Flow 240 heads. All parts installed new out of box. Low mileage engine, 300-400 miles since built, probably less. Putting smaller intake on so hood can go back on. When I removed Trick Flow intake there was oil on the intake/head mating surface. Oil is on both intake and head. About same amount of oil on passenger and driver side of intake. 20240308_133630.jpg20240308_133650.jpg20240308_133933.jpg20240308_134005.jpg Additionally, there looks to be a fine mist of oil/gas on head intake runners. Most heavy in #5 and #7 I’ve never seen this before. Car ran excellent. No oil consumption noted. No oil smoke from exhaust noted. Carb is Sniper FI. Is there a problem here? Where did this oil come from?
 
I'd say that the intake to cylinder head angle is off and therefore oil is starting to get sucked past the gaskets. There is a way to check to see doing a dry fit of the intake minus gaskets and seeing how much clearance you have. I dont remember the exact procedure but its not hard. Hughes engines might have the steps needed to check this on their website. Do you know if the block was milled excessively? If it was that could throw off your intake to cylinder head angles. Superperformance (Sic) makes different thickness intake gaskets that might be needed to increase the gasket crush.
 
What is happening is that you're sucking some oil up out of the "valley" area and into the intake runners. The valley's oil isn't "under pressure", so maybe you're not burning enough to notice. If you think about it, the leak must be on the front or back (maybe both sides?) of the valley pan or gasket sealing area. Since you just built the motor, my "guess" is that a combination of block milling/head milling, or just the combination of new parts, has the angle of the intake sealing face & the head sealing face, not perfectly parallel or "flat/even" to each other. This requires milling the head's intake face or the intake's head face to "square them up". Since the motor is assembled, the easiest/cheapest way is to mill the intake. In a perfect situation, you'd have the engine/intake/mill all together,, but you'll probably have to just drop the intake off at a machine shop. There is a method using special flat shims (precision washers) where you space the intake up off the heads "one perfect washer's thickness" on each corner. You put shim gauges at each corner...subtract the thickness of your shims...and that gives you (& your machinist) an idea of how to mill the intake, so that when it's reinstalled, it ends up square with the heads.
 
Probably try some thicker gaskets with some good fuel and oil resistant sealer on both sides of everything to hopefully seal it up without machine work. Fiber gaskets should compress some to fill a slightly uneven gap.
 
The engine was built by a pro. The block was decked but I don't know how much was taken off. Enough to get the compression right. The bolts did not have any sealant on the threads. There is one paper gasket on each side and it is on manifold side - nothing on engine side. New manifold (Holley SD) fits perfect. Bolt holes are dead on. I was thinking to put sealant around the intake ports and install the SD using the valley pan and gaskets that are on the engine now.
 
If the block had been milled, then any new intake will need to have a calculated amount milled off the mating surfaces also.

The eye-chromator is not any degree of an accurate judge of angles or clearances.
 
There is a good point here.....trying some sealer is cheap/easy to try. If I had to do it a 2nd time...mill the intake
 
Trial fit everything....even to the point of using feeler gauges!
 
There are many possible combos for installing a big block Mopar intake, use bathtub plus gaskets or without gaskets with RTV but not around the ports paper gaskets or composite .015" thin felpro or 0.030" thick if the heads were milled ... you get the idea. Lot of different ways and everyone does it a little different, and if the block was decked that is yet another variable.

If it was sucking oil in from the lifter valley I would expect signs of a vacuum leak and rough idle though, maybe it was residual oil from the install? 400 miles isn't a lot. Just do plenty of test fits with the new intake and use gaskets as needed, using studs on one cylinder head can help line everything up before final install with the bolts and make sure to follow the recommended torque spec and order especially with those TF heads. I chase the threads in the head and the mounting bolts several times to make sure there are no issues with gunk that can throw off your torque readings or worse, cross thread. Good luck with the SD, it's a good intake.
 
First: make sure the ends of the intake are not contacting the front & rear china wall. This would prevent the intake from properly seating against the heads.

You would only need a paper gasket on the engine side of the gasket if the flange angles were out & you are trying to seal a gap.

Edelbrock [ & others I presume ] recommend 25 ft/lb tq for 3/8" intake bolts on alum intakes. The factory recommended 45 with the cast iron intake; so with 25 ft/lbs you have less compressive force & a more 'flexible' metal that may not seal as well. Additionally, the raised bead in the intake gasket is designed to flatten out with 45 ft/lbs of tq. That is what creates the seal.....
You have less force now trying to compress the bead.
I would use a paper gasket between the head & the intake [ because this is where the oil is coming from ]. Use Loctite 518 or similar around the intake openings. NOT silicon, it reacts with petrol.
 
There is a good point here.....trying some sealer is cheap/easy to try. If I had to do it a 2nd time...mill the intake

Mill the head is better. But that ship has sailed for the OP. Maybe mill the intake, or try the 0.015" gaskets on both sides.

You do need to check the China wall/hold down bar/bolt for interference with the intake.
 
Well I pulled off the old valley pan and gaskets. I was wrong in my initial observation - there are 2 paper gaskets; one on each side of the valley pan.

I put the new manifold (its not new, I've had it for some time) on the bare heads. Clearance is .000 to .008 between heads and manifold. These measurements were taken around the intake ports of the heads. The manifold was not torqued to the heads for these measurements but I did apply slight downward pressure.

1 and 3 measured .007
5 and 7 measured .008
2 and 4 measured .003
6 and 8 measured .000

The bolts would not line up properly with no gaskets or valley pan installed.

For those of you who do this regularly are these measurements out of the ordinary? I don't know if 008 is a lot in this circumstance or not.

With a new valley pan only, with manifold in place, all of the bolts line up and can be started though the last one, no matter what order I used, was a little difficult to start but once started I could turn by hand.

So, having this additional information, whats the correct thing to do?

My thoughts are to not use the paper gaskets, apply sealant to heads, both sides of valley pan, and intake mating surface, and torque in place.

For the record the previous valley pan with two paper gaskets measured at .090. The new pan and gaskets measure at .085. pan is .025 and gasket .030
 
http://www.superformanceproducts.com/catalog/2016SuperformanceCatalog_RacerNet.pdf
Not sure on your port size but there are a few options here and the gaskets are quality in my opinion. If you are going to use any sealer on the gasket, use a non-hardening permatex on the valley pan side. Im not a fan on gluing gaskets to head or intake. To me your numbers are probably ok, but obviously we all would like to see equal measurements. But what has me wondering is that you say that you have a problem starting a bolt. I had a machine shop totally screw things up on fixing intake bolt holes on the head and things looked ok until you started to bolt it down. I couldnt get bolts to line up. I eventually removed the intake and ran bolts in and low and behold the bolt angles were all over the place. I would put the bolts in the head and get a machinist ruler and set it on edge on top of the threaded portion of the bolts and see if they are in line. My thinking is that if they are off kilter when you torque the intake down you are not getting even clamping force. Another way to check things without destroying paint etc after you put it together, I use an unlit propane torch and turn on the gas and while the engine is running listen for changes in idle quality. If it smooths out you have a vacuum leak. Of course try this at your own risk, Ive never had problems chasing idle issues this way, but be careful.
 
Must apply sealer on the head and China wall where the hold down bars are. Put Teflon pipe dope on your manifold bolts. U Tube the valley pan and intake in stall. There is a good video of doing this. Must run sealer in the crack at the head and hold down area of the block and go up the head some. Hope you get it figured out. I had oil running into the valley pan and need to put pipe dope on the bolts but forgot in the install. This time did not use the paper gaskets that came with the kit for the valley pan. Should not need them.
 
The bolts do not need a sealer. If you think your bolts are “leaking oil” that means the intake is not sealed properly.

Also, if the bolt holes line up well when you are using 2 - 0.030” paper gaskets, you don’t need sealant on the gaskets either. I usually use a thin film of light grease. Makes changing intakes on the dyno or at the track a breeze.
 
Auto Transport Service
Back
Top