• When you click on links to various merchants on this site and make a purchase, this can result in this site earning a commission. Affiliate programs and affiliations include, but are not limited to, the eBay Partner Network.

Pertronix ballast resistor

dodge68charger

Well-Known Member
Local time
8:36 PM
Joined
Feb 6, 2012
Messages
1,230
Reaction score
81
Location
Washington
Is their a certain ballast resistor i need for my car, i got the builder to put a pertronix setup in the distributor. I see there is one for points n electronic ignition. Thanks
 
What coil do you have? Some company's do want the ballast to be used with their coil.
 
I still have to get a coil for the car. Wanna keep it stock looking under the hood. Its a 440 engine with a stock rebuild n a slight cam. Not sure what to get
 
So it turns out i dont beed a resistor. Has anyone bypassed the resistor and still keeped it on the firewall. Heard you can run a wire through it
 
So it turns out i dont beed a resistor. Has anyone bypassed the resistor and still keeped it on the firewall. Heard you can run a wire through it

Just use 2 splices, same color wire and run the resistor behind the resistor on the Firewall.
Between the Firewall and Resistor assenmbly.
 
So it turns out i dont beed a resistor. Has anyone bypassed the resistor and still keeped it on the firewall. Heard you can run a wire through it
I used the Pertronix III with their FlameThrower III coil. I left the ballast resistor in place, just moved the feed to the coil to the other side of the ballast resistor, where it has full 12V all the time. Worked perfectly.
 
I've always heard/done it this way. If you're using the factory coil use the stock ballast resistor. If you're using the pertronix coil bypass the factory resistor.
 
IMG_1170.jpgI installed the Pertronix with the Flame Thrower III. Here's a pic of the bypass - I used spade connectors just in case I went back to needing a ballast; just unplug and reconnect. Afterwards I removed the ballast just to clean up the firewall.
 
I went with a coil (56028172AB) from a late model (1998 - 2003) Dodge that doesn't need a resistor but left wires hooked to the ballast resistor. Then cut open the wire loom about 6" to 8" away from the resistor so I could cut the wires, tie them together and bypass the resistor without anyone knowing. But then, I also rewired to add a later model (1970 - 1985) voltage regulator (5234625).
 
.... will this work with a MSD Blaster 2 coil also ? I am asking, because I have this coil and a MSD Ready to run Distributor.... and I am
not sure, if I need the BR...or not.... called MSD they say : I don´t need the resistor....but the instruction sheet says I need the Resistor.... Confused

Greetings Juergen
Brasil, follow the instructions on the MSD Blaster 2 coil. If it says to use a resistor, then use one. Last thing you want to do is burn up a nice coil or points by feeding with too much voltage.

Here's what I found on the MSD Blaster 2: (8202.pdf from MSD's website:

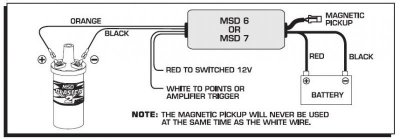
WIRING TO AN MSD 6 OR 7 SERIES IGNITION
The MSD 6 and 7 Ignitions are Capacitive Discharge Ignitions. They receive 12 volts directly from the battery and are responsible for delivering the positive voltage to the coil. Therefore, a 12 volt source wire is not required at the coil. When the installation with an MSD Ignition is complete, there will only be two wires making direct contact to the coil terminals: The Orange Wire from the MSD connects to the coil positive (+) terminal. The small Black wire from the MSD connects to the coil negative (-) terminal (Figure 1).

Figure 1 Wiring to an MSD 6 or 7 Series Ignition Control.
WiringToMSD6or7.jpg


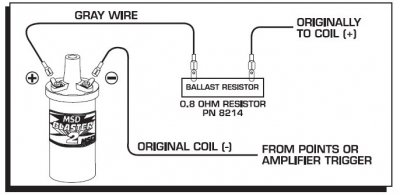
WIRING TO A STOCK POINTS IGNITION
1. Connect the negative wire to the negative terminal (-).
2. Connect a wire from the coil positive terminal to one side of the ballast resistor. Connect 12 volts to the other terminal of the resistor.
3. Install the high voltage coil wire.

Figure 2 Wiring to a Points Ignition.
WiringToPointsIgnition.jpg
 
.... but I don´t have the 1st nor do I have the 2nd Set Up.... I have the "MSD READY to RUN" distributor and the "BLASTER II Coil" no points ... the Dizzy is an electronic one.. and the cables that feed the dizzy are orange ( negative side of the coil ) and red
(positive side of the coil ).... the gray cable...feeds the TACH ( if equiped)

Thank you
Juergen
 
Finally found this diagram... I think I would use the ballast resistor.


msd_ignition.jpg
 
You can still keep the ceramic part of resistor, plugging the wires on its prongs, but just removing the resistor on back, and replacing with a jumper wire into the groove. Refill it with epoxy for safety with body.

This will keep stock look on engine bay
 
The only reason for a ballast resistor is so the coil provides the correct ohms for a points setup, if you upgrade to electronic ignition, any modern coil, including the one currently on your vehicle will usually be fine without the use of a ballast, some coils can be purchased with the correct ohm reading for points, and no resistor would be needed. I run into this al the time when restoring old motorcycles.
 
Auto Transport Service
Back
Top