• When you click on links to various merchants on this site and make a purchase, this can result in this site earning a commission. Affiliate programs and affiliations include, but are not limited to, the eBay Partner Network.

74 Satellite ignition/charging diagram

rustycopcar

Active Member
Local time
11:51 AM
Joined
Dec 13, 2011
Messages
33
Reaction score
1
Location
rochester mn
Im sure many of you can relate to me when you bought your car and realized that the last guy was NOT and electrition. And like me you have spent hours chasing down faulty and loose connections. well this is for all of you. i hope it gives you a smile maybe even makes you laugh. In the last four days i have found that the diagrams that other people have posted are about as useful as this one if your not sure where a wire goes chase it. their like birds that return to their nests. it will bring save you time and money. good luck and yes some of this is right, but be warned if it looks different than yours it probably is.
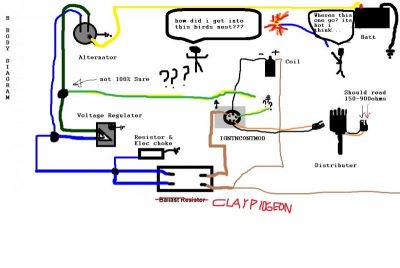
B BODY DIAGRAM.jpg
 
1974 has the seatblet interlock system that is tied into the main harness.
It is junk and can make the carr into an oversize paperweight.
I just finished replacing the entire harness out of a 74 Charger and installed a 1973 harness for simplicity and reliablity.
You really do not have to replace the harness,but the interlock can be disabled and the car will still function normally..
 
So true that should be the first to go. Extra wire to splice into something else some people must think. Cut it all out I say. If the car runs without it its just extra weight to get rid of. Except the pushbars those are handy.
 
If you do need a wiring diagram check this link out.. They have a number of things that can help you with your car.. If you have a Auto-Zone parts store around you You might want to consider buying a Haynes Repair Manual, I bought one for my 73 Satellite and im not sorry, all kinds of diagrams, wiring, rebuilding, info on specs for about anything for your car. They may sell them elsewhere but Auto-Zone is where i got mine.. Cute diagram you have there :)

http://www.mymopar.com/index.php?pid=18 Tool and reference section on left of page should take you to other places that will help you.
 
My 68 GTX was all hacked up. They had use wire nuts to make connections. I just replaced the underhood wiring harness and fixed all the problems.

Dave F
 
ron,
got one of those then almost cried after seeing that most the wires under the hood wer the wrong colors gagues and he used the cheapo crimps that you could pluck the wires out of with your pinky. from the alternator alone i had blue crimped to red crimped to yellow crimped to black. all wrapped with tape making almost no connedtion. talk about a nightmare!
 
and dfarmercse i was fortunate enugh to only find 2 wirenuts so far. i have to finish peeling of electrical tape to expose it all. he did a piss poor job of wiring it up but an outstanding job covering it up.
 
ron,
got one of those then almost cried after seeing that most the wires under the hood wer the wrong colors gagues and he used the cheapo crimps that you could pluck the wires out of with your pinky. from the alternator alone i had blue crimped to red crimped to yellow crimped to black. all wrapped with tape making almost no connedtion. talk about a nightmare!

Im sorry to hear this, when i finished up my car i ran into some electrical gremlins, nothing compared to what your saying here, that does sound like a nightmare, I don't know why when someone repairs things they don't take the time to do it right, You would think at the very least they would worry about fires! Just a suggestion but maybe you could in the wanted parts section put in a note asking if anyone has the particular wiring harness you need to replace all this.. I cant see what your explaining but i think id try, someone might have a decent one hear at a fair price, like i said just a suggestion but could benefit you, its dangerous by the sound of it. Im sure you can piece it all together the way it should be, but if you can get a good one, original and correct color coded might be worth a shot....Good luck.
 
ron,
i got the right color wires run and i didnt skimp on connectors i used the really strong spendy inline crimps that have permaseal in them that you have to warm with a torch, heat gun or lighter. i have replaced everything electronic under the hood of my car. this weekend im installing a MSD digital 6AL and Blaster 2 coil. tonight i finished up replacing the pick up coil and reluctor in my distributer. the last thing on my list. and WOW what a difference it makes. it stopped my hard hot starting completely. it also runs alot smoother now. as for the wires i have run my fingers along all of them to make sure they dont have cracks or crap crimps or wirenuts. i found a couple cuts in wires that i either replaced the entire wire if it was bad enugh or put several layers of high temp liquid tape.

So heres the quiz...
I have only one wire now that i dont know what it went to but its a Light gray wire and has a female terminal end on it. its close to the distributer and im wondering if its for manual transmission modles for the Tachometer. What is this wire?


thanks for all the help guys here on b bodies only. my car is running good and i will update you all with the goodie basket(msd, eddy intake, air cleaner and carb) im getting from summit and installing this weekend.
 
Ill give your quiz a go, From what your describing, It could be the wire to your oil sending unit, This is the 318? If you have an after market oil gauge, your oil line to the gauge is probably taking the spot the sending unit was in, Thats the only thing i can think of right there...
 
Rusty, did you find out what wire that was?

"So heres the quiz...
I have only one wire now that i dont know what it went to but its a Light gray wire and has a female terminal end on it. its close to the distributer and im wondering if its for manual transmission modles for the Tachometer. What is this wire?"
 
never did find out what it went to. i cut most of the old wiring out and did it up right. I installed an msd 6AL with the rev limiter set to 5500 max rpm. i installed a preformer intake and edlebrock 1407 carb (750 CFM) K&N air filter , advanced the timing to get better throttle response, and i installed a manual choke.(a MUST here in Minnesota) a couple weeks ago even at -17F hopped in pump twice choke and vroom. it runs so much better now. i am still tweeking and peaking with the kickdown though cause the linkage from carter to eddy is different. ill post pictures soon
 
Just curious, It sounds like you have it coming your way, Looking forward to the pics..
 
Auto Transport Service
Back
Top