• When you click on links to various merchants on this site and make a purchase, this can result in this site earning a commission. Affiliate programs and affiliations include, but are not limited to, the eBay Partner Network.

Motor is out - now under hood resto can begin

43tutor

Well-Known Member
Local time
4:48 PM
Joined
Dec 10, 2011
Messages
230
Reaction score
164
Location
Upstate SC
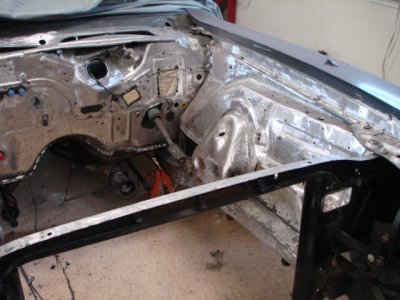
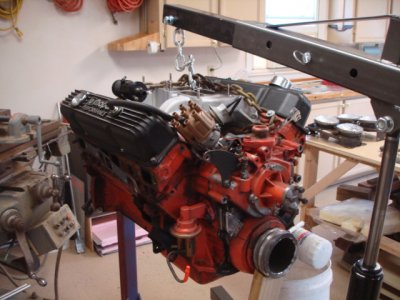
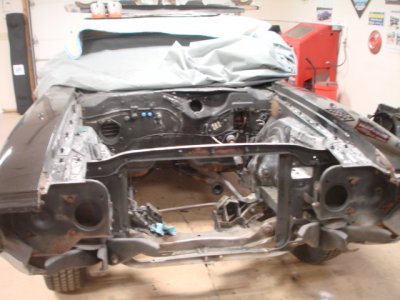
My son and I pulled the motor on our 72 SSP this past weekend. This was my son's (15 years old) first time pulling a motor and it was an experience for him. Once he hoisted the motor up and out his comment was "that thing is bigger then I thought". I told him "I just wish it where a Hemi". The motor we pulled is a 440. The previous owner installed this motor. The original 400 motor for the car is tucked away in the corner of the shop. Maybe someday I will drop the 400 back in.

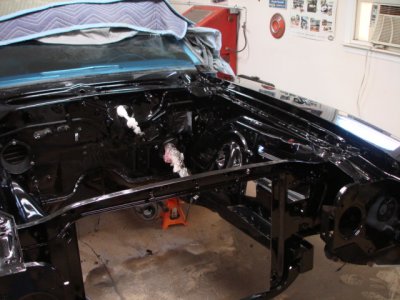
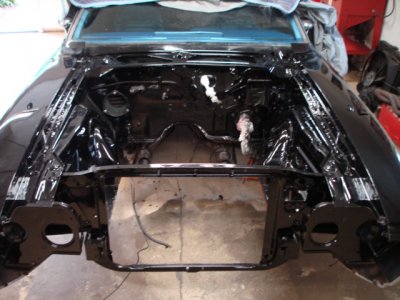
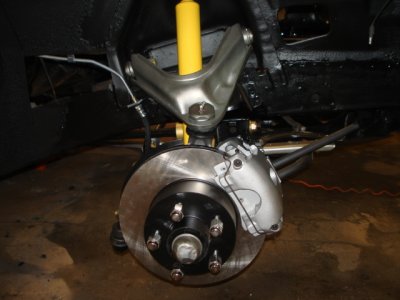
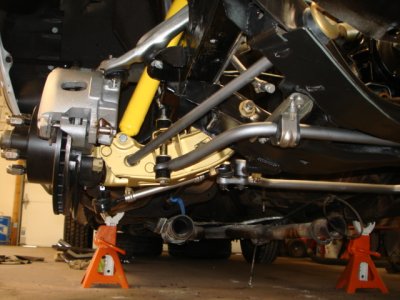
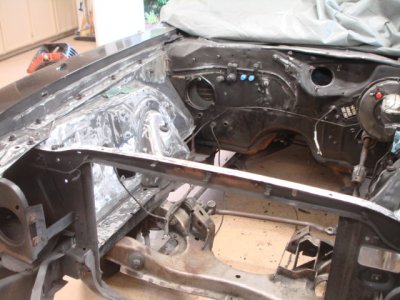
Our plans are to clean and paint everything under the hood. The plans call for putting it back as close to original looking as possible with maybe a few very subtle modifications. We will paint the motor color back to the original blue, re-install the A/C (previous owner removed it), install the factory exhaust, etc...

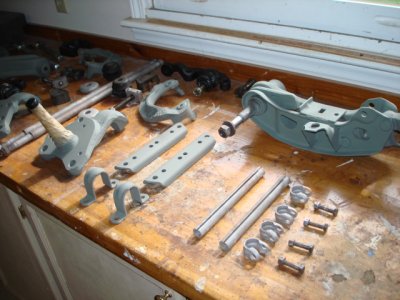
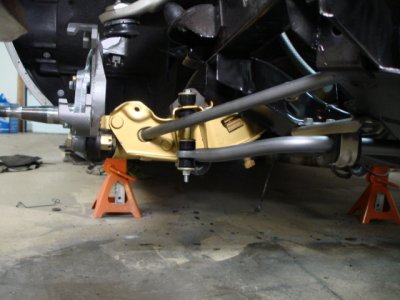
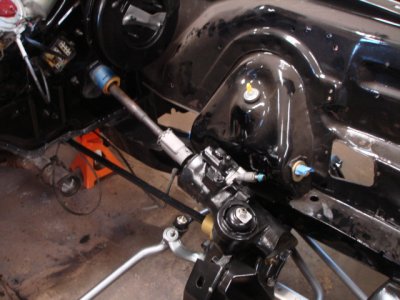
No plans to go crazy with the motor. While the motor and trans is out I plan to replace all gaskets and seals. I even plan to rebuild the steering gear box while I have easy access. The tranny will get a mild shift kit.

Once everything is back in place we will top it off with a new set of reproduction decals all placed in the correct location.
 

Attachments

  • 017.JPG
    017.JPG
    146.4 KB · Views: 1,500
  • 025.JPG
    025.JPG
    152.7 KB · Views: 1,430
Very cool. I cherished my time working on cars with my 3 boys. 2 of them are actually gearheads now and the other one can do his own maintenance. Have fun. Looks like a nice car.
 
That's a nice project for the two of you. I did the same type thing with my '69 GTX this past summer. Good Luck!
 
Slowly making progress. I had to stop for a while to get some things done around the house. Now back at it on the Mopar. Slowly making progress.
 

Attachments

  • 008.JPG
    008.JPG
    153.8 KB · Views: 1,296
  • 010.JPG
    010.JPG
    148.2 KB · Views: 1,293
Very cool! And an exciting time for you and your son too :D ... Keep us posted on the progress and don't be shy about hitting me up if you decide to dress up that plant a little while it's on the stand.
 
Nice project. Good decision to put AC back in. Put a Firm Feel Stage 2 box in and be done with it. Put the old box in the basement with the 400. Classic Auto Air Tampa can help if you need any AC stuff.
 
Here is an update on my car. After a very busy summer and a crazy work schedule I finally have time to work the car again. The inner fenders and firewall are now completely sanded to bare metal. The good news only one small rust spot the size of a quarter was found on the passenger side inner fender near the hood hinge connection. All other metal is solid.

The front suspension is completely taken apart and my son has been busy media blasting all the suspension. I will order the suspension rebuild parts this week and the paint. Hopefully this thing can start to be put back together.
 

Attachments

  • 002.JPG
    002.JPG
    159.9 KB · Views: 1,183
  • 006.JPG
    006.JPG
    151.9 KB · Views: 1,147
  • 007.JPG
    007.JPG
    157.1 KB · Views: 1,169
I finally have the paint applied in the engine bay. All the suspension is painted and rebuild kit has arrived. Now we can start bolting this thing back together.
 

Attachments

  • 001.JPG
    001.JPG
    151.8 KB · Views: 1,091
  • 003.JPG
    003.JPG
    148.6 KB · Views: 1,108
looking real good :headbang:
 
You mention about doing the steering box and add a shift kit to the trans. Instead of just adding a shift kit, why not open the trans and inspect everything while its out. Having a shop go through and freshen up the internals would be a good investment. Torque flights and none for having problems with the sprags, when the fail it will tear up the case.

Another option is finding a later model TF that has the lock up converter. They can be modified to the point that they are reliable and it will help your fuel mileage. I had done it to one of the old 1 ton maxi vans that Dodge produce back in the mid 70's. You can also play with the springs in the governor springs to increase or decrease your shift points.

I'm currently looking for a GTX or maybe a RR and one I do its something I will more then likely do to improve the drivability Good luck on your project.
 
Front suspension work is nearly complete. Here are the latest photos.
 

Attachments

  • 010.JPG
    010.JPG
    163.6 KB · Views: 921
  • 014.JPG
    014.JPG
    162 KB · Views: 920
Looking real nice!
Backing up a few months, what did you use to get the engine compartment down to bare metal? Looks like you did a real meticulous job. And what sealer and paint was used?
 
I used a 2" diameter paint removal tool in my air tool (90 degree die grinder) to remove the paint on the firewall and inner fenders. See photo below. The paint removal tool worked very well. I must have went through about 4 to 5 of those just to clean the old paint off. I purchased the tools at Harbor Freight (cheap disposable tool for $1.99 ea). I had the original layer of paint and primer plus an additional layer of some type of paint on top of the original paint. The small areas where the 2" tool would not reach I just sanded my hand. All the extra work paid off. The results turned out really nice.

Once all the paint was removed I used Sherwin Williams Automotive primer and enamel paint. The black on the K-member and suspension parts is Eastwood's Extreme Chassis Black with ceramic (satin finish).
 

Attachments

  • 003.JPG
    003.JPG
    148.8 KB · Views: 852
Your work looks excellent, since I know your going for a correct look here are two points.
Pull those shocks out and scuff them and spray them Satin Black, also remove your sway bar links and put them in from bottom up.
Everything else look way cool!!!
Ron
 
Front suspension and brakes now complete. The steering gear is completely rebuilt and installed. I will finish installing the new brakes lines, master cylinder and proportioning valve later this week.

Next is the motor. After debating back and forth several months I have decided to put the original number matching motor back in the car. The 400 will need rebuilt, so I plan to put a stroker kit in and turn it into a 451. I been looking at the stroker kits from 440 Source. Has anyone purchased from them and how is their quality? From what I researched seems like a good company.

Below are the latest pictures.

PS - I plan to pull the shocks and change the color. The yellow needs to go....
 

Attachments

  • 008.JPG
    008.JPG
    158.4 KB · Views: 738
  • 011.JPG
    011.JPG
    142.7 KB · Views: 695
  • 026.JPG
    026.JPG
    160.8 KB · Views: 736
Auto Transport Service
Back
Top