• When you click on links to various merchants on this site and make a purchase, this can result in this site earning a commission. Affiliate programs and affiliations include, but are not limited to, the eBay Partner Network.

Welding on Axle Housing Tubes

james j

Member
Local time
2:52 PM
Joined
Oct 25, 2014
Messages
17
Reaction score
0
Location
Chicagoland
Hi Guys!
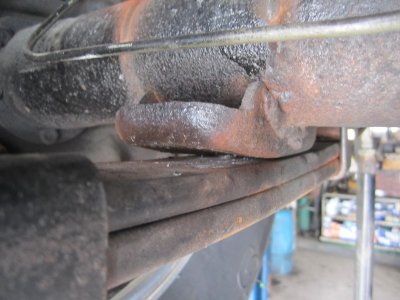
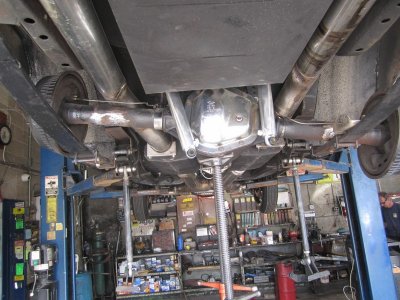
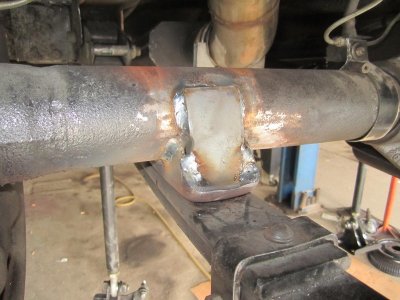
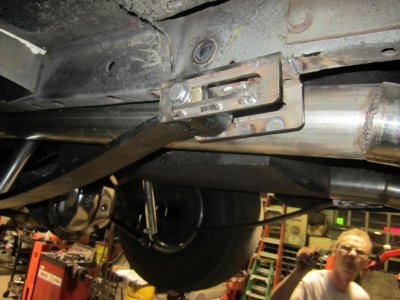
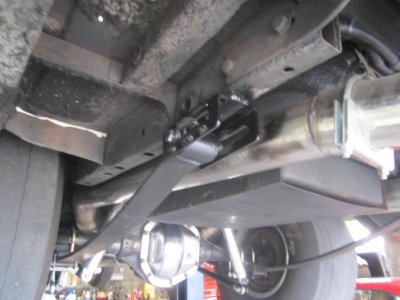
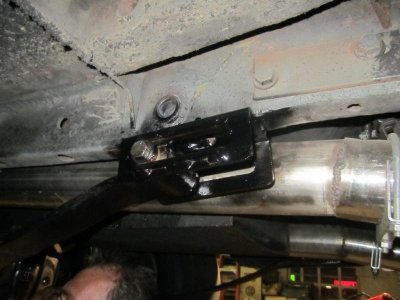
I'm a little new here, but I am finally getting back to my project. I'm have a '68 charger and am putting the spring relocation kit coupled with mini-tubs. While I have the new spring pockets are already installed in the frame rails, I have the new leaf spring perches just tacked in place on the rear end (which still has its axles in it). As such, I just wanted to see if you have any advice on how to finish the welds on new perches. I figure that it would be easier to ask, since I am concerned about warping. The rear end still has it's original axles in it, but they will be replaced before they go back in the car.

Any hints or advice would be greatly appreciated.

Thanks,

James qwerty2.jpg
 
stagger your welds and don't put too much heat into it, should prevent warping
 
I've welded on axles with an alignment jig installed and it absolutely warps the axle, a little heat from a torch added to the other side pulled it right back. The question is how much warp will they tolerate before you get in trouble?
 
I do it all the time with no jig and never a issue.Just don't run a steady bead,1" maybe and let it cool.
 
Go to Muggy Weld.com and buy some of the blue colored heat sink play dough stuff. It is reusable and absolutely sucks the heat right out of the area around where your welding. It will protect the rest of the metal around the weld from warping.
 
I've welded on axles with an alignment jig installed and it absolutely warps the axle...

How long did you make your welds? ...I've heard of some people keeping them at 1" and staggering them without issues.?
 
Doesn't matter how you weld them.....you will get some movement. You can even use products to take the heat out of the area but you will still be putting in heat at the weld point. Heating up the opposite side will bring it back but it's not precise and unless you have an alignment bar, you won't know what it's doing....but, people have been welding on these things since they were nearly new and unless you really make things bad, you're not going to notice it. Now will a perfectly straight housing free up some horsepower vs one that's 1/8th" out of wack? Probably but who has tested it? Also, I've seen some come in new cars that were bent from shipping and they didn't seem to do any worse. The only time things went bad is when the housing is really bent bad. My dad got one back in 69 that would waste wheel bearings within a years time but no one knew why. Axle housings have a pretty wide tolerance but most are within 1/8th" from the factory.....at least the ones I've checked. It's always best to do all of your welding and then check for straight but in a lot of cases, it's just not feasible.

 
How long did you make your welds? ...I've heard of some people keeping them at 1" and staggering them without issues.?

747Mopar and I were working on my axle housing . . . one thing that I need to point out is that once we cut into the housing to shorten it 3" on each side, we found that the driver side ( IIRC ) was out of true by at least a 1/2" . . . so the first question that I would have to pose to you - do you know that your current housing is indeed true ? ?

Go to my build, page 56 - post 1108 - it shows you what we did to get it shortened and keep it true ( we were amazed at how much it moved - but adding heat in the right places ( thanks 747 - he knows his stuff ) and the whole thing was trued up before we left . . . )

Good luck with the welding - it's an odd dichotomy - get it hot to assure good penetration - but not too hot as to cause it to warp ? ? ? Argh . . . getting a way to measure it helps !
 
Dit one? http://www.forbbodiesonly.com/mopar...-Restoration-(aka-Mad-Scientist-Build)/page28

My dummy bearings are all made from 316 stainless steel with about .002" clearance. That's pretty snug and things better be clean. The bar is made from 17-4PH stainless. Sticking it together on a Dana is much easier than sticking it though an 8 3/4 rear lol. Also, I do NOT do any welding with the bar in place. Made that mistake once! Stick the bar in, tack weld the bearing housings on and then slide the bar back out of them. Do some welding on one side then go 180 and weld then see how the bar fits (notice in my above post that the bar is not as wide as the housing is). If it's close, I'll do more welding and check again then final weld the rest. Also, the bearing housings go on last if I'm adding new spring perches or installing ladder bar mounts etc.
 
Sticking it together on a Dana is much easier than sticking it though an 8 3/4 rear lol.

Roger that Cranky . . . we had all kinds of fun getting it into, and out of, the 8 3/4 rear end . . . but we got it done . . .
 
How long did you make your welds? ...I've heard of some people keeping them at 1" and staggering them without issues.?

Honestly I'm more concerned with welding it in properly than the warpage because I'm using a jig and know I can pull it back if it does warp. Like Cranky said people have been welding on these things for decades and they typically work fine however if you were to compare bearing life I doubt they'd last as long as one done using a jig.

Building a jig isn't to hard if you have a buddy with a lathe, you'll need a true, smooth, rigid bar and 2 bushings to fit the carrier bearing clamps and another 2 that fit the axle tubes all bored to fit snug on the bar but still move easily enough. Again like Cranky said, pull the outer bushings before you weld.
 
Thanks for the idea 747. For a few bucks, I can whip one up... before stitching welds back and forth, ensuring that it will stay true. Has anyone ever made one before? ...any pics?

Thanks again!
 
Keep pinion angle in mind. After I twisted a perch at the track,set the angle 5* down and also braced the rear side of the perch.If I did it again I would the Calvert perches.:blob1:

While your under there,install a driveshaft loop even if you don't drag race!
 

Attachments

  • 8.1.14 003.jpg
    8.1.14 003.jpg
    108.9 KB · Views: 315
  • 8.1.14 007.jpg
    8.1.14 007.jpg
    158.4 KB · Views: 289
  • 8.1.14 012.jpg
    8.1.14 012.jpg
    77.5 KB · Views: 308
  • 8.1.14 013.jpg
    8.1.14 013.jpg
    124.8 KB · Views: 305
Yup, gusset the perches. If I'm racing with leaf springs and need to relocate the perches, I'll install the longer ones and gusset them too.
 
This is all great info, thanks guys!

- - - Updated - - -

Honestly I'm more concerned with welding it in properly than the warpage because I'm using a jig and know I can pull it back if it does warp. Like Cranky said people have been welding on these things for decades and they typically work fine however if you were to compare bearing life I doubt they'd last as long as one done using a jig.

Building a jig isn't to hard if you have a buddy with a lathe, you'll need a true, smooth, rigid bar and 2 bushings to fit the carrier bearing clamps and another 2 that fit the axle tubes all bored to fit snug on the bar but still move easily enough. Again like Cranky said, pull the outer bushings before you weld.

How about a few pics of that jig 747?
 
I will also add,,,, ,if you add rear sliders,use the calvert brand and do it right the 1st time. Afco offers their own sliders or the Chinese knock offs for half the price. I bought the Afco brand 'cause they are made in the USA. Problem was,the bushings were the wrong size and had to get the right ones from Calvert. The spring eye in the Calvert spring is different than Superstock spring.
 

Attachments

  • 5.31.15 009.jpg
    5.31.15 009.jpg
    63.1 KB · Views: 251
  • 2.26.15 055.jpg
    2.26.15 055.jpg
    53.7 KB · Views: 278
  • 4.7.15 005.jpg
    4.7.15 005.jpg
    65.8 KB · Views: 270
  • 7.8.15 001.jpg
    7.8.15 001.jpg
    48.6 KB · Views: 263
  • 5.31.15 023.jpg
    5.31.15 023.jpg
    57.1 KB · Views: 271
This is all great info, thanks guys!

- - - Updated - - -


How about a few pics of that jig 747?

I would but I borrowed an 1 15/16" shaft from work to do it, I have the bushings though.
 
Interesting. I have never seen sliders like those. Can someone explain how they work different than shackles?
 
I see, I am torn about the whole narrowing thing. On the one hand the wheels will be deeper from the outside edge with it narrowed and on the other do I want to go to the trouble of doing it or not? If I use the 9" I will have to relocate the perch pads anyway as they are on the bottom and if I use the 8 3/4 and don't narrow it I can buy backspaced wheels and be done with it. What to do?
I would but I borrowed an 1 15/16" shaft from work to do it, I have the bushings though.
 
Interesting. I have never seen sliders like those. Can someone explain how they work different than shackles?
The local dirt track racers have been using them (or did) for years. They work like regular hangers work. When the spring is compressed, they get longer and instead of the hanger moving back and forth in an arc, the sliders just move back and forth in a straight line.

I see, I am torn about the whole narrowing thing. On the one hand the wheels will be deeper from the outside edge with it narrowed and on the other do I want to go to the trouble of doing it or not? If I use the 9" I will have to relocate the perch pads anyway as they are on the bottom and if I use the 8 3/4 and don't narrow it I can buy backspaced wheels and be done with it. What to do?
Too bad you're so far away or you could use mine.....which is 1 3/4" diameter. It's made from 17-4PH shaft material and came already straightened and on size and I didn't have to do anything to it except polish it a bit. I like it because it doesn't rust in this humid Gulf Coast climate. The stuff isn't cheap though.....
 
Auto Transport Service
Back
Top