• When you click on links to various merchants on this site and make a purchase, this can result in this site earning a commission. Affiliate programs and affiliations include, but are not limited to, the eBay Partner Network.

67 GTX Dash Bezel Install

67GTX440

Well-Known Member
Local time
11:51 AM
Joined
Nov 29, 2012
Messages
1,013
Reaction score
430
Location
Jacksonville, FL
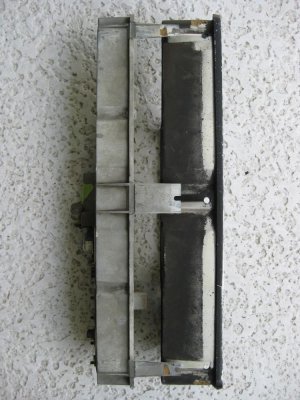
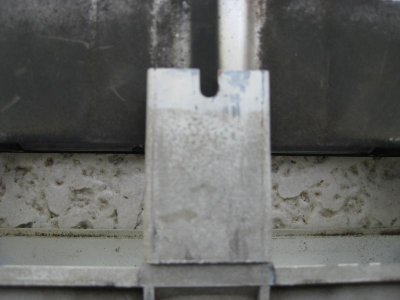
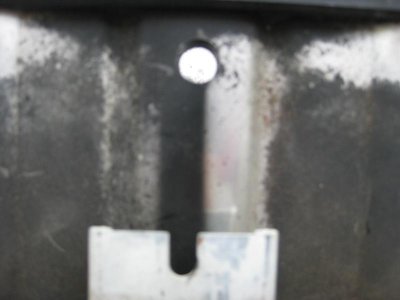
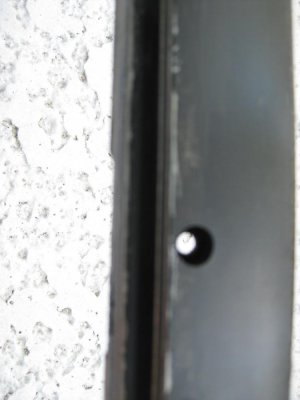
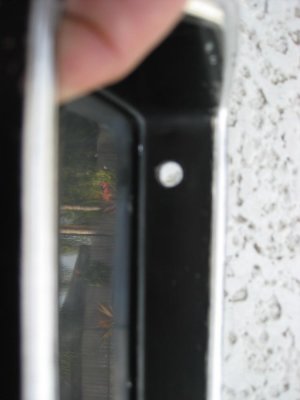
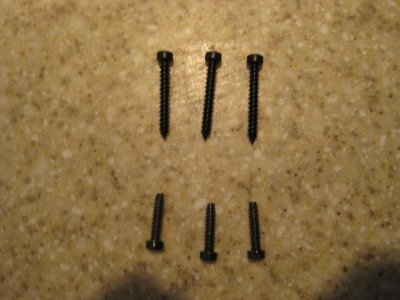
Reassembling my dash out of the car while awaiting car to get in for paint. The dash bezel is held in by round "cheese head" screws if I recollect. The lower screws holes have a lip on the bezel that allows the screws to tighten down against the lip. The top screw holes do not so there is nothing for the screw to tighten up against. Am I missing something on the top holes? I bought new dash bezel screws from RT Speciaties. Are the top screws longer than the bottom? Is there some insert that is supposed to go in the top screw holes? The RT Specialties screws come in two lengths and are black. When I removed this, it seemed like the original "cheese head" screws were chrome. Any help from a 67 B body guru?

Thanks!
 
I have a lot of extra 1967 GTX dash parts. I might be able to help, but i think we need some pictures. Im having a hard time figuring out your problem.

- - - Updated - - -

I have a lot of extra 1967 GTX dash parts. I might be able to help, but i think we need some pictures. Im having a hard time figuring out your problem.


Ok, nevermind. I'm pretty sure theres supposed to be little steel "anchor nuts" to use an aero term. Nothing too complex but i think i remember them being a very simple taco sort of shape and clip on to the dash itself. Theres also a strip of steel that goes on the top of the gauge cluster.
 
Maybe these pictures will explain it better. Holes in bottom of plastic bezel are 3/8" on the front of the bezel and 3/16 inch on the back side of the bezel. The gives the screws heads 3/16 of plastic to tighten up against. The top holes in the bezel are 3/8" all the way through. Nothing I see for a screw to catch on the top of the bezel unless you use a screw larger than 3/8" that is not flush with the bezel. I can see that there maybe should be a metal clip to accept a screw on the metal gauge surround This would firmly attach the gauge surround to the dash and the plastic bezel is firmly attached to the gauge surround by screws from the back of the gauge surround into the back side of the plastic bezel. As the holes in top of the plastic bezel are bigger around than the screw heads, they don't appear to attach the plastic bezel to the dash at all, except for the fact that they do firmly attach the gauge surround, that is attached to the plastic bezel. Do these screws just dangle in the upper plastic dash bezel holes rather than directly attach it at that point at all? I am confused and the screws I took off at disassembly were either missing or a mismatch of whatever the prior owner could come up with.

First and second - metal prongs on gauge surround that have u-shaped notches should have slide on screw clips?

Picture 3 - 3/8 holes clear through bezel on both old bezel that came off and new bezel going on.

Picture 4 - Bottom bezel hole that is 3/8 on the front side and 3/16 on th back side giving a lip for the screw to tighten against.

Picture 5 - 3/8 top hole clear through with no lip for screw to catch.

Picture 6 - Cheese head dash bezel screws from RT Specialties.

- - - Updated - - -
 

Attachments

  • 001.jpg
    001.jpg
    107.5 KB · Views: 264
  • 002.jpg
    002.jpg
    38.4 KB · Views: 261
  • 003.jpg
    003.jpg
    27.8 KB · Views: 283
  • 004.jpg
    004.jpg
    48 KB · Views: 269
  • 005.jpg
    005.jpg
    41.8 KB · Views: 252
  • 007.jpg
    007.jpg
    48.8 KB · Views: 277
Do the screws just tighten up against those slots when the cluster is all assembled and installed?

I wish i was home and could look at my stuff, but i'm on a mini-vacation to Coronado for another week. I remember i didn't have any issues at all when i put mine together. And mine was installed with countersunk head type screws used elsewhere on interior trim pieces. Sorry i couldn't be more help right now.
 
I am beginning to think you may be correct. That the screws tighten down against the notched ends of the gauge surround and the holes in the top of the bezel are just access holes. Anyone who finds out differently, please let me know.

- - - Updated - - -

My dash has those screw clips on the bottom, but not on the top. I think my top screws go directly into the dash metal. I sent the dash for powder coating and they did not remove the bottom clips, so I am guessing they would also not have removed the top clips had there been any.
 
My dash used the countersunk head type screws used elsewhere on interior trim pieces as 67 satellite stated. I am holding the dash in my hands and the top screws are retained by the metal forks only, not by bezel. Not sure about the upper clips, if i recall they went straight into dash frame. The metal to metal contact is needed to assure a good ground for the instruments to function properly. If you search this site for gauges not working properly a bad ground is a common problem. I ran an auxillary ground from one of the circuit board screws down to the column mount bolts.
 
...
- - - Updated - - -

... I sent the dash for powder coating and they did not remove the bottom clips, so I am guessing they would also not have removed the top clips had there been any.

Minor hijack here, but seriously?!?!? Regardless of what you're working on, if it comes apart, it needs to be in exploded view when it gets coated to do the job right. Did they at least remove the glove box lid before they coated it? Or replace the factory's plastic dip on your wire harness retainers?
 
Auto Transport Service
Back
Top