• When you click on links to various merchants on this site and make a purchase, this can result in this site earning a commission. Affiliate programs and affiliations include, but are not limited to, the eBay Partner Network.

69 Charger Awakening

Yeah I've been working in Barrie for a few years now. Its nice not having to commute to toronto for a while. Very busy right now which is good. I'm going to need some OT $$$$ to pay for parts!
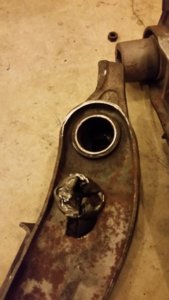
 
Started working on the lower control arms. I found a tip online from steve dulcich about welding a washer onto the bushing shell and then using a press to remove it. Seemed like an easy way to do it so I tried it.

20180211_163321.jpg
 
I took the lcas to work to use their press. I didnt take any pics of this process but it didnt work for me. The press broke my welds off. So I asked a welder at work to weld the washers back on. He put some good welds onto it. He also heated the outside with a torch before we went back to the press annnnnnnnd......the welds broke off again. Then i tried heating around the shell and pouring some oil on it......no go. So i went at the low tech way and used a cold chisel and hammer. 30min later i had one out! 2nd side only took 20min of hammering i guess I'm getting better at this.

20180217_185949.jpg
 
You should squeeze the lca snugly together by the bushing/pivot area with a clamp before/as you weld the plate on.
 
Last edited:
I think I put mine in my vise and tighten till they felt snug but still easy to rotate the adjuster arm. I also oiled the areas where the adjuster spins in the lca to make it smoother and help determine how tight to go. The adjuster rotates with the lca when driving so there is really never any harmful friction or movement between them. But after saying all that, you probably can't get them too tight, the weight of the car will probably move it to where it needs to be, if to tight to move by hand.
 
Last edited:
I got the lca plates installed today. They werent too loose to begin with but i put a c clamp on them to tighten them up before welding.

20180218_134409.jpg
 
I also removed the rubber bushings from sway bar mounts. It was hard to get them out but after drilling a few holes in the rubber i was able to pry them out.

20180218_163046.jpg
 
I also removed the rubber bushings from sway bar mounts. It was hard to get them out but after drilling a few holes in the rubber i was able to pry them out.

View attachment 573199
Have fun putting the new ones in. I couldn't find any tricks to get them in so I cut the bracket/holder, spread it open, slid in the bushing, bent the bracket back in place , then slowly spot&cool welded them back together, so not to burn the rubber.
 
Really? ??? Thats the only way? Im also wondering if powder coating those brackets will make it even tighter because of the thickness of the coating. What about squeezing it in with c clamps and lube? Im going with polygraphite for the sway bar.
 
Not sure, yours may be different. I couldn't find any way to get mine in. I cut the back of the brackets so it doesn't show. And welded slow..
 
Ok thanks kid. Anyone else have the same experience? Should i not have the sway bar brackets powder coated?
 
Powder coat shouldn't make much if any difference imo. Oh and yes I did try lubing and shoving them in with clamps, no way. If you cut the back of the brackets, spread them just a little, insert bushing/rubber, squeeze it back, weld a little spot, let it cool, weld a little more, etc., clean and dab/brush oil based enamel on weld area. It shouldn't burn the powder off anywhere that really shows if you go slow. I'm curious if this is a common problem myself and if anyone else knows a trick.
 
Well i haven't been able to find out if this is a common problem or if welding them is a common solution. So I'm not going to have the sway bar brackets powder coated. I will sandblast and paint the, hopefully this will avoid fighting against the powder coat while welding. Thanks kid.
 
A friend of mine showed me this video from power nation. The guys from detroit muscle have a 69 charger that they are doing mutiple upgrades to but 2017 episode 8 shows the sway bar bushing install. They tried it both ways, squeezing one side on with large channel locks and then the cutting welding method. The welding method looks way easier!
https://www.powernationtv.com/episode/DM2017-08/hard-charger-stop-and-turn
 
Auto Transport Service
Back
Top