• When you click on links to various merchants on this site and make a purchase, this can result in this site earning a commission. Affiliate programs and affiliations include, but are not limited to, the eBay Partner Network.

69 GTX SSBC Drum to disc conversion

mguesto

FBBO Gold Member
FBBO Gold Member
Local time
11:07 AM
Joined
Jan 2, 2011
Messages
126
Reaction score
100
Location
Schnecksville, Pa
I get a lot of email specials around the holidays like all of you, but this year I jumped on one and purchased the SSBC disc brake conversion kits for my 69 GTX. They said free shipping so I jumped at it.
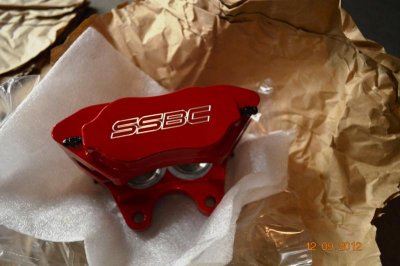
It was a tossup between Jegs and Summit. And Jegs won out by matching the pricing with free shipping, I saved an additional $15. This was just before Thanksgiving and the holidays. I got my stuff together out in the garage and unboxed it all to see what I got. This kit was the W156-7R kit that had the red 4 piston calipers.

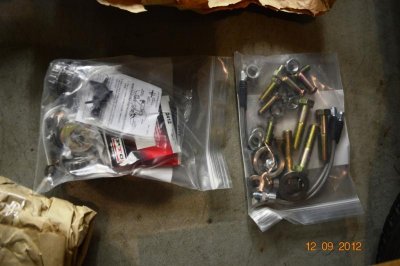
They got all this stuff in one box, and it was bagged and separated very well. congrats to the decision to wrap everything in paper and plastic. no marks or scratches on anything.

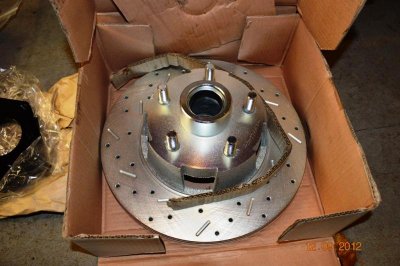
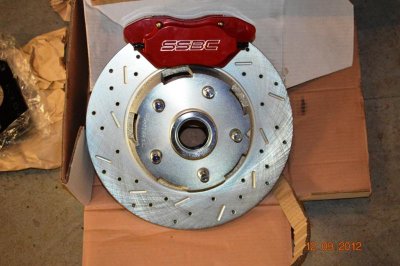
Checking to be sure that this fit inside my Magnum 500’s Some kits made it apparent that they would not fit certain offsets or wheels. These fit with some room to spare.

Now it is after New Years and my holiday visits are done. I made a trip to Hampstead, NC for a week and could not wait to get home to get in the garage to start this.


More to come

Matt

- - - Updated - - -

Don’t forget to disconnect the battery before doing anything. Get the car up high enough to get yourself underneath it. I used 6 ton jack stands on the frame.

Getting access inside the frame is not too easy without dropping the starter. So do that first and get the battery cables out of the way.

I started this out by first looking at the prop valve location since I had to replace that too. I had to see how the condition of the fittings were on the prop valve, and I did not like what I saw. So I ordered front lines and reused the long one to the rear axle. Some of the fittings were rounded off prior to my getting this car a few years ago. But that is another story.

prop valve on car.jpgfirst Master Cyl.jpg
Take a look inside what I thought was a clean master cylinder. When I drained this the fluid was not close to being clear and I found a jelly like substance left inside. Now I am glad I took this project on.
 

Attachments

  • boxed1.jpg
    boxed1.jpg
    46.2 KB · Views: 433
  • bag and tag.jpg
    bag and tag.jpg
    52.2 KB · Views: 415
  • caliper.jpg
    caliper.jpg
    48.5 KB · Views: 452
  • rotor.jpg
    rotor.jpg
    63.5 KB · Views: 445
  • rotor and caliper.jpg
    rotor and caliper.jpg
    58 KB · Views: 343
  • in the tire.jpg
    in the tire.jpg
    57.5 KB · Views: 347
continued

This replacement proportioning valve is for models with no break in the line to the rear axle and mounts in the same orientation as the original.
08 Both Props.jpg

The instructions that come with the kit are pretty good. Here is a shot of the mounting plate on the drivers side after pulling off the drum brake assembly. No slop in these plates at all. I ran the bolts in before trying to mount it. These fit very snug
09 lft side  mounted.jpg
One thing I did not know about is that the drilled and slotted rotors are directional. I was going over the packing list of the kit and noticed that they are engraved with a left and right part number. I had the drivers side on first and that was correct. Pack the new bearings from the kit and mount it up.
10 left rotor mtd.jpg

They give you spacers so the rotor and caliper line up using the original spindles.

11 lft side w pads.jpg

While following their guidelines to route the brake lines I feel like I must reorient the sway bar bolt the other way and have someone turn the wheel so it does not rub on anything. their suggestion is to put the brake line between the shock and the spindle.The space between the upper ball joint and the sway bar bold is minimal. When going stop to stop it does touch the spindle. so I might put some kind of hose over this area as added protection.

12 lft side behind.jpg

the hardest line to install for me was the one that goes from the prop valve over the firewall to the right front brake. Getting my 62 year old butt to hover over the 6 barrell setup and not fall in was hilarious to my wife. Naturally the first time I routed the line, I did not get it under all of the harnesses. So a second try was needed to properly do it. Now it is in the same holding clips as the factory and looks great.
13 rt side mtd.jpg

I put the new master cylinder in my bench vise wrapped in a shop rag and proceeded to bleed it. This is the only hangup on this project so far. the front bowl would not bleed anything and I had to send this back to Inline Tube so they can replace it. I spoke to Jake there and he was professional and courteous. The master is a new one, so I hope they send me another one and not resend this back to me.
 
While waiting

So while waiting for Inline Tube.com to send me another master cylinder. i can add that this project must have taken off 50 or more pounds to the front end of the car.
Here is a before and after shot of the job.
before shot.jpg
after shot.jpg

I will have to find a good spot to store these.
lost weight.jpg
 
Part Deux

These delays are caused by defective parts and my mistakes.
I did get a replacement master cylinder from Inline Tube.com and repeated the steps to bleed it.
Inserting it into the vise wrapped in a shop rag so it does not get marred in any way. This second master cylinder does not bleed in front bowl either. the fluid shoots up inside the master Cyl and into the air. thank god I was giving it slow motions. (insert the Snickers candy bar commercial here) I am frustrated in this because of the money spent in shipping that I will not recover. Sure they replaced the master cylinder for me at my expense. But just the time and aggravation is a bit much to chew. I have a few pictures here that show that the piston is flush with the back of the master at first, then after a few strokes, it stays inside the housing.
After timeb.jpg


Walking away for a while and coming back shows that the piston now rests outside of the housing. (WT heck)
Overnight b.jpg

And I can wipe the inside and get my finger wet from fluid.

its wet b.jpg
Back on the phone again and make arrangements to ship this one back and not except another from them. I scrounge around on the forum and see that Propwash and another are talking about MP brakes and their products. I decide on calling them and getting one of their master cylinders. Another $100+ with shipping.
I make the arrangements so that my trip to Florida is not having this master cylinder sit outside while I am away from home. they have it from NC to PA in two business days! Wow I am impressed. And the part looks good. Nicely boxed and wrapped.
After my trip, I get this master cylinder in the vise and I am gun shy in pushing in this rod. Not a good sign to have 3 in a row bad. This one is alive! it bleeds!. I am happy and can’t wait to get it mounted and plumbed.
MP cylinder.jpg

I was given a vacuum pump style tool that allows you to bleed the brakes by your self. I try it out and submit more pictures on the old fluid that is in the lines. This is before I connected the new master cylinder into the car. It was suggested to remove all the old stuff so you can see when your bleeding it that your getting the (new) fluid into the catch container. WOW, what a dirty mess I got out of the car.
Fluid1.jpg

fluid2.jpg

After 40 years, you get this kind of Root beer colored brake fluid that accumulated in the lines. check in the one picture here on the sediment inside the jar. What crud.
Fluid3.jpg

Now I finish connecting the lines and start the bleeding again. No such luck now. I go back to the master cylinder to see the levels, and I see a wet spot on the floor. I check and find that the line that feeds the left front brake is leeking. I cannot stop it. ( another snickers commercial here) Upset and not wanting to round out the new lines, I dis assemble all of it and take the prop valve over to the bench. I figured I did not check all of the fittings and one is leaking. No, On the inside of the proportioning valve the one seat is marred. I bring it to a friend for a second opinion on what to do, he says the valve was o.k. but the machine or person who flared the end of the line did not give enough to have a good fit. so he had the flaring took and he redid the end for me. worse case is I need to make yet another purchase on a new prop valve. But as of today, it is not leaking and must be a good snug connection. I used the vacuum tool and got out most of the air, but do not think the pedal is right. I will feel better doing a two man job of pushing the pedal and bleeding It that way.


Almost there and the weather is getting nicer.
Patiently waiting.jpg
The urge to get it outside is kicking in.

I also purchased the adjustable prop rod from MPBrakes. You might consider this when / If you need to purchase one in your projects. MP brakes has the pusrod that works! I first got one from Jegs. and i do not recomend this.

Jegs Pushrod.jpg

MP pushrod.jpg

Rod Jegs on bolt.jpg

rod on bolt.jpg

Rods compared.jpg
Notice how the end of the rod has this spring on it.
the one from MP brakes has a rubber ? sleeve on it. This works fine and inserts into the master cylinder as i think works best. When you go to mount the pedal you can see how the thinkness is better on the MP brakes unit. If you chose to use the Jegs one, you would have to shim this with washers to center it for the brake light switch.


More later
 
Auto Transport Service
Back
Top