73Charger400
Member
First off I'd like to thank everyone for the warm welcome on the Welcome Wagon. As I said on that section of the forum I'm 18 years old and I got this Charger last year for $300 real close to my house with no signs of cancer anywhere. I gave a pretty good history of the car on the Welcome Wagon forum so if anyone wants to know a little more background on the thing you can read it up here:
http://www.forbbodiesonly.com/moparforum/showthread.php?69987-Young-guy-from-CA!
This is the car when I first picked it up
View attachment 179002View attachment 179003View attachment 179004View attachment 179005
So you can see the car was rattlecanned black, not much of an interior beside the dash, ratty front bench seat, and a few door panels. Once it was cleaned I got onto working on the engine. Didn't take much to get it started, just needed some lovin' and a tune up. I made sure to put a little ATF in each cylinder and let it sit for three days at least to free up the cylinders then turned it over by hand to make sure everything was movin' right before I even dared to turn the key. An engine sittin out in the elements for almost seven years could easily lock up the pistons in the cylinders due to corrosion and what not, so I made sure to be careful. Once I'd gotten a headstart on the engine I moved the car under a canopy on the side of my house and tried to start stripping off the rattlecan mess.

Wet sanding with 400 grit on a quarter sheet sander made things a bit easier. I tried paint thinner first to take off the black with no luck. The wetsanding took out the rattlecan pretty well while leaving the hidden gold alone if you were careful. Also made sure to shine up the wheels which you'll see in a bit.

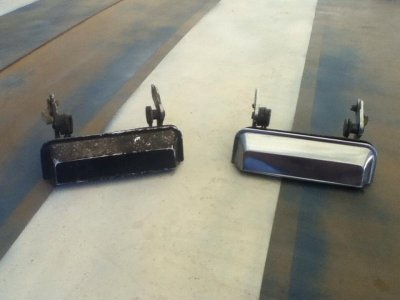
The previous owner sprayed the car without even taking off any chrome pieces. Some fine steel wool after coating the pieces thick in oil made short work of it though, and all the chrome looks like new. Guess rattlecan preserves this stuff pretty well haha
It took a lot of elbow grease to get all the black off and even more to get the engine and lights all working right to make it driveable. So much small stuff to do sometimes it felt like I was running in place. Before the car came out of under the canopy and into the driveway it got a new windshield, door glass, a set of used tires, redone brake system, and a bit of TLC anywhere else it needed. Out in the driveway is where it started to really get some work done. I sealed the interior from getting any more than the surface rust it already had.


Sorry, the pictures aren't the greatest here. I used two coats of brown rusty metal primer to make sure it sealed well and that I had a paint that would stick to the metal well. Took 3 coats of that machine grey protective enamel you see there to stop the brown from bleeding through and keep it all looking clean. I believe it was about a month after that was done that I sourced some seats here on FBBO for this beauty.


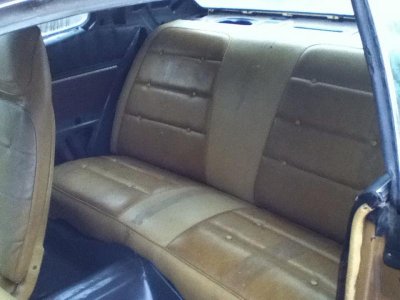
I was so happy to finally have a full set of seats. I didn't plan on converting to buckets until later down the road but I saw this full set and the condition that it was in and I had to jump on it. It was about 500 for the seats shipped from halfway across the country and everything. I went on to work on the instrument cluster after all the seats were set in there nice and cozy.
The speedo was stuck at 25mph while sitting still, so that was my reason for opening up the dash was only to fix that. Of course anyone that knows me knows that I can't resist doing more than I intended on something like this. I ended up cleaning out every particle of dust out of the thing, adjusting a couple other gauges in the cluster, and repainting the whole thing.

The picture doesn't do it justice, I shoulda waited for better lighting. I sanded out the simulated wood grain texture, painted it high gloss black (it was what I had lying around, luckily sitting under that overhang of the dash it doesn't get much light and it looks like just the right amount of gloss), and took a silver sharpie to make those outlines around the gauges. Needless to say even with my perfectionist syndrome I was pleased with it. Just wish I'd known how to do something with the A/C panel, it looks way out of place there now.
So I'd picked up a can of epoxy based primer a while back to seal up the window channel before I got new glass in there, and I decided it was about time I started sealing up the rest of the car. Starting with the front section, I took a full weekend and spent it all sanding and priming. It was well worth it, I don't have to worry about those bare metal spots from when I wet sanded ever rusting up again.
View attachment 179017
Soon after I realized I needed to redo the front suspension. I had to press in and press out all the control arm bushings and ball joints, replace sway bar bushings, tie rods, and do a little alignment myself to get it over to a professional alignment shop. I'd just like to say that 98% of this work I actually do on my own. The other 2% is for pro shops for things like alignment and windshield replacement. Most people would assume that this was a father-son project but my dad doesn't share the same passion for cars as I do and doesn't understand why I want to do half the things I do to this car. But hey, to every man his own. Anyways, with the front sealed up I started to focus more on getting the engine road worthy. The carb was giving me all sorts of problems, but now it starts great, the choke works, accelerator pump shoots good, and it pulls pretty well. One more thing I did was repaint the grilles. Here again my perfectionist syndrome took over and I taped off the chrome on those things so tight you'd think it came from factory looking like this.


I used some really super expensive paints on this one. I don't know if you guys have heard of the brand Rustoleum? REALLY pricey stuff, man haha. Yeah, all it took to get these guys looking real pretty was Rustoleum exterior satin black paint. The low sheen black really sets off the chrome, keeps it all looking super clean, and gives off that wonderful shine. Needless to say I was VERY happy with this one.
The latest thing I did for this old girl was just two days ago, and I didn't even touch the car at all. I'd bought some chrome pieces from a guy in Berkeley by the name of Merlyn and we stayed in touch. Last week he contacted me again out of the blue and told me about this old '73 Charger SE that was for sale on Craigslist, said I might want it. The guy was asking 700, I got it for 500. I guess I'm getting good at getting these old '73's for cheap. Brought this old boy on down and this thing looks absolutely horrible at first, but it has a lot of nice parts on it. No engine or trans, but the interior was mostly complete and it has a lot of parts that I was missing and a lot more left over.


After picking up this old boy that I nicknamed "Grandpa", I feel alot better about the condition mine was in. It's got about as much cancer as mine did though, and that's a good thing. I don't know what it is about this car but any picture I take of him he doesn't look as bad as he does in person. 41 years old, ugly as all hell, and somehow still photogenic enough to hide the worst of himself. Anyways, I plan to part out the car, see if I can at least make my money back, and get rid of him before I ship out to BASIC Training for the Marine Corp this August. I'd hate to put the car through the scrapper though. I'd like to give it a home with someone who's willing to fix her up a bit. Even if someone's gonna gut it out and race him and bash him to the ground, that's a better life than the wrecking yard where this car was already saved from once over in Kansas. I'm gonna post this old boy on the parts cars section of the forum once I finish taking all the pieces I need from it in a couple days and move it out of the driveway to the backyard. It's an SE car and it's pretty complete. I'm not taking much big stuff out of it, just a lot of smaller pieces, so there will be plenty left of this car even after I'm done.
So that's what I've done to my Charger so far, my first car. I bought it on April 21st, 2013, and completely coincidentally April 21st, 2014, exactly one year later is when I plan to get this girl registered and on the road and driving to school. Pretty sure I've worked out all the kinks as far as driveability goes, but with these old projects you never know haha. Thanks again for having me here on the forum guys. I'll keep you updated whenever I take on something new with her, and of course I won't forget the pictures.
http://www.forbbodiesonly.com/moparforum/showthread.php?69987-Young-guy-from-CA!
This is the car when I first picked it up
View attachment 179002View attachment 179003View attachment 179004View attachment 179005
So you can see the car was rattlecanned black, not much of an interior beside the dash, ratty front bench seat, and a few door panels. Once it was cleaned I got onto working on the engine. Didn't take much to get it started, just needed some lovin' and a tune up. I made sure to put a little ATF in each cylinder and let it sit for three days at least to free up the cylinders then turned it over by hand to make sure everything was movin' right before I even dared to turn the key. An engine sittin out in the elements for almost seven years could easily lock up the pistons in the cylinders due to corrosion and what not, so I made sure to be careful. Once I'd gotten a headstart on the engine I moved the car under a canopy on the side of my house and tried to start stripping off the rattlecan mess.
Wet sanding with 400 grit on a quarter sheet sander made things a bit easier. I tried paint thinner first to take off the black with no luck. The wetsanding took out the rattlecan pretty well while leaving the hidden gold alone if you were careful. Also made sure to shine up the wheels which you'll see in a bit.
The previous owner sprayed the car without even taking off any chrome pieces. Some fine steel wool after coating the pieces thick in oil made short work of it though, and all the chrome looks like new. Guess rattlecan preserves this stuff pretty well haha
It took a lot of elbow grease to get all the black off and even more to get the engine and lights all working right to make it driveable. So much small stuff to do sometimes it felt like I was running in place. Before the car came out of under the canopy and into the driveway it got a new windshield, door glass, a set of used tires, redone brake system, and a bit of TLC anywhere else it needed. Out in the driveway is where it started to really get some work done. I sealed the interior from getting any more than the surface rust it already had.
Sorry, the pictures aren't the greatest here. I used two coats of brown rusty metal primer to make sure it sealed well and that I had a paint that would stick to the metal well. Took 3 coats of that machine grey protective enamel you see there to stop the brown from bleeding through and keep it all looking clean. I believe it was about a month after that was done that I sourced some seats here on FBBO for this beauty.
I was so happy to finally have a full set of seats. I didn't plan on converting to buckets until later down the road but I saw this full set and the condition that it was in and I had to jump on it. It was about 500 for the seats shipped from halfway across the country and everything. I went on to work on the instrument cluster after all the seats were set in there nice and cozy.
The speedo was stuck at 25mph while sitting still, so that was my reason for opening up the dash was only to fix that. Of course anyone that knows me knows that I can't resist doing more than I intended on something like this. I ended up cleaning out every particle of dust out of the thing, adjusting a couple other gauges in the cluster, and repainting the whole thing.
The picture doesn't do it justice, I shoulda waited for better lighting. I sanded out the simulated wood grain texture, painted it high gloss black (it was what I had lying around, luckily sitting under that overhang of the dash it doesn't get much light and it looks like just the right amount of gloss), and took a silver sharpie to make those outlines around the gauges. Needless to say even with my perfectionist syndrome I was pleased with it. Just wish I'd known how to do something with the A/C panel, it looks way out of place there now.
So I'd picked up a can of epoxy based primer a while back to seal up the window channel before I got new glass in there, and I decided it was about time I started sealing up the rest of the car. Starting with the front section, I took a full weekend and spent it all sanding and priming. It was well worth it, I don't have to worry about those bare metal spots from when I wet sanded ever rusting up again.
View attachment 179017
Soon after I realized I needed to redo the front suspension. I had to press in and press out all the control arm bushings and ball joints, replace sway bar bushings, tie rods, and do a little alignment myself to get it over to a professional alignment shop. I'd just like to say that 98% of this work I actually do on my own. The other 2% is for pro shops for things like alignment and windshield replacement. Most people would assume that this was a father-son project but my dad doesn't share the same passion for cars as I do and doesn't understand why I want to do half the things I do to this car. But hey, to every man his own. Anyways, with the front sealed up I started to focus more on getting the engine road worthy. The carb was giving me all sorts of problems, but now it starts great, the choke works, accelerator pump shoots good, and it pulls pretty well. One more thing I did was repaint the grilles. Here again my perfectionist syndrome took over and I taped off the chrome on those things so tight you'd think it came from factory looking like this.
I used some really super expensive paints on this one. I don't know if you guys have heard of the brand Rustoleum? REALLY pricey stuff, man haha. Yeah, all it took to get these guys looking real pretty was Rustoleum exterior satin black paint. The low sheen black really sets off the chrome, keeps it all looking super clean, and gives off that wonderful shine. Needless to say I was VERY happy with this one.
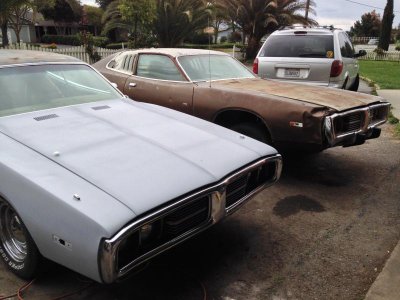
The latest thing I did for this old girl was just two days ago, and I didn't even touch the car at all. I'd bought some chrome pieces from a guy in Berkeley by the name of Merlyn and we stayed in touch. Last week he contacted me again out of the blue and told me about this old '73 Charger SE that was for sale on Craigslist, said I might want it. The guy was asking 700, I got it for 500. I guess I'm getting good at getting these old '73's for cheap. Brought this old boy on down and this thing looks absolutely horrible at first, but it has a lot of nice parts on it. No engine or trans, but the interior was mostly complete and it has a lot of parts that I was missing and a lot more left over.
After picking up this old boy that I nicknamed "Grandpa", I feel alot better about the condition mine was in. It's got about as much cancer as mine did though, and that's a good thing. I don't know what it is about this car but any picture I take of him he doesn't look as bad as he does in person. 41 years old, ugly as all hell, and somehow still photogenic enough to hide the worst of himself. Anyways, I plan to part out the car, see if I can at least make my money back, and get rid of him before I ship out to BASIC Training for the Marine Corp this August. I'd hate to put the car through the scrapper though. I'd like to give it a home with someone who's willing to fix her up a bit. Even if someone's gonna gut it out and race him and bash him to the ground, that's a better life than the wrecking yard where this car was already saved from once over in Kansas. I'm gonna post this old boy on the parts cars section of the forum once I finish taking all the pieces I need from it in a couple days and move it out of the driveway to the backyard. It's an SE car and it's pretty complete. I'm not taking much big stuff out of it, just a lot of smaller pieces, so there will be plenty left of this car even after I'm done.
So that's what I've done to my Charger so far, my first car. I bought it on April 21st, 2013, and completely coincidentally April 21st, 2014, exactly one year later is when I plan to get this girl registered and on the road and driving to school. Pretty sure I've worked out all the kinks as far as driveability goes, but with these old projects you never know haha. Thanks again for having me here on the forum guys. I'll keep you updated whenever I take on something new with her, and of course I won't forget the pictures.
") 18 and having fun with the Charger, i hope you get a lot of enjoyment with this!! Good luck and enjoy!!
18 and having fun with the Charger, i hope you get a lot of enjoyment with this!! Good luck and enjoy!! 


