• When you click on links to various merchants on this site and make a purchase, this can result in this site earning a commission. Affiliate programs and affiliations include, but are not limited to, the eBay Partner Network.

73 Charger heater valve "Bracket"

Leo

Active Member
Local time
4:57 PM
Joined
Mar 22, 2017
Messages
26
Reaction score
6
Location
Visailia
Does anyone have a picture of what the heater valve Bracket looks like? I recently installed heater and purchased a four seasons heater valve from rock Auto but now need a bracket to mount it parallel to the fender...

Thanks
 
Hi, there are options for the water control valve. The original valve was made out of plastic and would eventually fail. if that is the valve that you have purchased I am not sure exactly how you were going to find that bracket that supports that. The other option valve actually has a bracket built onto it and supports the valve and it’s correct orientation for the heater hoses. Do a search on Google of the valve that you are describing for your car and then look at the options and pictures that are posted for a 1973 Dodge Charger. This will give you a better understanding of how it looks and how it is done.
 
IIRC different between AC and non-AC.
 
73 heater valve is usually not anymore the bakelite one but the brass one. Brackets is not interchangeable on the brass piece like bakelite ones so each valve is body specific to fit specifically on each inner fender. Baquelite valve came usually with a set of brackets to match for your application being the same valve for everyone. I know this because i personally sold around 3 or 4 NOS baquelite valves maybe 12 years ago.

Since replacement brass heater valves use a generic bracket ( or maybe later models ) which DOESN'T match the 73/74 B body inner fender provisions, I dissasembled my factory one and the replacement piece I got to install the correct bracket on the new replacement piece. Is a tricky job but doable, needs to be made with care. Will post pics later. I can't recall where I have those pics.
 
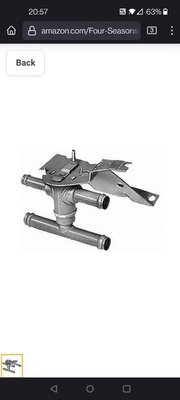
Thanks for the info...this is the valve I got... cable activated but the current bracket does not line up or fit correct on the fender this was thinking I may be missing another bracket...

Screenshot_20211223-205703.jpg

View attachment 1212325
 
Thanks for the info...this is the valve I got... cable activated but the current bracket does not line up or fit correct on the fender this was thinking I may be missing another bracket...

View attachment 1212326

View attachment 1212325
Yes, that's the replacement valve and no, you are not missing a bracket, they are just assembled with that generic bracket. There is not a valve replacement with the correct bracket for 73/74 B body. BTDT. Hence why I dissasembled both valves ( my factory one and the replacement valve ) and reassembled the new valve with the original bracket
 
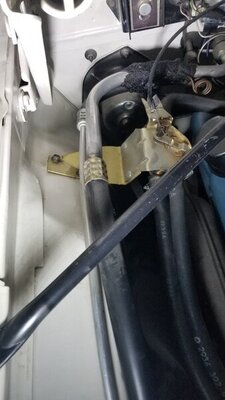
This is the correct look of the valve mounted ( original one before being serviced )

Sin título-Escaneado-07b.jpg


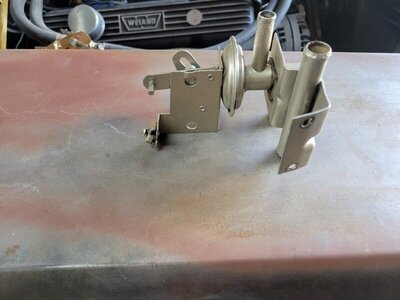
This is the new valve with the old bracket once serviced
9071-CCDE-E165-48-FA-A37-E-FC64-D6-A5-A0-DD.jpg


discarded parts. Note the new bracket shape. Nothing close to the original

634-AFE06-99-D3-49-CE-815-D-AEB9-A152-FD66.jpg


You need to open the valve tabs and remove the valve lever but BEFORE THAT take care of the lever with the valve indexing looking throught the valve nipples.

E7-CC5932-881-E-4100-884-D-418-B387-CC41-F.jpg


The valve inside has two faces with diff shape holes... dunno why, but thats why I took care about the lever and valve indexing

0-AC1632-B-9-C1-D-4-C6-B-AE49-FAB17-B3905-E5.jpg

8-E81-BBA2-8461-451-E-B558-561693-DD6-CBA.jpg


and here is the lever/top of valve being indexed and smashed to hold in place before bend the tabs for the final assembly

895361-B9-ED13-49-CC-AF51-F6-F22-CAEE73-C.jpg


I though had made MORE pics of every step allong the process but no. However I think these pics pretty much sums and shows clearly all the process needed and I think is easy to understand how it is.

Needless to say, it worked perfect and I had for the firts time a heater working on my car. I think my car never had run the heater system in it's life. In Venezuela the heater is not really neeeeeeded, so factory in fact got the water pump nipples sealed, still with all the parts assembled.
 
Last edited:
Those steps summed up everything. Thank you and Merry Christmas!
 
This unit came out of my 11/1971 SE and has the same bolt pattern as the plastic one.
Do you think it is OE? It has no factory markings so I assumed it was an aftermarket replacement.

20211224_084631.jpg
 
Since 73 all were brass just like the one I posted on first pic on my reply, ALTHOUGHT as mentioned some earlier 73 production could still get the Baquelite one.

The pic I posted is from my 74, which is the same for 73 so it works as a reference for the OP. Not for 71/72 thought.

I never have seen that brass one on a 71/74 B body at least. Yes, could be an aftermarket replacement? You should get the baquelite one. No matter if vacuum controled or cable controled, all 71/72 were a baquelite unit. For A/C cars at least.
 
Part number 3502721 After July of 1973.
339350-7bec37a8b3ba3715cc8a4c86bf322f56.jpg

Part number 3502346 up to July 1973.
s-l300.jpg
 
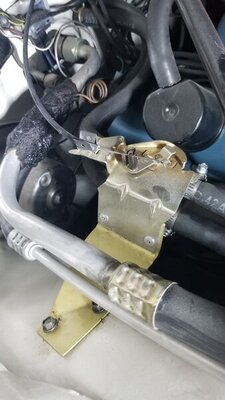
I am not sure if you can tell in these photos but I fabricated a bracket longer than the one used with the bakelite valve. I riveted it to the replacement valve. You will notice that I had to cut the replacement valve to get the fitment I was looking for. I am happy with it. Hope this helps.

20211224_173822.jpg 20211224_173836.jpg
 
The correct '71-72 B-body heater valve bracket looks like this, the original later superseded metal valve was designed to mount to this bracket.


3441883-P-1.jpg

DSC09929.JPG
 
Way back when my 73 had the black plastic one. What a piece of junk! I must have gone through three of them in the time I had the car.
 
Auto Transport Service
Back
Top