• When you click on links to various merchants on this site and make a purchase, this can result in this site earning a commission. Affiliate programs and affiliations include, but are not limited to, the eBay Partner Network.

Paint issue

69clone

Well-Known Member
Local time
6:33 AM
Joined
May 2, 2010
Messages
1,278
Reaction score
234
Location
Tennessee
Hey guys,
This has been bugging me and I don't know how to fix it. When I wet sanded my car this summer it came out like glass and clear as day. Well the day after it seemed to turn white in the clear. Almost like I left wax on it. I can rub it with my finger and it will look fine again but shortly after it turns back. I have quite a bit of these and it makes my car look like sh!t. I'm wondering if I need to take the buffer out and work on these spots or what. Has anyone had a similar problem?

Thanks,
~Nick
 
It sounds like you may need another step or two in your final sand. How high did you go with the paper? On new clear I finish with 1500 grit Black Ice then move on to the liquid (McGuire's) on a terry or microfiber bonnet. Wool cuts faster but you're in the 2000-2500 grit range now so too agressive of a pad will turn your polishing into burning.

It will look terrific wet, or when you touch it and the oils from your skin make it appear shiny. Thats exactly how I check to see how my graphics are gonna finish out, by pouring water over the piece. But as soon as it dries the sanding marks will reappear, tiny as they are, as milky white.
Sounds like you're on the right track, lets see some pics!

Thanks, I believe I was using 1200. My dad and I painted it we used a good gallon of clear. I was wet sanding followed by rubbing compound. I'll grab some higher grade paper next time I'm out.
 
A gallon of clear, mixed, ought to yeild around two gallons of sprayable material (depending on the mix ratio) so I'm figuring 3 to 4 coats depending on whether or not you did jambs, underside of decklid, hood etc. Either way, thats not gonna leave you much thickness to work with so be very careful not to break through to the basecoat. You probably already know this, but it's worth repeating...
Soak your paper for about 30 min prior to sanding.
Use good quality paper.
Stay away from body creases and edges.
Use masking tape on the above (to be safe).
Use lots of water.
A small squeegie will help you check your progress.
Dont rush it. More speed and pressure will just end you up with an uneven finish.
If you think you've broken through the clear, STOP. Breaking through usually means repainting the entire panel, but if its small, you can probably spot-fix it.
When you get to the polishing compound work that up in 2 or 3 stages just as you did with the sandpaper.
Stay with a single brand of compound, its the only way to be sure of consistant grit count.
Put the orbital away and finish with swirl-remover applied by hand. Its like giving your very own supermodel a massage and make all that hard work worth it.
Thanks for the info. We only sprayed the body not inside doors or trunk also the hood wasn't sprayed. Sounds like I could work on a few of those steps. My dad works fast, which is why he went through the clear as well as the purple on an edge :angry1:
 
I am currently buffing out my 72 Dart I just painted last week, I sanded it twice first with 1500 then 2000, I used a wool pad with 3M buffing compound then used a 3M foam waffle pad "2" (medium cut) with the same "2" compund then the finish light cut 3M foam waffle pad with "1" compound then used hand glaze on the car, looks amazing the Trizact system is awesome as well, if you are seeing white chalky spots crop back up then you have not buffed it out well enough, also a tip is when you wetsand use your hand and use a figure 8 pattern that way you are not concentrating your sanding in one area thus reducing the possibilty of sand through. The 3M stuff is expensive ($50.00 for one bottle of compound) but it is the best available, It's kinda funny I have more in the buffing pads & compunds than I do have in the paint!!! lol
 
I am currently buffing out my 72 Dart I just painted last week, I sanded it twice first with 1500 then 2000, I used a wool pad with 3M buffing compound then used a 3M foam waffle pad "2" (medium cut) with the same "2" compund then the finish light cut 3M foam waffle pad with "1" compound then used hand glaze on the car, looks amazing the Trizact system is awesome as well, if you are seeing white chalky spots crop back up then you have not buffed it out well enough, also a tip is when you wetsand use your hand and use a figure 8 pattern that way you are not concentrating your sanding in one area thus reducing the possibilty of sand through. The 3M stuff is expensive ($50.00 for one bottle of compound) but it is the best available, It's kinda funny I have more in the buffing pads & compunds than I do have in the paint!!! lol

Thanks, I read somewhere to always wet sand in a straight line and not do circles because they can leave swirls. After class tomorrow I'm going to pick up some higher grid paper and try what your suggesting. I do have the M3 compound, it seemed good but made a mess with the buffer.
 
A high-speed buffer will definitely sling some compond around. Everything within a 10-20 foot radius is gonna get bukkake'd so if you've got something nearby that you would prefer not to get splattered, ie toolboxes, another vehicle, whatever, it's easier to just move the buffing/polishing operation outside. That stuff is hard to clean up.
Stay with it, you'll be the expert people are coming to for advice before long.
 
This is why I buff all my work at low speed ,no mess and no wasted compound,not to mention no swirls,granted I haveover 100 hours in sanding and buffing, but if you want true perfection,it will take time


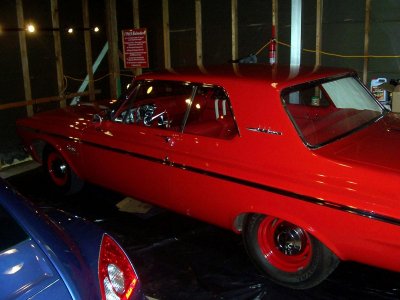
Picture007-6.jpg

Picture002-8.jpg
 
What brand of clear did you use? Being in the R&D field of automotive paint I've seen cheap clears haze up over and over no matter how much they're sanded and buffed. Some companies use cheap UV absorbers that slowly creap to the surface and cause a hazy appearence.
 
I have resisted chiming in here because of so many variables could contribute to the issue... Here's a few probables. 1. Improper flash times during clearcoat application. 2. Moisture in the airlines during clearcoat application. 3. Humidity (excessive) while spraying. 4. Lack of UV protectors (absorbers) as previously mentioned. 5. Cheap clear... You can polish cheap paint all day, and you still have cheap paint. 6. Wrong hardener used.

No simple solution unfortunately...
 
What brand of clear did you use? Being in the R&D field of automotive paint I've seen cheap clears haze up over and over no matter how much they're sanded and buffed. Some companies use cheap UV absorbers that slowly creap to the surface and cause a hazy appearence.

I used Matrix MPB base and their AG40 high-solids euro clear. I've been using AG40 for over 10 years,so if it caused problems for me, do you think I would be using it for so long or warranty my paint for life? I simply love this stuff .
 
messing with paint is like messing with women...
the more you do the less you know....
weather, humidity, "wet sand & the wheel", compound....and hand finnish
etc & etc.
*one time I used "corn starch and h20"mix , and it looked "wet"!!!
this step was done by hand.
hope this helps...
Sonny Black
 

Attachments

  • 100_3859.jpg
    100_3859.jpg
    108 KB · Views: 404
I used Matrix MPB base and their AG40 high-solids euro clear. I've been using AG40 for over 10 years,so if it caused problems for me, do you think I would be using it for so long or warranty my paint for life? I simply love this stuff .
I think maybe Bones was asking the OP what he used.....? But man, your car looks great as does Sonny's!
 
I can't remember the name off the top of my head but it was all picked out and mixed by a paint manager at NAPA. The clear was fine until I wet sanded it to get rid of a run, bug and orange peal? I was able to try a spot awhile back after Jonnyuma told me to go back and work it with the buffer, it did help. I probably needed to spend more time on it but just not an option with my schedule right now.
 
Auto Transport Service
Back
Top