• When you click on links to various merchants on this site and make a purchase, this can result in this site earning a commission. Affiliate programs and affiliations include, but are not limited to, the eBay Partner Network.

patch panel welding help

99ss

Well-Known Member
Local time
12:50 AM
Joined
Jul 15, 2010
Messages
2,212
Reaction score
470
Location
Oregon
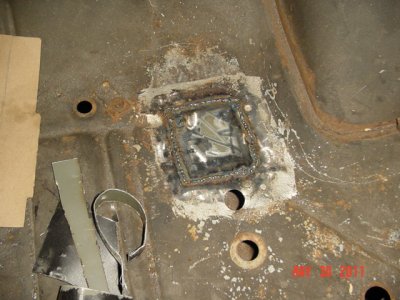
Ok going to try my first patch on the exterior panel of a car .. How do I do this and not screw it up?...LOL
I know I want to just use do quick spot to keep the heat down and not warp the panel. But how much of a gap should i leave to weld/fill between the panel and the pacth? how do you hold that in place while trying to weld it?
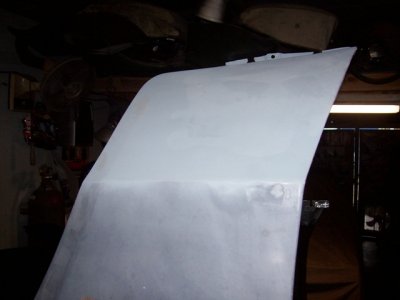
more work to hone my skills for the big re-do of the SS
( here forth my Sport Satellite will be known/called the SS..LOL easier to type) This is the 79 z28.. Coming along ok.. I can start a thread is anyone cares but I know this is a B-body site and its an f-body..hahahaha
 
As with all body and paint, prep work is crucial. Don't start welding until that patch fits like a glove. I like about a 1/16" gap, and make sure both sides of the metal (on the car and your patch) are bright and clean; paint or undercoating on the backside can and will effect your welds. As far as holding it in place, i prefer to step the edge to fit behind your substrate, then use klekos or sheet metal screws to hold it in place, then go back and plug weld the holes.
 
I dont have a way to back it. Its right on the corner with the door jamb. Maybe a couple flush magnets will hold it til I tack it.
Just nervous about it. I could really make it worse in a hurry...... DOH!

I read that thread... prop is a pro isnt he...LOL
 
I dont have a way to back it. Its right on the corner with the door jamb. Maybe a couple flush magnets will hold it til I tack it.
Just nervous about it. I could really make it worse in a hurry...... DOH!

I read that thread... prop is a pro isnt he...LOL

LOL...Not a pro by any means 99ss. Lotta guys out there with more experience and finess with welding than myself. Just posting what I have learned over the years and hope it helps someone out down the road. I appreciate the compliment and best of luck with your patch. Once you get rolling on it, you'll see there is no real reason to be intimidated by it. Just flip down your mask and pull the trigger. Best way to learn buddy.
 
Just flip down your mask and pull the trigger. Best way to learn buddy.[/QUOTE]

I've been working on my patch under the battery tray for a couple sessions and the best tip I have for you is to buy a auto darkening shield. I got one at Harbour Freight for $50 bucks. My problem is welding in the right spot after flipping down. Did much better after the new helmet. No gap in the seam is the way to go.
 
Auto dark helmet

The auto helmet was the first thing I bought :headbang:
Works great to I might say.
 
I'm no welder and still ain't i patched this car blind and stupid i just started cutting and welding and as time goes on you'll get better. Just a few photos of a trunk patch this was my second patch i ever made and welded the other photo is the fender inner structure i fabbed up before and after.
http://s1138.photobucket.com/albums/n522/lou3500/charger project/

My photobucket of the charger project,i'm not a professional body man and some of the body work is not quality but i never intended for this thing to be a show car, just some thing for my son and i to have fun with. I'm just showing you that don't be afraid just jump in there and do it.
 

Attachments

  • charger metalwork 003.JPG
    charger metalwork 003.JPG
    156.7 KB · Views: 296
  • charger metal work 036.JPG
    charger metal work 036.JPG
    116.2 KB · Views: 294
  • metal work-white topper 006.JPG
    metal work-white topper 006.JPG
    75.5 KB · Views: 279
Besides the Auto Darkening helmet, a mig light or other way to put light on the area helps a lot- especially until you are comfortable welding. If this is your first patch panel, the key is work slowly, no matter how close you are to finishing, don't get excited and leave the trigger down, lol. I would say cut the patch- a great trick is get a piece about the same size, lock it on top of the area, and use a cut off tool to cut both at the same time (1/16" wheel) Then, it should mate. After that, do a zap on each side of the patch. Make sure it is where you want it. After that, keep zapping on each side, 1 zap at a time, letting cool. Grind your welds (flapper discs are amazing, but dont just dig in on the weld or you'll warp it) .....Just my technique, and it will probably fail for everyone else that tries it, lol....
 
I zap a few puddles on each side, then use my compressor blow gun to cool the welds to prevent warping...the blow gun trick makes the process a bit faster vs waiting for the weld/s to cool...
 
Auto Transport Service
Back
Top