Grabinov911
Well-Known Member
Because I looked all over the site and couldn't find the answer to this question, I post this:
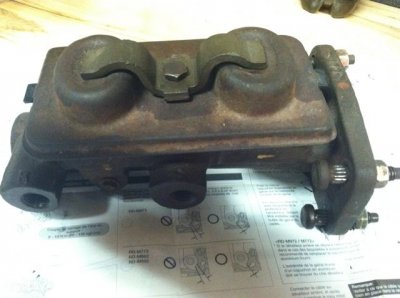
The 1970 Roadrunner Manual Drum car has a master cylinder with 2 reservoirs. The reservoir in the front (toward the front of the car) serves the rear brakes. The reservoir toward the rear of the car serves the front brakes. The fitting size and thread pitch for the rear brake line (front of master cylinder) in 9/16" 20. The fitting size for the front brake line (toward the firewall) is 1/2" 20. Why are they different? I suppose to keep the assembly line folks from getting them backward. This is a serious pain, because 9/16" 20 is the rarest thread size known to man (based on my survey of every parts store within 100 miles of Los Angeles)! See pic below of factory Master Cylinder.

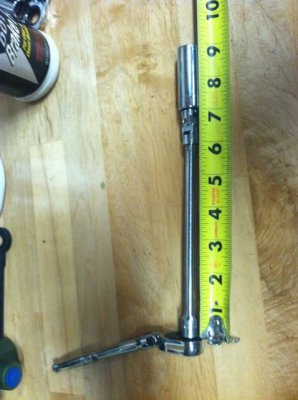
Getting this master cylinder out is a serious pain as well. It was installed before the dashboard went into the car! It is held to the firewall by 4 studs attached to the master cylinder which stick through the firewalll to the interior. The upper right nut (when sitting in driver's seat) is WAY up there, and hidden by the steering column and the dash structure. I used the 1/4"-drive socket combination below, with a 1/2" semi-deep socket, to get that nut off the interior firewall. It works for the other 3 nuts as well. There is a tape measure in the photo because the length of the socket itself (2") is relevant. Too long - won't fit. Too short - won't fit over the threaded part of the stud which sticks out beyond the nut. I used a snap-on flex head ratchet (also relevant) because the snap-on tools have a very fine wratcheting mechanism which lets you get lots of "clicks" in a small space (also relevant). It only took me about 3 hours to find this combination.

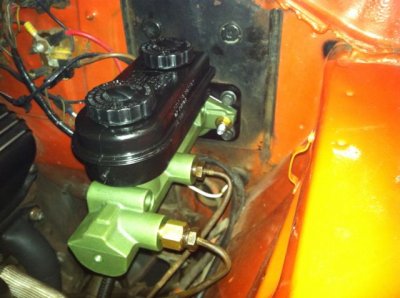
The Mancini Racing part is nicely machined aluminum, and it is threaded the same in both the front and rear ports. Both are 1/2" 20. This is a nice common size. It mounts to an adapter (black aluminum in pic below) which they sell which converts the four hole firewall to a two-stud mount. Strangely, while the part fits perfectly, they do not provide the four bolts which go through the firewall. The studs from the factory master cylinder (see pic above) cannot be used as they do not fit through the Mancini adapter holes - unless you want to machine the holes on your brand new adapter. You'll see that I put a spot of glue on the heads of the bolts I used to hold them in place as I tightened the nuts from the interior side. This worked well, but studs from the engine compartment side would have been the right technique - if the adapter came with them.

You'll see that it took an adapter from the 9/16" 20 ferrule on the factory brake line to the 1/2" 20. After extensive searching, the only thing I could find close was a 9/16" 18 to 1/2" 20. These were available at every store and all over the place online. Unfortunately this is NOT the size I needed. SO: I tapped the 9/16" 20 with the ferrule on the car!
Why?
Because a 9/16" 20 tap is the next rarest thing on the planet! Think that's bad? Try finding a 9/16" 20 BOLT to use as a tap (the fittings are only brass after all - easy to tap with a steel bolt)!
In the end I gently threaded the adapter fitting with brake fluid as a lubricant (hey it was dripping all over anyway right) - on, off, on, off, and eventually got a nice fit. As I said, at least brass is soft and easy to thread.
Oh, and one more thing!

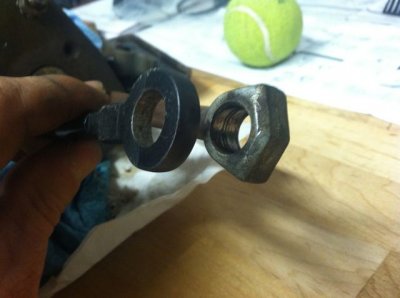
I bought a Mancini adjustable length brake pushrod to go with my new master cylinder. In the picture above the black part is the Mancini adjustable pushrod end. You'll see that it looks nothing like the factory end. This MATTERS, because the pushrod "face" at the pedal (pictured) is the surface which contacts your brake light switch. The round tipped Mancini part does not work well against the round faced switch plunger. In addition, the adjustable part was nearly an inch too long (even after I cut off some of the threaded adjuster rod on it) AND the hole in the brake pedal end (pictured) is too small for the complex and important factory bolt/stud which holds the rod to the pedal. It looks the same size in this picture because I already needlessly machined this one to fit! (read on)
If you like, fight with it for two hours, cut the rod, machine out the hole in the end to fit the brake pedal stud and try to install it to find that it is STILL too long and wont work your brake light. or JUST USE THE FACTORY BRAKE PUSHROD! I wish someone had told me that.
Getting the pushrod out of the factory master cylinder is tough. Basically you just pull it out, but it is held in by a rubber bushing which does not give up easily. Just pull. replace the thrashed bushing with the one in the master cylinder kit. The push the factory rod int the Mancini master cylinder.
Hopefully someone searching the site will find this useful someday...
Greg


The 1970 Roadrunner Manual Drum car has a master cylinder with 2 reservoirs. The reservoir in the front (toward the front of the car) serves the rear brakes. The reservoir toward the rear of the car serves the front brakes. The fitting size and thread pitch for the rear brake line (front of master cylinder) in 9/16" 20. The fitting size for the front brake line (toward the firewall) is 1/2" 20. Why are they different? I suppose to keep the assembly line folks from getting them backward. This is a serious pain, because 9/16" 20 is the rarest thread size known to man (based on my survey of every parts store within 100 miles of Los Angeles)! See pic below of factory Master Cylinder.

Getting this master cylinder out is a serious pain as well. It was installed before the dashboard went into the car! It is held to the firewall by 4 studs attached to the master cylinder which stick through the firewalll to the interior. The upper right nut (when sitting in driver's seat) is WAY up there, and hidden by the steering column and the dash structure. I used the 1/4"-drive socket combination below, with a 1/2" semi-deep socket, to get that nut off the interior firewall. It works for the other 3 nuts as well. There is a tape measure in the photo because the length of the socket itself (2") is relevant. Too long - won't fit. Too short - won't fit over the threaded part of the stud which sticks out beyond the nut. I used a snap-on flex head ratchet (also relevant) because the snap-on tools have a very fine wratcheting mechanism which lets you get lots of "clicks" in a small space (also relevant). It only took me about 3 hours to find this combination.

The Mancini Racing part is nicely machined aluminum, and it is threaded the same in both the front and rear ports. Both are 1/2" 20. This is a nice common size. It mounts to an adapter (black aluminum in pic below) which they sell which converts the four hole firewall to a two-stud mount. Strangely, while the part fits perfectly, they do not provide the four bolts which go through the firewall. The studs from the factory master cylinder (see pic above) cannot be used as they do not fit through the Mancini adapter holes - unless you want to machine the holes on your brand new adapter. You'll see that I put a spot of glue on the heads of the bolts I used to hold them in place as I tightened the nuts from the interior side. This worked well, but studs from the engine compartment side would have been the right technique - if the adapter came with them.

You'll see that it took an adapter from the 9/16" 20 ferrule on the factory brake line to the 1/2" 20. After extensive searching, the only thing I could find close was a 9/16" 18 to 1/2" 20. These were available at every store and all over the place online. Unfortunately this is NOT the size I needed. SO: I tapped the 9/16" 20 with the ferrule on the car!
Why?
Because a 9/16" 20 tap is the next rarest thing on the planet! Think that's bad? Try finding a 9/16" 20 BOLT to use as a tap (the fittings are only brass after all - easy to tap with a steel bolt)!
In the end I gently threaded the adapter fitting with brake fluid as a lubricant (hey it was dripping all over anyway right) - on, off, on, off, and eventually got a nice fit. As I said, at least brass is soft and easy to thread.
Oh, and one more thing!

I bought a Mancini adjustable length brake pushrod to go with my new master cylinder. In the picture above the black part is the Mancini adjustable pushrod end. You'll see that it looks nothing like the factory end. This MATTERS, because the pushrod "face" at the pedal (pictured) is the surface which contacts your brake light switch. The round tipped Mancini part does not work well against the round faced switch plunger. In addition, the adjustable part was nearly an inch too long (even after I cut off some of the threaded adjuster rod on it) AND the hole in the brake pedal end (pictured) is too small for the complex and important factory bolt/stud which holds the rod to the pedal. It looks the same size in this picture because I already needlessly machined this one to fit! (read on)
If you like, fight with it for two hours, cut the rod, machine out the hole in the end to fit the brake pedal stud and try to install it to find that it is STILL too long and wont work your brake light. or JUST USE THE FACTORY BRAKE PUSHROD! I wish someone had told me that.
Getting the pushrod out of the factory master cylinder is tough. Basically you just pull it out, but it is held in by a rubber bushing which does not give up easily. Just pull. replace the thrashed bushing with the one in the master cylinder kit. The push the factory rod int the Mancini master cylinder.
Hopefully someone searching the site will find this useful someday...
Greg


