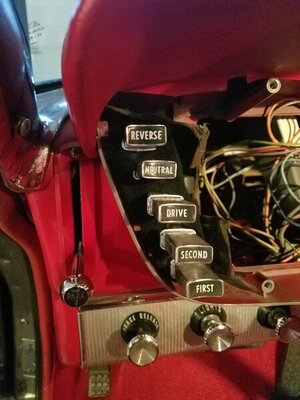
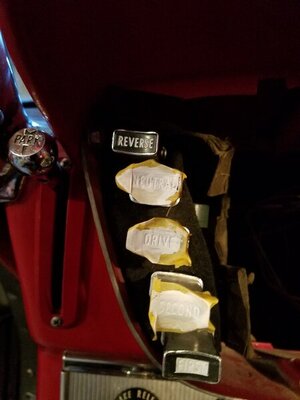
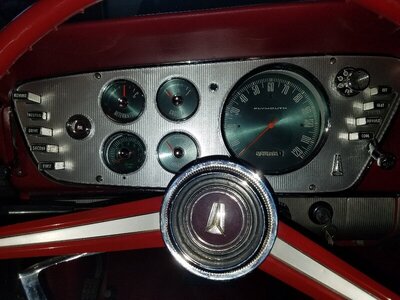
Reverse pattern push buttons

dvw

Well-Known Member
Local time
3:10 PM
Joined
Feb 16, 2010
Messages
7,199
Reaction score
11,747
Location
waterford mi
Did these for a buddy today. If youve had one of these apart, you know the buttons dont swap. The rest of the buttons will get a cleanup as well. This assy was a spare.
Doug
20201213_161650.jpg
 

PRND21

FBBO Gold Member
FBBO Gold Member
Local time
3:10 PM
Joined
Aug 16, 2016
Messages
3,965
Reaction score
6,817
Location
Central Indiana
So, how is it done? Do you cut the stem from the button and reattach? Or is this a trade secret?
 

64BEL

FBBO Gold Member
FBBO Gold Member
Local time
2:10 PM
Joined
Feb 25, 2010
Messages
5,213
Reaction score
7,637
Location
Wisconsin
I don't need any but I'm curious about how it's done.
 

Part Stalker

FBBO Gold Member
FBBO Gold Member
Local time
12:10 PM
Joined
Jul 27, 2020
Messages
455
Reaction score
208
Location
East of Tacoma
I would imagine you cut/change the faces and splice them together under the chrome bezel. I haven't done it but was looking at bags of push buttons this weekend. I will wait for the official version.
 

dvw

Well-Known Member
Local time
3:10 PM
Joined
Feb 16, 2010
Messages
7,199
Reaction score
11,747
Location
waterford mi
20201214_053326.jpg
I made a jig to cut them. Drill out the stakes in the sides of the covers. Slide the aluminum sleeves off. Pay attention before you glue them. The arms on the D and 1 buttons turn opposite directions. Glue them and slide the sleeve back while the glue is still wet. Restate the sleeves with an automatic center punch.
Doug
 
Last edited:

Ron H

FBBO Gold Member
FBBO Gold Member
Local time
2:10 PM
Joined
Feb 29, 2016
Messages
7,791
Reaction score
8,728
Location
WI
I had the buttons out to clean them and the linkage also lubing as part of restoing the dash. Suggest, don't apply anything alcohol or solvent based to clean them as this will skank the plastic as I found using a mule button. Mild cleaners. I removed the old paint with a blunt toothpick and fine type of q-tip I got at hobby lobby. Also got some water-based white paint to swab the button then remove the overlay paint to leave the white in the indented letters. Used a dremel with tiny buffing pad to shine it some. Not perfecto; but looks a lot nicer for my satisfaction.

PB in Dash 1.jpg PB in Dash 2.jpg Ply Dash Finish.jpg
 

khryslerkid

FBBO Gold Member
FBBO Gold Member
Local time
3:10 PM
Joined
Mar 10, 2010
Messages
28,062
Reaction score
46,550
Location
Hanover, Pennslyvania
You left out the part on how you relocated the shifter mechanism to where the heater controls are on your car. That is what I think is really neat! (I've seen your videos)

Can't do this on a '62. The buttons are solid black with the locations noted in the bensil. Those locations light up but not the buttons like the newer models.
20201216_134641.jpg


When I removed my aluminium sleeves to replace with better ones, I used a small screwdriver to pry up where the stakes were and they slid off. Then I gently squeezed them back into shape before reinstalling. They're anodized and will polish up.
Screenshot_20201216-134841.jpg
 

matthon

Well-Known Member
Local time
3:10 PM
Joined
Mar 3, 2018
Messages
1,288
Reaction score
1,087
Location
New York
Those locations light up
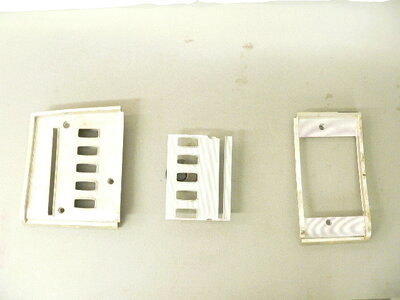
Is it just the bulbs behind the white plastic with the reverse, neutral, etc. that light it up, more like the light shines through the plastic?
Seems like the plastic is not very transparent when held up to the light.
I have a 62, but have not finished the dash yet.
 

Ron H

FBBO Gold Member
FBBO Gold Member
Local time
2:10 PM
Joined
Feb 29, 2016
Messages
7,791
Reaction score
8,728
Location
WI
On my '63, there are tiny bulbs that seat in the assembly behind the buttons. To replace them I had to pull off the buttons to access them. The button frame work is opaque assume to allow the light to shine through
 

Ron H

FBBO Gold Member
FBBO Gold Member
Local time
2:10 PM
Joined
Feb 29, 2016
Messages
7,791
Reaction score
8,728
Location
WI
View attachment 1040396 I made a jig to cut them. Drill out the stakes in the sides of the covers. Slide the aluminum sleeves off. Pay attention before you glue them. The arms on the D and 1 buttons turn opposite directions. Glue them and slide the sleeve back while the glue is still wet. Restate the sleeves with an automatic center punch.
Doug
Watching your cool video, aside from moving the buttons to the right, you have the drive gears flipped with D being the bottom button. Assume this reduces the odds of hitting N or worse while speed shifting. Seem to recall the ultra rare SS cars had the buttons this way with a manual VB? Interesting to know what you had to do - do set your car up this way.
 

Ron H

FBBO Gold Member
FBBO Gold Member
Local time
2:10 PM
Joined
Feb 29, 2016
Messages
7,791
Reaction score
8,728
Location
WI
On my '63, there are tiny bulbs that seat in the assembly behind the buttons. To replace them I had to pull off the buttons to access them. The button frame work is opaque assume to allow the light to shine through
Sorry - I used opaque, meaning not. Otherwise transparent so the button lights up..
 

khryslerkid

FBBO Gold Member
FBBO Gold Member
Local time
3:10 PM
Joined
Mar 10, 2010
Messages
28,062
Reaction score
46,550
Location
Hanover, Pennslyvania
Is it just the bulbs behind the white plastic with the reverse, neutral, etc. that light it up, more like the light shines through the plastic?
Seems like the plastic is not very transparent when held up to the light.
I have a 62, but have not finished the dash yet.

One bulb (orange wire)
20201217_193906.jpg

20201217_193935.jpg


And the bulb location has the blue cover on it.
20201217_195156.jpg


The plastic material with the wording is transparent plastic.
20201217_194001.jpg

20201217_194051.jpg
 
Last edited:

QuickBpBp

FBBO Gold Member
FBBO Gold Member
Local time
3:10 PM
Joined
Oct 14, 2010
Messages
12,227
Reaction score
37,357
Location
SE PA
Creative that is for sure. Can I ask now that they are done and glued back together does the light still pass through them giving them that glow or does the glue block them from being Illuminated like the others that are unaltered??
 

dvw

Well-Known Member
Local time
3:10 PM
Joined
Feb 16, 2010
Messages
7,199
Reaction score
11,747
Location
waterford mi
The bulbs still light up. The placement of the single bulb isn't the best. A second bulb would help. You cant "paint" the bulbs with a sharpie. They will light up what ever color you like. Mine are red. Moving the shifter was easy. One bracket welded to the dash. New holes for the cables closer to the accelerator pedal. I did that because the roll cage interferes with the shifter box. the bezel was a little trickier. Cut the inside out of the heater bezel. Cut the out off the shifter bezel. Glue them together. That would've worked. I have a friend that works in a the plastic lab. He molded me a new part from the one I glued. you can still see the seam a little ,but it looks pretty good. Cut up a factory shift delete plate and added the 5th gauge where the shifter used to be.
Doug
I7.jpg
I14.jpg
I12.jpg
I13.jpg
I8.jpg
 
Top