• When you click on links to various merchants on this site and make a purchase, this can result in this site earning a commission. Affiliate programs and affiliations include, but are not limited to, the eBay Partner Network.

Trunk pan

hunt2elk

FBBO Gold Member
FBBO Gold Member
Local time
1:08 AM
Joined
Jul 15, 2009
Messages
10,595
Reaction score
11,837
Location
WI
Hi guys, I am looking for a center section of a trunk pan for a 69 RR. Just between the frame rails. Does anybody know if this is made, or will I end up buying a full pan? Jeff@521 has the best price on AMD full pans, but they are all truck freight which adds alot to the cost. Sherman sells theirs for about $55. less -- is this comparable quality to AMD? Don't suppose any of you has what I am looking for laying in your spare parts corner? Thanks.
 
Pretty common for the center to rot out i think.

This might not help you much but I once repaired the center of a 68 with a donor section from another 68.

Started with this

trunkbeforereplacingcenterpan.jpg


This is what i cut from the donor car, see how I got inside the frame rail runs and cut forward about to where the spare tire holder mounts?

trunkcutfromdonorcar.jpg


On the car being repaired I made a very careful shallow cut on top of the inboard frame rail weld lips and pealed the bad skin out. Then i trimmed the donor pan to fit in like a puzzle piece. I was able to run a butt weld right on top of the inboard frame rail weld lip, it worked out pretty slick actually, blended out really nice. You couldn't tell it had been repaired when i was done.

donorpanweldedin.jpg


I can't find any pictures of it after I finished and primed the trunk but it tirned out nice.

Here's another comment or experience I'll share that may or may not help.

I (in recent weeks) talked with Jeff at 521 about my trunk floor for my 69. I sounded just like you, was only interested in the center above the fuel tank.

Well I bought a 1 piece tank from Jeff and I was talking about just cutting out the center and i was willing to accept that amount of "waste".

When i really got into my tear down of my car i found that my trunk floor was weak in several areas outside of the center area over the tank.

back closer to the tail pan on both sides it was very weak, also between the frame rails and the trunk extension area it was weak.

I used almost the entire full pan in my car and I'm very glad i did it. i was able to clean the insides of my frame rails and rust proof them, I was able to inspect them and I found a crack inside each one where the shock crossmember is welded to the frame rails which I repaired. Yeah it was a little more work beings I decided to take it all the way to the factory tailpan welds. (you have to drill out the trunk latch box and the 2 tail pan braces) But wow i'm glad I did it, i gained access to my rear crossmember which needed some attention as well. It was a very good thing replacing my entire trunk floor, in my case it was anyways.

And I was sure I just needed the center section.

LH/RH halves is a good way to go too.
 
Every 69 B-body I have seen has rust issues there, I have a AMD one piece coming for my 69 Charger but I am replacing the rear tail light panel if your not doing that just get the two piece and you will save on freight.
 
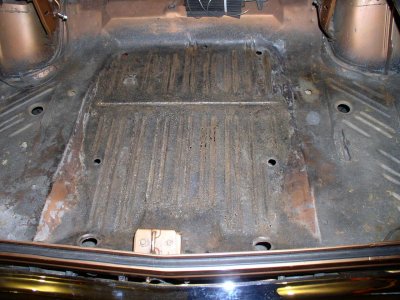
Yes Dave that is exactly what I'm thinking of doing. This is for my convert. The only problem is in the middle portion. The bottom of the pan is shiney new looking metal. All the corrosion came from the top. I replaced the weatherstrip last year, but I would imagine the back of the top would still leak in a rain storm. This will be the first replacement panel on this car. I learned how to weld with arc, so wirefeed is new to me. I went and bought a Millermatic 140 today and will practice alot before touching the car.
 

Attachments

  • P4280018.jpg
    P4280018.jpg
    179.3 KB · Views: 238
Last edited:
Wow yeah, first impression looking at that pic is that it does just need the center tub.

That trick I did with the donor car grafting would work perfect on your car, one problem.... hard to find a donor with a good trunk floor.

our donor happened to sit for who knows how many years with a torque converter resting back there that had spilled fluid into the tub in the center.
 
Millermatic 140 is a great unit...Got one myself. Set your gas on your regulator to 25-30, AMPS at just over 5 and wire speed about 4 1/4 to 4 1/2..That should get you in the ball park for welding in that donor pan. I'd use .030" wire. Wire going into pass jerky or studder like, slow your wire speed or turn up the AMPS. Wire pooling/droplet inside the tip housing or at the tip, speed up your wire speed or turn down your AMP. You'll have to decide which way to go by seeing how the arc is interacting with the base material. Don't try to run a continuous weld. That's a great way to warp your metal. Little tac welds 2-3 inches apart from each other. Work from one end to another. Make sure you give them time to cool a bit. Keep working back and forth until she's welded 100%.

Be sure you select the right tip for the wire you are using. They're not universal. Also, make sure the feed wheel off the wire feed motor under the lid is set for the right wire size. Clean your tip/housing often while welding. Slag/spatter around that area can obstruct your shielding gas and cause porosity, spatter and poor puddle settling.
Also, remember welding postion will often require you to modify your settings for AMP/Speed..Play around with her for a while..best way to learn

Good luck to ya
 
Prop, After explaining to the welding supply company what I was doing, they recommended ER70S-6 .023 wire. Do you think this is too thin - should I exchange it for .030? I thought I read on one of Dave's posts that he was using .023 on the quarters which is the same thickness steel, right?
 
I've got a millermatic as well, I think mine is a 180, it was the smallest 230v unit available when I purchased it 7-8 years ago..

I had a spool of .030 on for all my plug welding, tacking and other welds I have done along the way to get me to where I am at on my car now.

The knobs on my miller are variable, they turn like a volume knob on a radio rather than click settings. I guess I'm bad about knowing exactly where I'm at with my machine settings, I'm guilty of just reaching down and tuning blindly wire speed and amps until I’m happy.

I put on a spool of .023 last night, and I want to say I ended up at around 2.25-2.5 on my amps and maybe 32-ish on my wire speed? (guessing)

Anyways, I do like the .023 wire for body work, especially open panel welds like long seaming a quarter skin on. Like prop said, just buzz little tacks and move to a cool spot, buzz another etc. Big thing is to get the piece secured where it fits, as in all 4 corners, then half way between each corner, then between those tacks etc. Keep closing the distance between tacks by putting new ones centered between existing ones. A lot of times you can buzz maybe 3/8" little stitch welds without creating too much heat then move on to the new spot.

I like the "skinny wire" because I can get that nice little “buzz weld” going on, it really is a different critter when you jump down to .023, it suits the task at hand pretty well in my opinion (with my machine anyways)

With .030 wire I turn things down really low and do ok but the arc seems to start "cold" and I end up creating a little more heat because I have to stay into the trigger a little longer because that cold start with the arc.... if that makes any sense? Basically the warping fears are addressed by controlling your trigger time, as tempting as it is to just stay on that trigger you have to limit your trigger time to just a couple seconds if you are into an area like I am right now, sewing a 7 ft long quarter skin onto a car.

Simulating spot welds by drilling holes and plug welding is pretty easy and it’s good practice for mig welding. Of course you shoot for the underlying material through the hole, try to get that arc starter there then stay into the trigger until that puddle comes up and fills your drilled hole. Don’t stay into the trigger too long though or your puddle will fall through, and it sucks when that happens.

I think I’m basically just repeating stuff that prop already said now so I’ll stop yammering on like a fool.

I wouldn't be without a spool of .030, can't beat it for the general purpose stuff.

But I’d hang onto that .023, you'll like it on that sheetmetal.
 
Hunt,

To each his own on the wire size. I've been back and forth over the years with .023 and .030

For me, real, real fine stuff works well for the .023. The .030 wire fills holes/gaps real well. The problem I run into with the .023 is that it takes more wire at a faster speed to fill any area. With that being said, your AMPS need to go up to facilitate the increased wire speed. I find myself putting more heat into a panel using .023 than I do .030. On the .030, I run about 15-20% less AMP's and slower wire speed than the comaparative fit up for .023.

The .023 does not work real well for spot welding or gaping/filling in any voids over 1/16" IMO. On the flip side, the .030 creates a larger weld puddle, but in turn has better penetration along the horizontal plane.

With that being said, I use the .023 for real fine applications like fine jeweler type work or areas that limit the size of my weld cap. The .030 I use on pretty much 90% of all the other automotive sheetmetal applications and typically stays on my machine. I do keep a spare spool of .023 on the cart for when the need arises.

There are a lot of factors that also effect the wire Dia. you use. Type of metal, MFG of the wire, welding position, machine, enviroment. The main one just being the operator's technique. Like I said, ive juggeled between the .023 and .30 over the years and the .30 is the best all around wire for automotive sheetmetal welding, but that's just me. Either one will get that donor pan in the car for ya.

To answer your question on thickness..Most automotive sheetmetal is typically 20 guage...Thickness of that is .0359".


I would recommend you get a spool of each, try them out and decide for yourself which wire size you feel most comfortable with.

Good luck
 
Auto Transport Service
Back
Top