• When you click on links to various merchants on this site and make a purchase, this can result in this site earning a commission. Affiliate programs and affiliations include, but are not limited to, the eBay Partner Network.

Who wired their own car?

kamkuda

Active Member
Local time
4:08 PM
Joined
Jun 8, 2012
Messages
32
Reaction score
21
Location
Ontario
I have a 68 Road Runner with a painless system and a fast xfi fuel injection system

It was wired for me and there were some issues like a poor ground for the alternator and headlights blew out.
I am not very confident with wiring (although I have the diagram) but there were 2 sections that needed to work together. The standard wiring and the fast efi system

I have some issues with the EFI system and want to double check to ensure that I am not getting bad information to the computer (ie the fuel pressure in the system says 71 lbs and it show mechanically at 40lbs)
The engine has had some changes, has been in and out and added some other electrical components.

So after the long (brief) here is the question

Any suggestions for a novice trying to learn and be self sufficient?
To trace issues
Look at overall problems
Anything to be careful when I try to locate the issues?

Thanks
 
It can be tough if you don't know what to look for. I wire prototype cars for Chrysler. We deal with this stuff every day. Loose terminals, bad grounds are by far the most common. But some of the stuff gets way over the top with radio, magnetic, inductive interference. Follow the diagram, make sure the grounds are good, make sure the terminals and crimps are good.
Doug

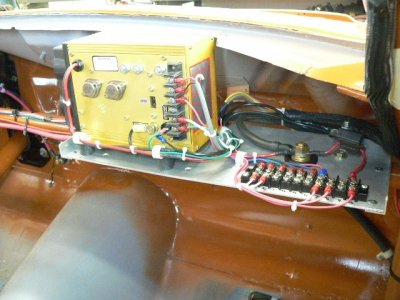
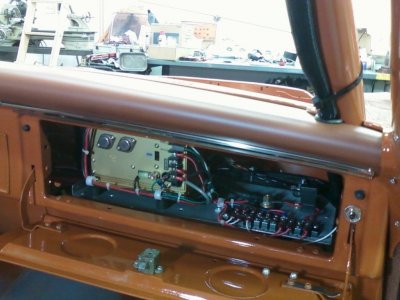
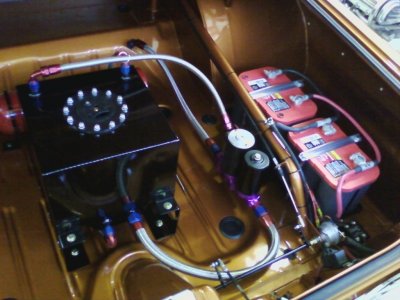
E17.JPG E18.jpg E28.jpg
 
wired my own car, complete from front to back. using the wiring diagram (as well as reading glasses) to put it all back correctly. take your time, and look over the diagram time and again to make sure it's right. i'm a novice too. was my 1st. attempt at wiring.
 
Back in the early 80's i had to replace the harnesses in my 70 Charger with a 69 Charger harness... Fun times... Now going to redo it with a American Autowire kit..
 
It is usually a good idea when an issue arises electrically to check from the end of the circuit backwards or in other words, if the head lights are at issue, start at the bulb sockets and work your way back to the fuse. I hope you did check for a blown fuse first otherwise the circuit will not complete at all. Some circuits start with a switch of power and terminate via ground and some circuits like brake lights and interior lights are always live circuits and are activated by grounding a door switch or brake light switch. Using your electrical diagram trace each circuit individually and verify each circuit from the start of the power source to the load at the end of the circuit. The reason I say work backwards is because loads are generally outside the cabin and that's usually where most connectors are. In the case of Painless, the circuits are sort of "modular" and easy to verify. Your EFI system is noted for sensitivity to electrical "noise" and should be on a circuit all by itself. Shielding may be required or even braided or shielded wiring. In some areas especially around the ignition components, you may have to run the wire through a grounded conduit like a piece of 5/16 brake line. My electronic Autometer tach needs it's power supply directly from the battery via a relay or the needle bounces terribly as it picks up the noise from the alternator regulator switching. Ground everything where possible, even turn signal buckets and make sure the grounds are good and connected between every body component. Motor to k-member, to firewall, to dash, to battery and to alternator and regulator. EFI should be off it's own relay connected directly to battery and the relay activated by ignition. Fuse according to manufacturer's instructions. Be patient and thorough and if the previous installer screwed up the harness installation you'll find out where. One more thing, invest in the proper tools to verify electrical integrity - VOM meter for voltage and continuity and an illuminated probe for testing the presence of voltage and switching operations. And above all else, check every bulb socket where possible for corrosion or shorting. If done properly using a Painless system, you should not have a bulkhead connector at all, if you do check every contact thoroughly. Good luck!
 
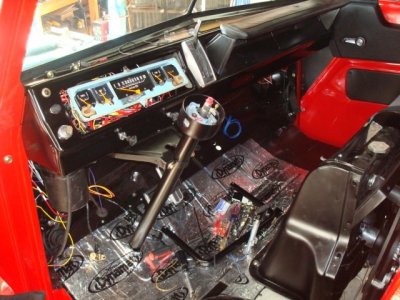
Yes....started from scratch because the original loom was old and crusty. Just laid it all out, copy the length and follow the diagram to get the colours correct.

DSC05208.JPG
 
Thank you I has been a long time since I have been on FBBO
Yatzee Great easy to remember advice too. I appreciate it
 
It can be tough if you don't know what to look for. I wire prototype cars for Chrysler. We deal with this stuff every day. Loose terminals, bad grounds are by far the most common. But some of the stuff gets way over the top with radio, magnetic, inductive interference. Follow the diagram, make sure the grounds are good, make sure the terminals and crimps are good.
Doug

View attachment 341763 View attachment 341764 View attachment 341765
2X on everything Doug said. Especially on grounds. Inductive interference is something you should attempt to familiarize yourself with. You don't need to overthink it as much as just being aware of conditions and its sources. There are actually simple ways to combat RFI.
 
I do all my own wiring. It makes troubleshooting so much easier. Doug, curious as to why a 7AL rather than a Programmable 7?
 
2X on everything Doug said. Especially on grounds. Inductive interference is something you should attempt to familiarize yourself with. You don't need to overthink it as much as just being aware of conditions and its sources. There are actually simple ways to combat RFI.
Yes thanks I will look into it I do have the coil and pickup for the crank trigger relatively close to each other
 
I do all my own wiring. It makes troubleshooting so much easier. Doug, curious as to why a 7AL rather than a Programmable 7?


I agree. I switched out my 7AL to a digital 7. So much easier.
I rewired both my cars and it's nice to know what to look for if there's a problem down the road compared to having someone else that did it for you.
 
Not sure about out West but for those of us from the East and Central that run NSS, most events even if they are not affiliated use the NMCA rules. The main reason most NSS racers don't use the Digital 7 Programmable (MSD 7531) is that they are basically not approved. The earlier Digital 7 (MSD 7520, non-programmable) is approved.

NMCA Rules -
IGNITION
All ignition boxes must be listed on the NHRA ET approved ignition box list or operate with less functions and features than approved boxes.

NHRA approved ignitions NHRA ET -
Manufacturer Part Number Classes Permitted
MSD 7531 Nitrous Pro Mod ONLY
NHRA Accepted Ignition Systems Updated January 12, 2015
 
Yes thanks I will look into it I do have the coil and pickup for the crank trigger relatively close to each other

They really need to be separated. MSD sells a shielded cable (PN-8862) that is always a good idea.
 
I do all my own wiring. It makes troubleshooting so much easier. Doug, curious as to why a 7AL rather than a Programmable 7?
It was free when my buddy upgraded.
Doug
 
Not sure about out West but for those of us from the East and Central that run NSS, most events even if they are not affiliated use the NMCA rules. The main reason most NSS racers don't use the Digital 7 Programmable (MSD 7531) is that they are basically not approved. The earlier Digital 7 (MSD 7520, non-programmable) is approved.

NMCA Rules -
IGNITION
All ignition boxes must be listed on the NHRA ET approved ignition box list or operate with less functions and features than approved boxes.

NHRA approved ignitions NHRA ET -
Manufacturer Part Number Classes Permitted
MSD 7531 Nitrous Pro Mod ONLY
NHRA Accepted Ignition Systems Updated January 12, 2015


7530T digital 7 is what I use. I believe its NHRA approved.
 
It was free when my buddy upgraded.
Doug
Best reason right there. I forgot about them not being allowed in NSS. I run a 7531 in my street car. Love it. Took the digiset off when we put the 7531 on and were able to spray right at the launch.
 
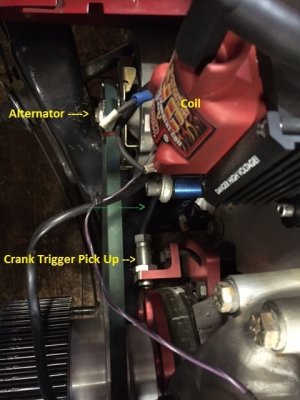
Here is the alternator coil and crank trigger together

The Green Arrow is where the crank trigger wire comes very close to the alternator

cranktrigger2.jpg
 
Here is the alternator coil and crank trigger together

The Green Arrow is where the crank trigger wire comes very close to the alternator
. I
View attachment 342330
I use twisted pair shielded wire with a 3rd bare ground wire. Ground the shield to the MSD box ground stud at that end only. Never an issue.
Doug
 
I do all my own wiring too, I know what's what that way too...

I like to use relays a lot, cuts down on spikes etc.
I like to have arming/over ride switches as a fail safe along with fuses too...

I've done my own harnesses & used
American Autowire
Ron Francis
Painless Performance
Mad Enterprises www.MadElectrical.com
M&H Electrical Fabricators stuff from time to time too
among others

depends on the project & how extensive I want to get...
 
Auto Transport Service
Back
Top