• When you click on links to various merchants on this site and make a purchase, this can result in this site earning a commission. Affiliate programs and affiliations include, but are not limited to, the eBay Partner Network.

'68 Satellite 4-door light refurb...and big fat engine swap.

Keep up he good work, Kurt

Love the steelies!

Thanks!

I went ahead and masked off everything around the intake manifold and re-shot the intake and gaskets tonight. The engine quiz thread was making me a bit too self-conscious about the top bits that I never got around to repainting after the lifter disaster:

15s4h7q.jpg

15ojmgj.jpg


Still really quite surprised nobody in the other thread has figured out the big secret of the quiz photo.

-Kurt
 
Just checking in with a few updates, starting with "It's amazing what a simple wet sanding can do."

2qm3q88.jpg


Nice, eh? Well, this is what I started with - enough orange peel to embarrass half a dozen Macco shops:

fnz4ts.jpg


I used a process of 1200 grit -> 1500 grit -> 2000 grit -> 3M fine compound to get to this point, followed by an application of good ol' Meguiars #7 and a wax. Pretty good, I dare say. I only did part of the fender - the weather forced me inside.

ioeoud.jpg


And on another unrelated note, about three studs on the driver's side brake drum (left hand threads) are ready to snap - they don't tighten smoothly. One gave way entirely:

2n8scck.jpg


This doesn't matter for the Satellite, but it does matter for the Valiant, as the spindle and drums will make their way onto my Valiant sooner or later (anyone in Miami have a large bolt pattern Mopar A-body 7-1/4" or 8-1/4" rear axle for sale?).

Problem is, before I do any of that, the Satellite is going to need new rotors (I have the disc spindles), 11.75" caliper brackets, and lower control arms with sway bar mounts (and preferably new bushings installed - not keen on that job).

Ah, what expensive fun we weave.

-Kurt
 
Kurt,thanks for the small block edumacation.The more door thing has become more popular due to the prices on 2 doors. Have seen many 4 dr & wagons with the RR & GTX theme which is way cool.I commend you for your enduance to finnish the car.
I'm a boost junky now and the CR your dealing with is screaming BOOST!!My Parents used to live in Coconut Creek,so I found the Home Depot cruze in.Do you go there? Is it still there???
 
Kurt,

Is that the original paint???

Looks beautiful!

Justin

Hardly - it's a really, really terrible repaint that one of the previous owners gave it. If it's not entirely apparent from that orange peel, take a close look at the B-pillar and door frames in the next picture. The paint has more drips than if I had slathered tree sap and molasses on the pillar. Should be interesting to wet sand THAT out:

347d20p.jpg


I found this in the PO's Facebook profile. I'll give them credit for effort, though the primer they used doesn't quite hide the unevenness of the mess under the paint.

19msuo.jpg


The wet sanding sure improved on this, that's for sure!

Kurt,thanks for the small block edumacation.The more door thing has become more popular due to the prices on 2 doors. Have seen many 4 dr & wagons with the RR & GTX theme which is way cool.I commend you for your enduance to finnish the car.
I'm a boost junky now and the CR your dealing with is screaming BOOST!!My Parents used to live in Coconut Creek,so I found the Home Depot cruze in.Do you go there? Is it still there???

I love the 4-doors - and given the saturation of everything else in the market, I probably would still prefer them if I had the cash for the alternative. Plus, I don't have to worry about pillarless quarter panel cracks :)

Granted, you can also run into parts source problems for the 4-doors, either a lack of the parts, or parts with prices through the roof due to the parts sharing with the like 2-doors of the same era. Plus, you get the occasional jerk who feels obligated to put you down for bothering with a 4-door (and for whatever reason, these guys seem to be over-the-top nasty - guess they're pissed that I'm keeping them from tearing apart another parts car).

Boost, eh? Frankly, I'm not quite certain what CR I'm running with the 360 pistons mated to the Mag 5.9 heads. I'd rather it look original under the hood too, so I'll probably be keeping it as-is for now - even though it looks like some kind of weird mix of a '69 340 dumped in a B-body. I don't mind the van cam either - might come in handy if I throw a hitch onto this thing to haul my junk around.

'68 Plymouth Satellite - "340 Four Barrel" by cudak888, on Flickr

-Kurt
 
Phuck those jerks,most of them don't even have a car,let alone your skills to get something rolling!!!:thumbsup:
 
Did some more tonight on the door:

33zfu47.jpg


Phuck those jerks,most of them don't even have a car,let alone your skills to get something rolling!!!:thumbsup:

Hah! Well, I can't say that I'm reinventing the wheel here. Just applying some known techniques to spiff up a car that would usually be dismissed as parts.

-Kurt
 
Few things to report. Finally got most of my factory disc brake conversion bits (F/M/J-body disc brake spindles, 11.75" Cordoba/police Diplomat-sized slider caliper brackets, slider calipers, upper control arms - though I would like to get some tubular arms with built-in caster improvement - and rebuilt lower arms with sway bar mounts.

Like an idiot, I haven't photographed any of that, or the $400 order from RockAuto for the rest of the consumable steering parts and rotors - but that's another story.

While waiting for that to arrive, I figured I'd pull the seat and remove the fabric, as one of the springs appeared to be poking the fabric at top. I wound up finding about 4 or 5 broken springs, a missing bolt for the back, and one loose. Gotta check the mounting threads to make sure they're not boogered up.

1968 Plymouth Satellite bench seat removed by cudak888, on Flickr

1968 Plymouth Satellite bench seat removed by cudak888, on Flickr

Also grabbed a nice shot of the interior while at it. Looks like it's the perfect time to put some sound deadener in (nothing like working with rot-free floorpans from the get-go) and also sort out the PO's Roadkill-worthy wiring for the lights and Federal Interceptor (which will have to be removed to be road legal).

1968 Plymouth Satellite (Belvedere) - Seats Removed by cudak888, on Flickr

Also posted some under-dash pictures for reference. Might help some B-body owners in a jam: https://www.flickr.com/photos/43240189@N03/

-Kurt
 
This gets me excited:

F/M/J spindle set up for B-body disc swap by cudak888, on Flickr

11.75" adapters, FMJ spindles, and brand-new ball joints. Well, at least one, because the LH ball joint Rock Auto sent me had gacked-up threads right out of the box. Chinesium for the win. NOT.

In other news, I pulled up the carpet (a new replacement, from the looks of it) to inspect the sound deadening. I knew the pans were in good shape, and they didn't disappoint:

Gaze upon these perfect floorpans by cudak888, on Flickr

Gaze upon these perfect floorpans by cudak888, on Flickr

Of course, someone had to tear one of the plugs enough that I feel obligated to pound it back into shape and MIG a patch:

Makes you wonder... by cudak888, on Flickr

Got the carpet out to see what it had - just jute padding under the carpet, nothing else:

B-body molded carpet (rear) by cudak888, on Flickr

May the carpet force be with you:

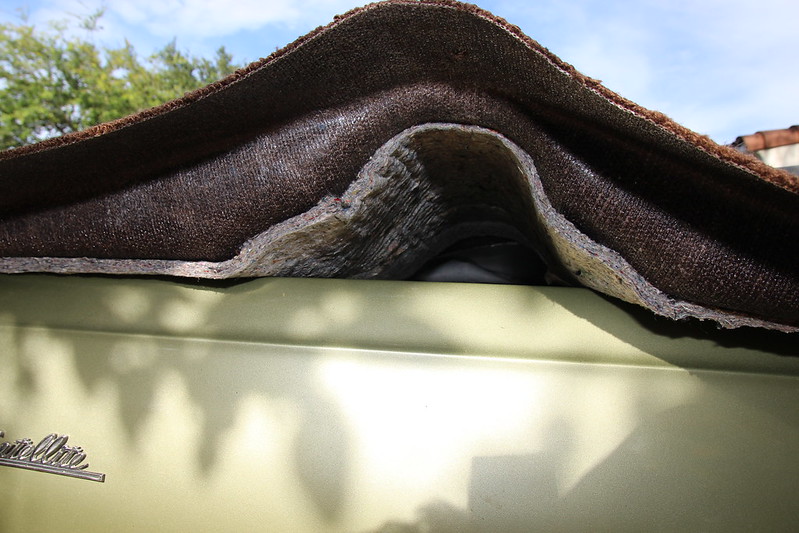
Obi Wan's Mopar carpet by cudak888, on Flickr

So now, the big question: Now that I've blown more than I should on the suspension and the seat springs, what am I'm going to do about penny-pinching the sound insulation? Probably going cheap and putting Noico sound deadener on the areas that resonate, followed by their heat insulation pad on top to further quiet the beast. Anything to get the carpet taken care of in short order so the seat can get reinstalled, pronto.

-Kurt
 
Coming along great Kurt!

I am sure you are excited with those disc brakes....
 
Coming along great Kurt!

I am sure you are excited with those disc brakes....

I'm looking forward to the installation of the discs, as I'm doing everything including the LCA's - was able to source a set of recently rebuilt arms, complete with swaybar tabs. I'm hoping the Diplomat brake likes allow me to route the calipers to the rear - at least, that's what others have said will work.

What I'm NOT looking forward to is redoing the brake lines for the prop valve. I don't have a proper hydraulic flaring tool, and I don't trust the el-$hito manual types. I'm not sure where I have to change the line, but I'd gladly swap over existing lines from a later B, with disc/drum fittings - if I knew it would work.

-Kurt
 
Installed some springs from forum member HalifaxHops a few nights ago, but didn't get pictures. But I did get photos of where I took the death-wheel to the floorpan. If all goes well, it'll be MIG welded shut by this evening:

Floorpan patch by cudak888, on Flickr

Not the greatest fit ever, but it is what it is. Better than someone riveting an old stop sign over it.

Floorpan patch by cudak888, on Flickr

-Kurt
 
Welded the patch in today. I've never had more trouble trying to MIG in a long time; result looks like dog poo, and that's giving it all the best of it. The factory floorpan metal in this area has become very thin, and is near impossible to weld.

Whatever the case, I got it done. The perfectionist in me wants to rip the whole footwell area up and put in a new one. I'm not. The trunk floor repairs by the PO are only marginally better than my floorpan job, and quite frankly, I have no desire to let this become another Eternal Project Car™, because it already has had a few moments like that.

Time to move ONWARDS.

-Kurt
 
Put in some Noico sound deadener today, followed by foam heat insulation pad, also Noico. Here's the deadener being cut to fit. Didn't get anything but video footage of the foam:

Sound deadener by cudak888, on Flickr

The carpet had never been cut properly to allow the pedal to recess through it. Look at the earlier photos of the car - the pedal looks crooked (though it's the carpet below it that gives it that appearance). I finally took care of that. Carpet still fits like hell around the high beam switch, and I can't do anything about it (unless there's a panel that's supposed to fit over that):

Better accelerator pedal fit by cudak888, on Flickr

The results of a number of hours of hard work. Believe it or not, I realized that the reason the PO had never bolted in the belts is because the front seat was recovered with the seat back fabric glued to the lower bench. As a result, you couldn't slip the buckles through (!):

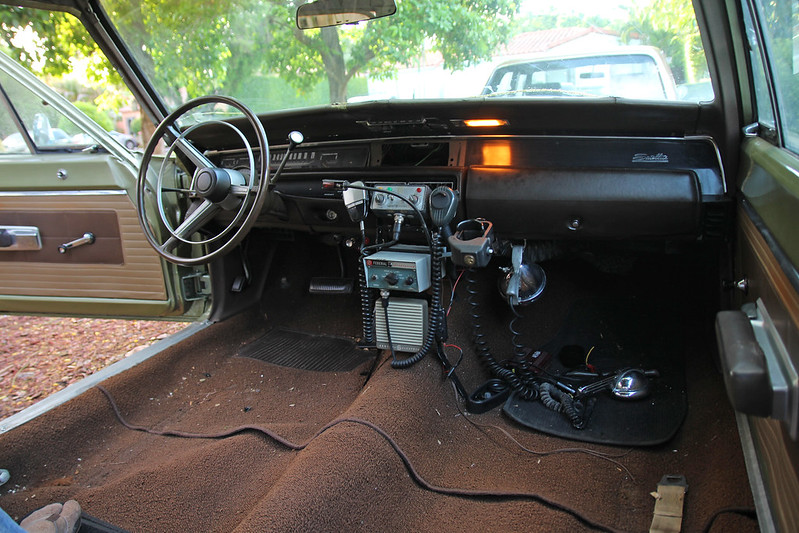
Reinstalled the carpet by cudak888, on Flickr

-Kurt
 
Hey, Kurt,
Did you re-use the old carpet, then? If so, came out really nice. Good job!
 
Hey, Kurt,
Did you re-use the old carpet, then? If so, came out really nice. Good job!

It's the same one that was in the car, but I'm quite certain that it's a replacement. It's too new and clean to have been the original, and the fit had to be tweaked a bit at the back seat. Not to mention that the belts had been lying unbolted on the floor ever since I bought the car.

Here it is just after I removed the front seat:

1968 Plymouth Satellite (Belvedere) - Seats Removed by cudak888, on Flickr

You can see the ugly accelerator pedal fit here:

1968 Plymouth Satellite (Belvedere) - Seats Removed by cudak888, on Flickr

1968 Plymouth Satellite (Belvedere) - Seats Removed by cudak888, on Flickr

And this picture was probably taken the day I brought it home, especially since the shotgun rack key is still in the lock:

1968 Plymouth Satellite Unmarked Squad Clone by cudak888, on Flickr

-Kurt
 
Very nice project! Did you ever get your lock hardware sorted out for the front doors? My son is stripping all the hardware off a pair of 4 door front doors from a 68 Coronet and doesn't have a use for any of the 4 door stuff. We were just going to use the door shells as test panels to spray with a couple colors as sort of full size swatches to use for deciding between Plum Crazy and B3. I don't know if the lock cylinders work right, but the rest of the hardware is all there. Would rather send it to someone who can use it than throw it out.
 
Very nice project! Did you ever get your lock hardware sorted out for the front doors? My son is stripping all the hardware off a pair of 4 door front doors from a 68 Coronet and doesn't have a use for any of the 4 door stuff. We were just going to use the door shells as test panels to spray with a couple colors as sort of full size swatches to use for deciding between Plum Crazy and B3. I don't know if the lock cylinders work right, but the rest of the hardware is all there. Would rather send it to someone who can use it than throw it out.

Thank you so much for the offer! I was lucky enough to score a very lightly used driver's lock mechanism along with an NOS passenger's unit for all of $55 on eBay (must have fallen through the cracks of all the watchers!). After much nonsense, I was also able to ascertain what I needed for the missing rod as well (and wound up with way too many 2-door spares in the process). Everything has since been installed and the driver's door readjusted - all works great now.

I thank you immensely for the offer of yours though. I'd take you up on it, but the rear locks work quite well too, so - fingers crossed - I should be set for a while.

Out of curiosity, are you keeping the door lock buttons though, and if not, by any chance, are they brown? One of them popped into two pieces on me while doing the carpet job, and I could definitely use one to replace it with.

-Kurt
They are brown and I think that at least 2 of them are in good shape (the other two are faded, according to my son). PM me your mailing address and I'll send you a pair.
 
Auto Transport Service
Back
Top