Took your advice and read this whole thread. You are indeed, KING of the documented builds. Even though I have a 63 Fury with a big block I thoroughly enjoyed your journey. Thanks for the knowledge and entertainment and I'll continue to follow along.
You are using an out of date browser. It may not display this or other websites correctly.
You should upgrade or use an alternative browser.
You should upgrade or use an alternative browser.
'68 Satellite 4-door light refurb...and big fat engine swap.
- Thread starter cudak888
- Start date
If someone used the same tie rod ends for inners and outers how did they get them to screw into the tie rod sleeve? They are right and left hand thread.
cudak888
Well-Known Member
You certainly have been on an adventure!
Every wheel stud front or rear, swedged or not. I had no problems banging them out with a 3lb mallet. On swedged studs a press will almost always bend the drum....
Were those original tie rod ends shot?
Adventure it has been, and last night even more so (more on that to follow - posting these replies first).
I'm not too concerned about the damage to the other front drum at this point. Last weekend, I did a semi-hard braking test from 70, and it started chattering and felt as if it was going to lock up and spin the car around. Not good!
The polished balls of the original tie rod ends were caked with solidified grease and felt really crummy - some were tighter than others and possibly usable, but I didn't care to chance it. All of them had cast-in Mopar part numbers, but all of them were also the same part number, while the books and Rock Auto specified a different tie rod end for the inside and the outside (and the parts I received did, indeed, have a different angle between the cup and the threaded part of the casting). Probably a dealer kludge from back in the day.
Took your advice and read this whole thread. You are indeed, KING of the documented builds. Even though I have a 63 Fury with a big block I thoroughly enjoyed your journey. Thanks for the knowledge and entertainment and I'll continue to follow along.
Why, thank you! Glad to see that you enjoyed the story. Reading big build threads is a particular pasttime of mine (one of my favorites is the 95-page build of the Jeep known as "Magnum Force" on JeepForums.com), and I like to return the favor in kind when I can
")
If someone used the same tie rod ends for inners and outers how did they get them to screw into the tie rod sleeve? They are right and left hand thread.
I was about to say that someone must have changed out the tie rod sleeve...but if they did that, I shouldn't have been able to install the new ones. Perhaps the 7-digit Mopar number on the ends is an engineering number? Every single one of those tie rod ends looked identical.
Now I'm ticked that I didn't save all four of them (I kept one to photograph). Damn!
-Kurt
cudak888
Well-Known Member
Back to the build - yesterday morning, I made the decision to rip out the Lokar cable and put the factory kickdown back in. I didn't like the amount of slack the Lokar system required, the way it barely cleared over one of the trans cooler lines, nor did I have any idea what ratio the 904's kickdown arm is.
The Lokar cable pulls a 1:1 ratio, but how should I know if the lever at the transmission was doing the same? After reading enough about fellows who had to re-drill the arm to get the proper actuation (see the photo below) I decided Ma Mopar had it right with their Rube Goldberg machine.
The next two photos are from the following Hot Rod Magazine article @ http://www.hotrod.com/articles/the-lowdown-on-stock-torqueflite-kick-down-linkage/

And even though I was up against five million variants of kickdowns, I'm pretty certain the 340-style kickdown is essentially identical to the 318's, with only the upper arm differing. Seems to match up with the 340 linkage in the photo below. Then again, I could be wrong.

And so I refurbished the linkage over the week and installed it on Saturday. Seems to work good, though the rear arm adjustment is really maxing out. But now that I look at the photo of all the linkages above, I think I cut and threaded the upper arm too short. This thing started life with a fixed slot for a Thermoquad, not a Carter, so it had a fixed slot. For better or worse, I cut it, threaded it, and put the slotted adjuster on it from the 318 linkage.
I might have made the mistake of matching up the overall length based on the position of the 318's 2-barrel arm on the bellcrank. In the worst of cases, I can always cut this one and the 318 linkage and weld them together to lengthen them. I won't do that until someone can get me the overall length of an original, unmodified 340 linkage arm though:

And in a massive victory of nothing that special to begin with, I took it that night to the local car show in Doral. This is the first time I've made a fully successful A-to-B trip with the car. The one run to Advance Auto when it was running like poop doesn't count in my book.
That said, the show was half rained-out to begin with when I got there. Only the Corvettes were left. And within 15 minutes, we were greeted with more rain and wind than we received with Hurricane Matthew. Did I mention that I still haven't shelled out for the $450 in door weatherstripping that this car still needs?
 1968 Satellite, 1968 Barracuda by cudak888, on Flickr
Believe it or not, the weatherstripping wasn't really an issue. I know the bottom edge of the rear window must leak, given the way water pools in the trunklid pivot supports in the trunk, but I returned to the car to find the top center of the window leaking onto the rear seat. And after a brief moment of surprise, I realized this confirmed what I believed all along: The rear window was resealed at one time, and they botched it up by omitting the rubber spacers at the bottom. The window slid down in its recess when the adhesive was curing, and the rest is history.
Perhaps that's why I wound up with this particular car - it was screaming for someone who would actually fix it correctly for a change.
Oh, and on one last note - I tried re-installing the starter splash shield (the steel one at the left rear of the K-frame, not the plastic ones up front) when I was buttoning up the kickdown. It will not fit anymore due to the longer idler arm, but the slot can be enlarged to suit. I'm not sure if a E-body/Challenger T/A splash shield would bolt in - one eBay seller claims the E-body splash shield also fits 1971/72 B-bodies. Can anyone here confirm if the framerail shape is the same for the '68-70s, before I spend any more money experimenting?
EDIT: The cheapest E-body splash shield on eBay is $75 bucks. $75 for a 40-year-old piece of ABS plastic? I'll cut up the original steel one, thank you!
-Kurt
The Lokar cable pulls a 1:1 ratio, but how should I know if the lever at the transmission was doing the same? After reading enough about fellows who had to re-drill the arm to get the proper actuation (see the photo below) I decided Ma Mopar had it right with their Rube Goldberg machine.
The next two photos are from the following Hot Rod Magazine article @ http://www.hotrod.com/articles/the-lowdown-on-stock-torqueflite-kick-down-linkage/
And even though I was up against five million variants of kickdowns, I'm pretty certain the 340-style kickdown is essentially identical to the 318's, with only the upper arm differing. Seems to match up with the 340 linkage in the photo below. Then again, I could be wrong.
And so I refurbished the linkage over the week and installed it on Saturday. Seems to work good, though the rear arm adjustment is really maxing out. But now that I look at the photo of all the linkages above, I think I cut and threaded the upper arm too short. This thing started life with a fixed slot for a Thermoquad, not a Carter, so it had a fixed slot. For better or worse, I cut it, threaded it, and put the slotted adjuster on it from the 318 linkage.
I might have made the mistake of matching up the overall length based on the position of the 318's 2-barrel arm on the bellcrank. In the worst of cases, I can always cut this one and the 318 linkage and weld them together to lengthen them. I won't do that until someone can get me the overall length of an original, unmodified 340 linkage arm though:
And in a massive victory of nothing that special to begin with, I took it that night to the local car show in Doral. This is the first time I've made a fully successful A-to-B trip with the car. The one run to Advance Auto when it was running like poop doesn't count in my book.
That said, the show was half rained-out to begin with when I got there. Only the Corvettes were left. And within 15 minutes, we were greeted with more rain and wind than we received with Hurricane Matthew. Did I mention that I still haven't shelled out for the $450 in door weatherstripping that this car still needs?
1968 Satellite, 1968 Barracuda by cudak888, on FlickrBelieve it or not, the weatherstripping wasn't really an issue. I know the bottom edge of the rear window must leak, given the way water pools in the trunklid pivot supports in the trunk, but I returned to the car to find the top center of the window leaking onto the rear seat. And after a brief moment of surprise, I realized this confirmed what I believed all along: The rear window was resealed at one time, and they botched it up by omitting the rubber spacers at the bottom. The window slid down in its recess when the adhesive was curing, and the rest is history.
Perhaps that's why I wound up with this particular car - it was screaming for someone who would actually fix it correctly for a change.
Oh, and on one last note - I tried re-installing the starter splash shield (the steel one at the left rear of the K-frame, not the plastic ones up front) when I was buttoning up the kickdown. It will not fit anymore due to the longer idler arm, but the slot can be enlarged to suit. I'm not sure if a E-body/Challenger T/A splash shield would bolt in - one eBay seller claims the E-body splash shield also fits 1971/72 B-bodies. Can anyone here confirm if the framerail shape is the same for the '68-70s, before I spend any more money experimenting?
EDIT: The cheapest E-body splash shield on eBay is $75 bucks. $75 for a 40-year-old piece of ABS plastic? I'll cut up the original steel one, thank you!
-Kurt
Last edited:
moparnation74
Well-Known Member
That shield is actually there to protect the automatic kickdown linkage and not the starter......they only came on AT cars....
I have a shield if you need one at a fraction of that cost for the plastic one. The only thing you have to replace is the rubber pad that attaches via staples. These are available through whomever carries rem products.
As for the tie rods I wasn't asking on the basis of pn's(which I know very well) but I was interested in any good ones...my cars are built for correctness and I never pass up those types of spare parts....
Carry on.....
cudak888
Well-Known Member
That shield is actually there to protect the automatic kickdown linkage and not the starter......they only came on AT cars....
I have a shield if you need one at a fraction of that cost for the plastic one. The only thing you have to replace is the rubber pad that attaches via staples. These are available through whomever carries rem products.
As for the tie rods I wasn't asking on the basis of pn's(which I know very well) but I was interested in any good ones...my cars are built for correctness and I never pass up those types of spare parts....
Carry on.....
Interesting - I take it Chrysler engineers feared the pivots would rust and potentially jam the throttle? Just curious what the design philosophy was behind it. Ironically enough, I spent most of my drive from the car show through puddles. Good thing I greased every single pivot!
Send me a PM, let me know what you want for the shield. Also, I'd be glad to give you the one tie rod I have left, even if the deal for the shield doesn't go through.
-Kurt
Last edited:
cudak888
Well-Known Member
Took a few photos in homage to Gone in 60 Seconds today. LAPD, meet 6-1-4-Henry-Sam-Ocean:
[url=https://flic.kr/p/Mm8Dnz] Gone in 60 Seconds by cudak888, on Flickr[/URL]
 LAPD, meet Eleanor. by cudak888, on Flickr
 Los Angeles City Ford: 614 HSO by cudak888, on Flickr
-Kurt
[url=https://flic.kr/p/Mm8Dnz]
Gone in 60 Seconds by cudak888, on Flickr[/URL]LAPD, meet Eleanor. by cudak888, on FlickrLos Angeles City Ford: 614 HSO by cudak888, on Flickr-Kurt
cudak888
Well-Known Member

Dropped the gas tank today (3/4 full! Not fun!) to swap out the leaky sender lockring that was installed with the repop sender that the PO stuffed in this car.
Incidentally, please never route the tank vent lines like you see here (with a U-shaped tube). That was done only to prevent spills when bringing it down.

When I was searching for the issue of leaky repop sender lockrings, not once could I find an actual comparison photo that would give me an idea of what to look for - visually - between the crappy repops and the good repops. So, without further ado, here are two closeup comparisons between the way-too-thin "packaged with sender" replacement lockring, and the properly reproduced part I bought from Bill Rolik Enterprises:


I'm sure I won't have to explain which is which; the difference is painfully obvious.
-Kurt
cudak888
Well-Known Member
Spent the day yanking out the leaky rear window today and resealing it. Popped it out without much fuss using a bicycle shifter cable:
 Plymouth Satellite rear window resealing by cudak888, on Flickr
 Plymouth Satellite rear window resealing by cudak888, on Flickr
Cable got it out with little fuss, and single-handedly too (barely long enough, but was able to pull from the opposite side of the car).
Flange is pretty darn good overall, but I found a crapload of filler in the corners, which explains why I was getting water in the trunk. Stinkin' Bondo magnet!
Since it's painted and I don't want this thing to become The Eternal Project Car (I've got a '71 Mustang awaiting proper metalworking skills after I'm done with this thing), I poked out whatever rust was left, filled up all the leaking pinholes with JB Weld, and called it a day:
 Plymouth Satellite rear window resealing by cudak888, on Flickr
Had to put in some trim clips too. I put JB Weld behind each of them to prevent further leaks:
 Plymouth Satellite rear window resealing by cudak888, on Flickr
Window flange cleaned up really nicely with Goof Off:
 Plymouth Satellite rear window resealing by cudak888, on Flickr
Getting ready to go back down - with a set of factory window spacers at the bottom to make sure the thing would sit right this time:
 Plymouth Satellite rear window resealing by cudak888, on Flickr
 Plymouth Satellite rear window resealing by cudak888, on Flickr
Window ready to go in. Used 3M Single Step Primer on the window and the pinchweld and 3M urethane Windo-Weld as an adhesive. No butyl:
 Plymouth Satellite rear window resealing by cudak888, on Flickr
Bam - perfect install:
 Plymouth Satellite rear window resealing by cudak888, on Flickr
Thanks to forum member '68 Charger, I didn't have to reinstall the crappy trim that came with the car either; this is a beautiful replacement set from a '70 Coronet:
 Plymouth Satellite rear window resealing by cudak888, on Flickr
-Kurt
Plymouth Satellite rear window resealing by cudak888, on FlickrPlymouth Satellite rear window resealing by cudak888, on FlickrCable got it out with little fuss, and single-handedly too (barely long enough, but was able to pull from the opposite side of the car).
Flange is pretty darn good overall, but I found a crapload of filler in the corners, which explains why I was getting water in the trunk. Stinkin' Bondo magnet!
Since it's painted and I don't want this thing to become The Eternal Project Car (I've got a '71 Mustang awaiting proper metalworking skills after I'm done with this thing), I poked out whatever rust was left, filled up all the leaking pinholes with JB Weld, and called it a day:
Plymouth Satellite rear window resealing by cudak888, on FlickrHad to put in some trim clips too. I put JB Weld behind each of them to prevent further leaks:
Plymouth Satellite rear window resealing by cudak888, on FlickrWindow flange cleaned up really nicely with Goof Off:
Plymouth Satellite rear window resealing by cudak888, on FlickrGetting ready to go back down - with a set of factory window spacers at the bottom to make sure the thing would sit right this time:
Plymouth Satellite rear window resealing by cudak888, on FlickrPlymouth Satellite rear window resealing by cudak888, on FlickrWindow ready to go in. Used 3M Single Step Primer on the window and the pinchweld and 3M urethane Windo-Weld as an adhesive. No butyl:
Plymouth Satellite rear window resealing by cudak888, on FlickrBam - perfect install:
Plymouth Satellite rear window resealing by cudak888, on FlickrThanks to forum member '68 Charger, I didn't have to reinstall the crappy trim that came with the car either; this is a beautiful replacement set from a '70 Coronet:
Plymouth Satellite rear window resealing by cudak888, on Flickr-Kurt
Last edited:
Nice work!
jeepers007
Well-Known Member
Great info on the rear window. Was the trim from the '70 also off a more-door?
cudak888
Well-Known Member
Great info on the rear window. Was the trim from the '70 also off a more-door?
Yes, the replacement trim was from a 4-door Coronet. None of the Plymouth or Dodge 2-doors have rear window trim that can exchange with the 4-doors.
-Kurt
cudak888
Well-Known Member
Just a heads up - the big video I've been promising for the last year will be out tonight at 12 midnight EST on YouTube at the following channel: https://www.youtube.com/user/cudak888
Here's a teaser trailer I posted to Twitter:
-Kurt
Here's a teaser trailer I posted to Twitter:
-Kurt
cudak888
Well-Known Member
It's up!
-Kurt
-Kurt
cudak888
Well-Known Member

Guess what I did today?


The 2.76:1's got ousted for 3.23:1's today.
Unfortunately, I screwed up setting the axle endplay a tad too tight, so I've got to go back in there and re-adjust it again tomorrow...and I'll probably be aching all over worse than I am now.
At any rate, a quick spin around the block is much improved
I also tried to throw the Konis on it, but found the shock mount on the spring plate to be slightly too large in diameter for the lower eyelet. Also a bit too long too. Wonder what's going on there...
-Kurt
Last edited:
cudak888
Well-Known Member
Not sure where I left off here, but since my last post, I slammed 11" Budd drums on the back. Ran into a problem where it looks like the thrust block is somehow worn down about 1/8" and causing the right side drum to rub (full story: http://www.forbbodiesonly.com/mopar...-sits-deeper-after-diff-swap-whats-up.125064/). I shaved a bit of the backing plate to clear it for now, and will address the damn center section again another time.
In the meantime, some Budd 11" goodness (from FABO's whitepunkonnitro - awesome guy, excellent parts, and always super reasonably priced).

And then I'm still fighting an ordeal with the gas tank blowing fuel out the J tube as it can't purge out all the pressure in it without taking half the gas with it. That thread is here for anyone who wants to read that debacle, and what I've engineered as a fix (http://www.forbbodiesonly.com/mopar...s-during-every-drive-blows-out-j-tube.125561/). And for the record, I tried the JB-Weld-a-vent-on-the-cap trick, and the gas caused the JB Weld to start shrinking and peeling (!)
That brings me to the NEXT disaster from last Saturday. All my parts came in for the brake line conversion to the rear (except the clamp for the proportioning valve - and Classic Industries wants $18 for that little piece of crap!), but I just had to remove the master cylinder reinforcement off the firewall to get rid of the brush paint on it...didn't I?
Well, I spent FIVE STINKING HOURS trying to do this. Yea, I know, you're not supposed to do it with the dash on. So it escalated quickly into a nightmare:

Note to self that night: "This wasn't supposed to happen."
Also busted the dimmer switch when pulling the lower switch panel - plastic bit of it cracked in two. However, I highly suspect it cracked when I reconnected it after restoring the lower switch panel earlier last year, as it was working on removal, and not on re-installation then. It just decided to come to a head now and snag when I needed the panel out. At any rate, that cracked switch took aobut 30 minutes of that five-hour affair just to free it.

Now, the real kicker is that once I was able to get to the master cylinder reinforcement's upper inboard nut, it took ANOTHER 30 minutes to get the damn plate out, as the holes on the firewall and the brake assembly were BARELY aligned with each other. Result? Pound it out, and pound it in.
And even though I was in the mood to strangle every Mopar engineer in sight that night, I was able to achieve this by the end of the day - plus a successful bench bleeding:

Perhaps the only bright thing about this is that I now have a complete excuse to restore my gauge panel (mostly polishing a whole lot of grit that looked like paint splatter off the clear lens), which I got functioning - including both the gas and temp gauges - and do the ammeter-to-voltmeter conversion. Speaking of which, I loathe my repaint of the gas gauge indicator.

Now the real question will be if I can get the rear brake line pipe fittings off the distribution valve without rounding them out. Going to cut the lines and use a 6-point hex. And somehow, I'm not convinced it'll work...
-Kurt
In the meantime, some Budd 11" goodness (from FABO's whitepunkonnitro - awesome guy, excellent parts, and always super reasonably priced).
And then I'm still fighting an ordeal with the gas tank blowing fuel out the J tube as it can't purge out all the pressure in it without taking half the gas with it. That thread is here for anyone who wants to read that debacle, and what I've engineered as a fix (http://www.forbbodiesonly.com/mopar...s-during-every-drive-blows-out-j-tube.125561/). And for the record, I tried the JB-Weld-a-vent-on-the-cap trick, and the gas caused the JB Weld to start shrinking and peeling (!)
That brings me to the NEXT disaster from last Saturday. All my parts came in for the brake line conversion to the rear (except the clamp for the proportioning valve - and Classic Industries wants $18 for that little piece of crap!), but I just had to remove the master cylinder reinforcement off the firewall to get rid of the brush paint on it...didn't I?
Well, I spent FIVE STINKING HOURS trying to do this. Yea, I know, you're not supposed to do it with the dash on. So it escalated quickly into a nightmare:
Note to self that night: "This wasn't supposed to happen."
Also busted the dimmer switch when pulling the lower switch panel - plastic bit of it cracked in two. However, I highly suspect it cracked when I reconnected it after restoring the lower switch panel earlier last year, as it was working on removal, and not on re-installation then. It just decided to come to a head now and snag when I needed the panel out. At any rate, that cracked switch took aobut 30 minutes of that five-hour affair just to free it.
Now, the real kicker is that once I was able to get to the master cylinder reinforcement's upper inboard nut, it took ANOTHER 30 minutes to get the damn plate out, as the holes on the firewall and the brake assembly were BARELY aligned with each other. Result? Pound it out, and pound it in.
And even though I was in the mood to strangle every Mopar engineer in sight that night, I was able to achieve this by the end of the day - plus a successful bench bleeding:
Perhaps the only bright thing about this is that I now have a complete excuse to restore my gauge panel (mostly polishing a whole lot of grit that looked like paint splatter off the clear lens), which I got functioning - including both the gas and temp gauges - and do the ammeter-to-voltmeter conversion. Speaking of which, I loathe my repaint of the gas gauge indicator.
Now the real question will be if I can get the rear brake line pipe fittings off the distribution valve without rounding them out. Going to cut the lines and use a 6-point hex. And somehow, I'm not convinced it'll work...
-Kurt
cudak888
Well-Known Member
For those who are still with me, the whole front end brake and suspension swap went to hell last weekend when the new 11.75" rotors turned out to be machined incorrectly. The whole fiasco is covered here: http://www.forbbodiesonly.com/mopar...endix-prt1132-11-75-disc-brake-rotors.126393/
But at least I have a photo for bragging rights
 Centerbores out of spec on new Bendix PRT1132 11.75" disc brake rotors by cudak888, on Flickr
Jokes aside, the whole brake deal forced me to throw a tire on my '80s B150 spare rim, and that wound up in an epiphany: The car looks really, really good with the stock-looking black rim over the Dippy police rims:
 1968 Plymouth Belvedere (Satellite) w/P235/75/R15s by cudak888, on Flickr
 1968 Plymouth Belvedere (Satellite) w/P235/75/R15s by cudak888, on Flickr
 1968 Plymouth Belvedere (Satellite) w/P235/75/R15s by cudak888, on Flickr
 1968 Plymouth Belvedere (Satellite) w/P235/75/R15s by cudak888, on Flickr
And so now I've got my fingers crossed that I'll find four more of these stinkin' rims (I had a chance to get all four of these from the junkyard when I got this one...and they're now probably a twisted mass of metal - GRR!) at the Florida Nats tomorrow.
-Kurt
But at least I have a photo for bragging rights
Centerbores out of spec on new Bendix PRT1132 11.75" disc brake rotors by cudak888, on FlickrJokes aside, the whole brake deal forced me to throw a tire on my '80s B150 spare rim, and that wound up in an epiphany: The car looks really, really good with the stock-looking black rim over the Dippy police rims:
1968 Plymouth Belvedere (Satellite) w/P235/75/R15s by cudak888, on Flickr1968 Plymouth Belvedere (Satellite) w/P235/75/R15s by cudak888, on Flickr1968 Plymouth Belvedere (Satellite) w/P235/75/R15s by cudak888, on Flickr1968 Plymouth Belvedere (Satellite) w/P235/75/R15s by cudak888, on FlickrAnd so now I've got my fingers crossed that I'll find four more of these stinkin' rims (I had a chance to get all four of these from the junkyard when I got this one...and they're now probably a twisted mass of metal - GRR!) at the Florida Nats tomorrow.
-Kurt
jeepers007
Well-Known Member
Kurt, have you had a chance to weather test your rear window reseal?
Like the bike cable idea. Where did you get the window suction cups, btw?
Like the bike cable idea. Where did you get the window suction cups, btw?
cudak888
Well-Known Member
Kurt, have you had a chance to weather test your rear window reseal?
Like the bike cable idea. Where did you get the window suction cups, btw?
I have. That trunk now stays dry as can be under any monsoon!
Window suction cups are from my video camera hood-mount suction cup system. It looks something like this when assembled:
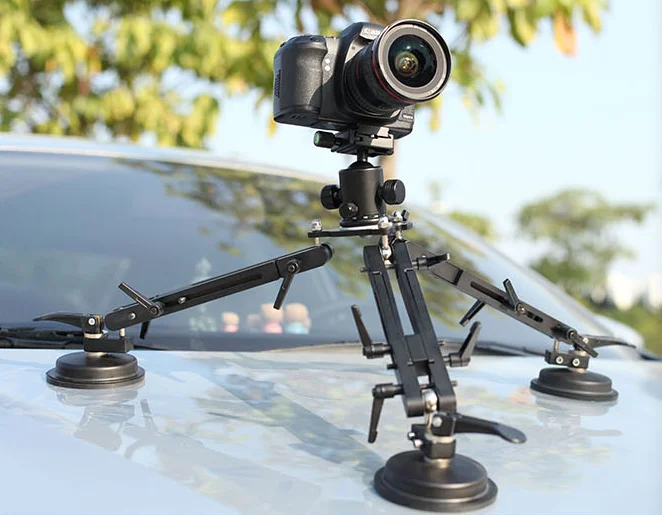
-Kurt
cudak888
Well-Known Member
Have had zero luck finding a set of those '80s van rims, but finally buttoned up the disc brake conversion (sans UCA alignment and tie-rod adjustment) today. Discs are the replacements from Bendix and fit perfectly - I quickly shot them with a bit of high-temp black paint before having one of the local shops machine the surface. Figured it'd be better to have a lathe-cut surface with the new pads, and I didn't have to mask off anything to get a nice look. Plus, less rust.
 F/M/J Disc Brake Swap on '68 B-body by cudak888, on Flickr
FYI: Those drilled rotors that I tried earlier had a completely crap fit with the dust caps. Either way, I had to bash them to make them work. Not that concerned about it.
While I was at it, I snapped some photos of the infamous anti-rattle rubber bands. Yes, this is how you install them. Dum-dum engineering for the win:
 Mopar anti-rattle rubber band by cudak888, on Flickr
 Mopar anti-rattle rubber band by cudak888, on Flickr
 Mopar anti-rattle rubber band by cudak888, on Flickr
I almost wasn't able to bleed the brakes, because the Googling I did about a year ago for this project mistakenly led me to believe that M-body brake hoses would work when converting a 1968-70 B-body to rear-mounted F/M/J-body calipers. WRONG. These guys are indexed at the framerail tab with a single notch, not a 6-point hex. Did some more Googling today, and found out that 1969-72 Camaro/Nova brake lines are the ticket.
Here's a comparison - F/M/J front disc hose at left, B-body front drum hose in the center, '69 Camaro hose at far right. The brake caliper end isn't identical to the Mopar one, but it works fine. It's about 15" from end to end:
 F/M/J Disc Brake Swap on '68 B-body by cudak888, on Flickr
 F/M/J Disc Brake Swap on '68 B-body by cudak888, on Flickr
 F/M/J Disc Brake Swap on '68 B-body by cudak888, on Flickr
And here's how they fit on the car at each lock-to-lock extreme with the suspension fully extended:
 F/M/J Disc Brake Swap on '68 B-body by cudak888, on Flickr
 F/M/J Disc Brake Swap on '68 B-body by cudak888, on Flickr
And so that was my Saturday.
Another thing - if anyone here is seriously considering doing this swap, do yourself a favor and just get Cass' kit at Dr. Diff. You'll wind up spending twice that trying to do it piecemeal (even if you buy the stuff used), because half of what you buy will probably be the wrong thing (and you won't figure it out until later).
-Kurt
F/M/J Disc Brake Swap on '68 B-body by cudak888, on FlickrFYI: Those drilled rotors that I tried earlier had a completely crap fit with the dust caps. Either way, I had to bash them to make them work. Not that concerned about it.
While I was at it, I snapped some photos of the infamous anti-rattle rubber bands. Yes, this is how you install them. Dum-dum engineering for the win:
Mopar anti-rattle rubber band by cudak888, on FlickrMopar anti-rattle rubber band by cudak888, on FlickrMopar anti-rattle rubber band by cudak888, on FlickrI almost wasn't able to bleed the brakes, because the Googling I did about a year ago for this project mistakenly led me to believe that M-body brake hoses would work when converting a 1968-70 B-body to rear-mounted F/M/J-body calipers. WRONG. These guys are indexed at the framerail tab with a single notch, not a 6-point hex. Did some more Googling today, and found out that 1969-72 Camaro/Nova brake lines are the ticket.
Here's a comparison - F/M/J front disc hose at left, B-body front drum hose in the center, '69 Camaro hose at far right. The brake caliper end isn't identical to the Mopar one, but it works fine. It's about 15" from end to end:
F/M/J Disc Brake Swap on '68 B-body by cudak888, on FlickrF/M/J Disc Brake Swap on '68 B-body by cudak888, on FlickrF/M/J Disc Brake Swap on '68 B-body by cudak888, on FlickrAnd here's how they fit on the car at each lock-to-lock extreme with the suspension fully extended:
F/M/J Disc Brake Swap on '68 B-body by cudak888, on FlickrF/M/J Disc Brake Swap on '68 B-body by cudak888, on FlickrAnd so that was my Saturday.
Another thing - if anyone here is seriously considering doing this swap, do yourself a favor and just get Cass' kit at Dr. Diff. You'll wind up spending twice that trying to do it piecemeal (even if you buy the stuff used), because half of what you buy will probably be the wrong thing (and you won't figure it out until later).
-Kurt
Similar threads
- Replies
- 23
- Views
- 1K
- Replies
- 3
- Views
- 1K


