You are using an out of date browser. It may not display this or other websites correctly.
You should upgrade or use an alternative browser.
You should upgrade or use an alternative browser.
1966 Coronet 500 Convertible Retoration - SassyPants :-)
- Thread starter SassyPants
- Start date

Car Nut
Well-Known Member

daytona kid
Well-Known Member
X2:happy1:
SassyPants
Well-Known Member


Jeremiah
Well-Known Member
What a cool car. Remind me again...361 2-barrel? We looked lond and hard for a 1966 Coronet 500 Convertible 383-4, 4-speed car before we found out automatic car. Your combo will drive like a dream. I used to work on a '66 Charger with a 361-2/4-speed combo and it was very responsive for being so smooth!
Keep the progress pics coming!
Keep the progress pics coming!
SassyPants
Well-Known Member
Hello everyone, When we had our car Media Blasted I took this Pic of just under the Cowl, Rider's Side. Anyone ever seen anything like this before? I have not.

Nice! I'm working on a 66 500 convert 361/auto. Keep every d**n screw+ clip!
SassyPants
Well-Known Member
Yep, I throw away NOTHING until a new or refurbished one is on the car. We are trying to stay as close to Original as we can afford. It has been a journey. Best, B.
Slap Stick
Well-Known Member
Weirkote is the brand name for galvanized steel made by the Weirton steel company.
ArcelorMittal was formed by the takeover of Arcelor (Spain/France/Luxembourg owned) by Mittal Steel (India).
You would be surprised to see who owns much of our steel industry.
ArcelorMittal was formed by the takeover of Arcelor (Spain/France/Luxembourg owned) by Mittal Steel (India).
You would be surprised to see who owns much of our steel industry.
Last edited:
SassyPants
Well-Known Member
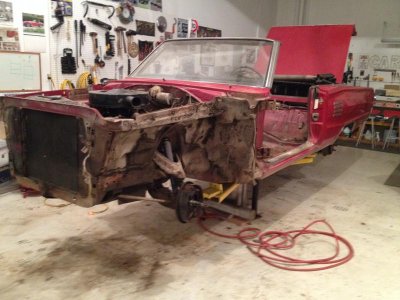
I am beginning to do some catch up on the 66 Coronet Resto. I just had not taken the time to post many pics as I went along. So, there will be a few coming your way. These have been a long time coming, so forgive me. Some are 4 ish years old. Grease Ball, you might say. Underside shot before going to the Strippers and then hard labor on getting some of the caked grease off the engine.


Last edited:
SassyPants
Well-Known Member
Here are some more starting with one that has the car pretty much disassembled. then back from the Strip Joint and you can see there is some work to do on this Kansas car.


SassyPants
Well-Known Member
Here are some more. First, in the old shop. Wait a minute, that is not a MOPAR in the foreground ") . Metal work done, starting body work, Car off to final Body Work and Paint, and finally, the Block Casting number. Car is Numbers Matching.
. Metal work done, starting body work, Car off to final Body Work and Paint, and finally, the Block Casting number. Car is Numbers Matching.


. Metal work done, starting body work, Car off to final Body Work and Paint, and finally, the Block Casting number. Car is Numbers Matching. SassyPants
Well-Known Member
Starting to get parts restored. Put at least High Heat Engine Paint on the parts, some got the VHT heat paint and all parts were Baked to set the paint, except the Diff. It is Engine paint. Then one shot of some parts on the car.


SassyPants
Well-Known Member
First shot, Engine Bay awaiting Engine/Trans. Engine at the Engine Builders, Engine/Trans ready to go home. Front K Member and front suspension ready to receive the engine.


SassyPants
Well-Known Member
Engine/trans home and in the car. Underside with exhaust installed. The car heads to the Top Guy to get the top on.


SassyPants
Well-Known Member
So, this is it for today. It gets us pretty close to where we are after 5 years. The trunk is on with the Coronet 500 Tail panels. I put in the old Carpeting as it was important that it was kept for nearly 5 years to use as reference for the new instal. I never throw ANYTHING away until the new/restored parts are ON the car. Finally, new tires on the back with trim, just because I wanted to see what it looks like. You can also see the first real scratch we put on the car while unloading it from the Top Instal. Best to you all, B.


SassyPants
Well-Known Member
Here is a pic of Sassy Pants and her car in summer of 1974. Two years after this it became her High School Ride. It went into a barn after she got out of High School and we got it out about 5 years ago to start the adventure of bringing her back to life.

SassyPants
Well-Known Member
Folks, today I finished with putting in the Master Cylinder and Bleeding the brakes. Sassy Pants herself was on the brake pedal today.
Yesterday I tried to do the Bleeding with Gravity Feed. No luck. Today we did the pump/release method and got it squared. What I can tell you is that getting to the bleeders on the Front wheels was a bugger with the bleeder tubes on. Had to make a slight mod on a 7 mm wrench using the vice and some strong arm to get a nice bend in it.
Tomorrow, hopefully the Steering Column. Best to all, B.
SassyPants
Well-Known Member
Similar threads


