• When you click on links to various merchants on this site and make a purchase, this can result in this site earning a commission. Affiliate programs and affiliations include, but are not limited to, the eBay Partner Network.

Tips and tricks for a '73 RR dash removal

manic_mopar

Well-Known Member
Local time
4:07 PM
Joined
Sep 9, 2016
Messages
119
Reaction score
56
Location
Houston
Hey all. My dad is coming out here to hang out for a week and we have some projects lined up for the car! Complete dash removal, new insulation, plug up the firewall, and new dash harness is the main objective. Door hinge rebuild is the other main task.

For the dash, my search didnt come up with a ton of info on this year dash. I saw that the steering column needs to be lowered, maybe remove the front seats to make it easier. Any other helpful tips on making this an easy process? I still need to jump into one of my books and see what the factory recommends.
 
Remove kick panels, A pillar molds... need to remove top inner windshield mold, side headliner molds and door sill plates to make this easier.

-Unplug any body to dash related item:
Antenna cable
AC vacuum lines ( there is a multiport plug around brake pedal brackets )
Hazzard flasher and brake light switch wires around brake pedal brackets
AC-heater resistor plug at box
Vacuum line coming from engine bay ( there is a check valve you can unplugg )
Heater wire coming from engine bay at heater control
Passenger side door jam switch
If console, orange wire at pasenger kick area
If 74, interlock sensors harness at passenger kick area
Driver side door jam switch wires
Remove floor dimmer switch plug from floor ( 2 1/4" hex heads screws )
Unplug rear lighting harness, dome light harness, emergency brake wire ( rear deffog, powered window harness and speakers if equipped ) and seat/seatbelt sensors harness if 72/73 on driver side kick area
Release wiring from driver side kick area wiring body looms.
Loose bulkhead/fuseblock assembly from firewall ( two 7/16 nuts on engine bay side )
Any other acc wiring going through firewall with grommet if equipped ( AC harness if 74, tach wire if equipped )
If cruise control, harness can keep on car, just unplugg it from the main harness ( blue and black wires around )
Speedo cable from cluster.
Unplug ign switch, turning switch, ign key courtesy light switch if equipped.

Drop steering column. 2 7/16" hex head nuts and one bolt same size on bracket. Just the 2 nuts if 74.

If 71/73, there are two 1/2" bolts on steering column bracket at firewall bracket what removing them will give you more play with steering column to let it drop. 74s don't need that since they play more free.

Speaker grill: 3 phillip screws and 4 1/4" hex head around windshield vents. Keep them safe to not drop them throught the windshield vents!

4 3/8" hex heads close to the glass on top of firewall to dash frame

Two 7/16" hex bolts on sides of dash frame at kick panel area. DON'T remove them just get them loose. Those bolts will help you on keep the weight safe on them

Be sure you don't have ANYTHING able to keep hooked to the body down the dash frame while removing

Lift the full frame dash assembly a bit to release it from the top of firewall provisions and let it drop to you, then will be ble to pull out the full assembly. Watch out the steering column brackets studs, they will remain on car and can disturb a bit the process. It can be removed though!

I have being able to do it with seats and console in place, but if you want can remove them if you feel more comfortable doing it... honestly I don't think is necesary

No need two persons to remove it, but WAY better to be sure won't get any wire accidentally being hooked around while pulling it out. Also playing as assistant to get it out through the door access.

Easier through the passenger side door due the steering column will be in the middle if doing it at driver side

I think that sums pretty much all
 
Last edited:
Ah yeah what he said!
Wow that's the most accurate instructions I've ever seen you my friend are a bad *** in dash removal. Thank you for your input on this site I'm sure others will need this info can we make this a sticky!
 
Nacho you are the man! Thanks so much for the detailed description. Cant wait to not have little fiery hot air jets blasting through the unplugged holes of the firewall! Lol
 
I would recommend taking the few extra steps to remove the column altogether, knock out the coupler roll pin, get the column out of the way completely. IMO, removing the two column mounting studs from the pedal bracket is a must do, allows the dash frame to pivot back before lifting off the two outboard bolts. Allows further access to possible remaining connections.
 
If decide remove the column, then unbolt completelly the firewall bracket and not just the two bolts I mentioned, because the rag joint won't go through the small hole of the small braket I told. The small bracket I told hold by two 1/2" bolts is mounted on the big one attached to firewall with 3 1/2" bolts
 
Is that to suggest you can “Drop” the column sufficiently without unbolting the larger column firewall filler plate? If so, would have to disagree. Un-bolting the smaller o-ring clamping plate only, would not allow the column to drop very far at all.
 
Last edited:
And the 74 didn't even need that. They don't have that bracket LOL. But column shaft is more articulated on engine bay side.

( just posting what I have made, not telling I'm right or wrong)
 
Ah yeah what he said!
Wow that's the most accurate instructions I've ever seen you my friend are a bad *** in dash removal. Thank you for your input on this site I'm sure others will need this info can we make this a sticky!
Need to add one very important step. Disconnect the battery cables. Both of them.
 
Ok, well I could jump some step, but as I told on my first reply... that sums out pretty much all

Any extra advice will be welcomed.

And as I told, can't recall need to remove the full column althought won't hurt to remove it or loose the firewall bracket. I didn't need on my 74 ( not even loose it from firewall ) or recall need it on the 72 ( just the bearing bracket ) AS FAR I recall.
 
I really appreciate all the input guys! gonna tackle it this week.
 
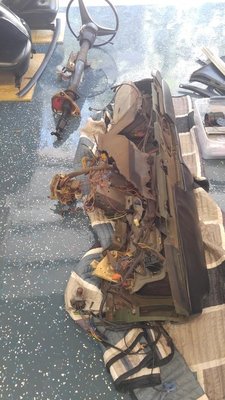
Just did this on my '73 road runner. I removed the seats and steering column. Made it easy to maneuver the dash frame out of the car.

I used Nacho's list, pasted it into Word to edit it. I then itemized it into bullet points, and checked them off as I took care of each item. Nacho's list is great!

Couple of areas to double-check, be sure the antenna wire is completely detached, and be sure the HVAC control cables are free from the braces that reinforce the pedal assembly.

IMG_1589.JPG
 
I did a similar thing too redrunner. Got it out! Now to clean it up and get to the real work.

0727171252.jpg
 
Isn't really HARD to do it, right?, just be patiente and double check on every harness or anykind of line being out of the way... Fortunatelly we don't have to remove the windshield like earliers!
 
Yeah it really wasnt too hard at all. Like you said, patience pays with this job. I can already see 10 other things i want to replace on this thing down the road. Guess ill tackle that stuff whenever i get AC this winter. Your check list worked great nacho. Thanks again. We wnt ahead and removed the seats and steering column since it was easy enough to di. Made it way more easy and comfortable to work on.
 
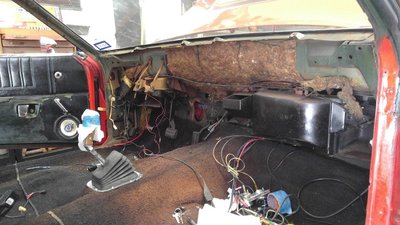
Has anyone replaced this insulation or know where to get it from? I dont see it listed anywhere and would love to update it.

0727171252a.jpg
 
I simply will use anything available locally. Maybe that suff used for air conditioning ducts insulation ( not the yellow fiberglass ) or dynamat. I can't spend money bringing stuff from USA anymore.

Upholstery shops use to have a similar material made with gray cotton.
 
Last edited:
Auto Transport Service
Back
Top