You are using an out of date browser. It may not display this or other websites correctly.
You should upgrade or use an alternative browser.
You should upgrade or use an alternative browser.
Ramcharger/Air Grabber Plastic?
- Thread starter hunt2elk
- Start date
moparnation74
Well-Known Member
Call this gent....he will guide you in what you need.....
https://m.facebook.com/AIRGRABBERRESTORATION/
https://m.facebook.com/AIRGRABBERRESTORATION/
How about 3D print parts ?
- Local time
- 12:56 PM
- Joined
- Jan 29, 2018
- Messages
- 21,479
- Reaction score
- 68,040
- Location
- Midland Ontario, Canada
JB Weld Plastic Bonder worked great for me....
Starts at Post 208 and continues onto the next page or more.
https://www.forbbodiesonly.com/mopa...ge-super-bee-coupe-restoration.145777/page-11
Starts at Post 208 and continues onto the next page or more.
https://www.forbbodiesonly.com/mopa...ge-super-bee-coupe-restoration.145777/page-11
Photon440
Well-Known Member
- Local time
- 9:56 AM
- Joined
- Mar 14, 2012
- Messages
- 18,489
- Reaction score
- 34,038
- Location
- Surrey, B.C. Canada
The parts are fiberglass produced in a closed mold under pressure. You can get a good repair with the other suggestions - JB Weld is mostly epoxy resin, and the fiberglass resin idea is great too but in either case you'll need something to bridge the gaps. Preferably more strands of fiberglass or pieces of glass matting. Tear the patches to shape instead of cutting so you get feathered edges.
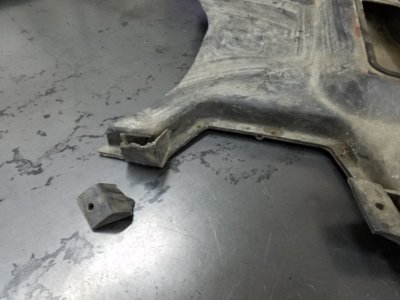
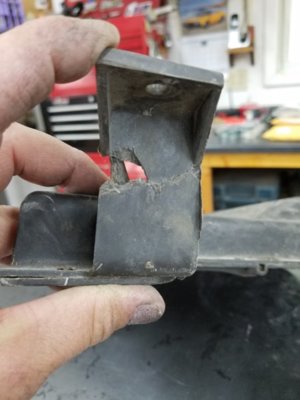
To be as effective as possible, all traces of cracked and fractured material should be ground off, even at the risk of making the damaged area larger. You'll need so have some way of keeping things perfectly aligned while the new material sets, so if it's flat on both sides that would be helpful. Your picture shows that some of it is still able to be fitted together so you're in luck. Rather than attempting the entire repair in a single operation, I would do it in steps.
Using the area that still fits, use some JB Weld to glue it back together, fitting as tightly as you can and fixing it so that it stays in the right position while curing. After that step, you can go to work with a small disk on a die grinder and actually thin down the area that has already been glued, so you can put on a stronger layer of real fiberglass and resin without making the part thicker in the end.. The glue was just to hold it in place, not as the actual repair.
Now, you can either fill the voids with layers of fiberglass and resin, keeping the ratio of resin low so that it's as much glass as possible and then clamp flat wood on either side to keep it compressed while it cures - wax paper first will keep the wood from sticking - or you can use pre-made material such as long strand fiberglass filler in a can to do the filling. Either way, I would use the wood and clamps which will put pressure on the part to force the mix into the existing parts and fill any hidden cracks as well. Plus it will help squeeze out excess resin.
This is a lot of work but in the end you'll end up with a solid piece this way. Careful grinding and sanding to shape will make it almost invisible and it will be strong. You can make it stronger still if you use epoxy resin instead of polyester resin. Epoxy is harder to find (boat repair places or specialty fiberglass supply stores have it) and costs more but it's twice as strong and has far less smell. However it also usually requires warmer weather to work in.
Yep, already checked your thread out Wayne. Just thought I would ask to see if there is a product used specifically for this material.JB Weld Plastic Bonder worked great for me....
Starts at Post 208 and continues onto the next page or more.
https://www.forbbodiesonly.com/mopa...ge-super-bee-coupe-restoration.145777/page-11
- Local time
- 12:56 PM
- Joined
- Jan 29, 2018
- Messages
- 21,479
- Reaction score
- 68,040
- Location
- Midland Ontario, Canada
I hate playing with fiberglass.. why I took the JB route and it work VERY well (and it's close to the correct colour). I tried to snap the tabs off that I repaired after it cured and I was going to break the OE material before the repaired section if I tried any harder.
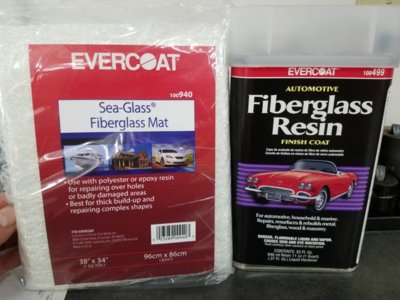
I like your recommendation. Is this the stuff I should use?The parts are fiberglass produced in a closed mold under pressure. You can get a good repair with the other suggestions - JB Weld is mostly epoxy resin, and the fiberglass resin idea is great too but in either case you'll need something to bridge the gaps. Preferably more strands of fiberglass or pieces of glass matting. Tear the patches to shape instead of cutting so you get feathered edges.
To be as effective as possible, all traces of cracked and fractured material should be ground off, even at the risk of making the damaged area larger. You'll need so have some way of keeping things perfectly aligned while the new material sets, so if it's flat on both sides that would be helpful. Your picture shows that some of it is still able to be fitted together so you're in luck. Rather than attempting the entire repair in a single operation, I would do it in steps.
Using the area that still fits, use some JB Weld to glue it back together, fitting as tightly as you can and fixing it so that it stays in the right position while curing. After that step, you can go to work with a small disk on a die grinder and actually thin down the area that has already been glued, so you can put on a stronger layer of real fiberglass and resin without making the part thicker in the end.. The glue was just to hold it in place, not as the actual repair.
Now, you can either fill the voids with layers of fiberglass and resin, keeping the ratio of resin low so that it's as much glass as possible and then clamp flat wood on either side to keep it compressed while it cures - wax paper first will keep the wood from sticking - or you can use pre-made material such as long strand fiberglass filler in a can to do the filling. Either way, I would use the wood and clamps which will put pressure on the part to force the mix into the existing parts and fill any hidden cracks as well. Plus it will help squeeze out excess resin.
This is a lot of work but in the end you'll end up with a solid piece this way. Careful grinding and sanding to shape will make it almost invisible and it will be strong. You can make it stronger still if you use epoxy resin instead of polyester resin. Epoxy is harder to find (boat repair places or specialty fiberglass supply stores have it) and costs more but it's twice as strong and has far less smell. However it also usually requires warmer weather to work in.

Photon440
Well-Known Member
- Local time
- 9:56 AM
- Joined
- Mar 14, 2012
- Messages
- 18,489
- Reaction score
- 34,038
- Location
- Surrey, B.C. Canada
That will do it. Are you familiar with using fiberglass resin? If so, you're on your way. If not, follow the mixing directions carefully. Be aware of the limited time you'll have before the resin kicks off and goes hard. Get a can of acetone to clean your brushes and equipment...and fingers. I like to mix my resin in plastic containers like ice cream tubs, it doesn't stick to that material and you can just pop out the remainder after it goes hard.
- Local time
- 11:56 AM
- Joined
- Nov 21, 2008
- Messages
- 21,786
- Reaction score
- 57,851
- Location
- In GTXtacy Illinois
That will do it. Are you familiar with using fiberglass resin? If so, you're on your way. If not, follow the mixing directions carefully. Be aware of the limited time you'll have before the resin kicks off and goes hard. Get a can of acetone to clean your brushes and equipment...and fingers. I like to mix my resin in plastic containers like ice cream tubs, it doesn't stick to that material and you can just pop out the remainder after it goes hard.
Just out of curiosity, would Dyna Glass (or similiar) work?
No, but I will probably learn all about it this weekend.That will do it. Are you familiar with using fiberglass resin?
- Local time
- 9:56 AM
- Joined
- Nov 22, 2010
- Messages
- 17,434
- Reaction score
- 21,776
- Location
- Muroc Dry Lake Bed
Call this gent....he will guide you in what you need.....
https://m.facebook.com/AIRGRABBERRESTORATION/
Thank you moparnation74 for this helpful Post!
Good to know!
Photon440
Well-Known Member
- Local time
- 9:56 AM
- Joined
- Mar 14, 2012
- Messages
- 18,489
- Reaction score
- 34,038
- Location
- Surrey, B.C. Canada
It will, but if you see an option between long strand and short strand, take the long. Some brands offer both.
chtampa
Well-Known Member
Playing card is a great idea. When I modified my Air Grabber ducts, I found out that you need to do all of the layers at once. Alternate between resin and mat over and over until the patch is thicker than you need. When it is dry flip it and die grind a groove into the cracks and repeat. Then sand with a 2" disk. I had up to 8 layers before I let it dry. Used acid brushes and threw them away. I used random mat to match the original.
Similar threads
- Replies
- 8
- Views
- 303


