• When you click on links to various merchants on this site and make a purchase, this can result in this site earning a commission. Affiliate programs and affiliations include, but are not limited to, the eBay Partner Network.

Project Unicorn - 1968 Charger Restoration

Man...look how far you have gotten in such short time......Car looks great.....

Look at the gaps and fitment.....A beauty she will be when painted!

Thanks a lot! Hope to be spraying colour in about 3 months. Still have lots to do to make sure it’s all straight before paint.
 
Work continues... not taking a lot of photos these days as I work through the blocking sanding stage. Think I’m still on track for paint in october.

Panels are coming off the car for the final sanding/prep. Chassis goes back on the rotisserie this weekend for the last time in preparation for paint.

625C971E-EC64-4045-9DFC-CD0F48DF8FA0.jpeg
 
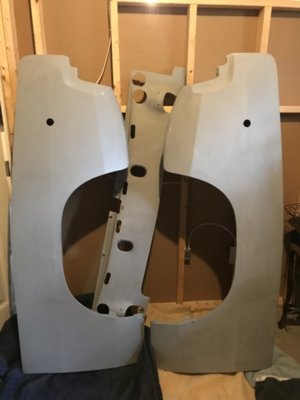
Fenders are finished being blocked and just scuffed and laid down two coats of epoxy primer on the inside. They are ready for colour.

E3DDCB88-96CB-4D94-BD57-30B117A394E7.jpeg
BA195EA3-4DD4-4E47-9F4F-027495452AD1.jpeg
B7E97501-5C50-4D99-849A-6FCA9F0D103E.jpeg
6108A711-8361-4C0C-BA1D-F12033D779D8.jpeg
image.jpg
 
Front valence needed some metal repair and straightening and then body work. All blocked and ready for paint now.

F0D14BB4-1112-4F08-8455-C48C44A2B0DF.jpeg
934B4868-2961-4581-B313-46927AF77F66.jpeg
E8005F4A-B80A-490A-80CE-2543549189F3.jpeg
 
Quarters are finally all done being block sanded, think the lines are clean and ready for paint. Just a few minor things to finish up on the chassis and it’s ready for paint too.

Will soon start on prepping the garage space for making the temporary paint booth.

image.jpg
 
Getting down to the end of body work, finally got around to drilling new and filling old holes for the R/T emblem on the rear tail panel.

6092E4D6-DE82-47DC-A6A0-E8FE96269CF6.jpeg
8D4DAD5E-53A6-4058-BBB4-7E0CACC66200.jpeg
 
Need lots of pics of how you build your paint booth please!
 
Paint booth is done. Thought maybe I would need to add some lights inside but I think it will be enough; there is a lot of natural light from the windows and a lot of light coming through from the rest of the garage. Going to spray a test piece this weekend and that will help determine if more lighting is necessary.

Booth is 12.5 feet wide, 21ft long and 9.5ft high. 3.5mil plastic stapled to 2x2 studs. Zipper at the front for access while painting to mix, etc. To zippers at the back for bringing the car in and out. Need to grab a thermometer today and mount inside so I can monitor heat inside the booth.
Extra air dryer and filter added just outside the paint booth in addition to the setup for the main garage.

Total cost for the booth, approx $400.

Base is siliconed to the floor for a seal. All joints are sealed with clear packing tape. I think it’s pretty air tight. When both fans are going the plastic on the walls visibly sucks in, so good negative pressure being created.

D56F3BEA-D014-4AFB-BBC8-FC66D1544A54.jpeg
378A7A20-C67D-4395-BBFB-F32551589BFA.jpeg
C45C1659-782E-4B96-9911-A1A35223ADB9.jpeg
69918DFA-46F0-4037-A982-C7D5B7391921.jpeg
53165374-F108-4763-B438-EF00232B7CC0.jpeg
3FFED8A1-BAF7-4FAC-9495-595846BDC458.jpeg
AEE09D70-3603-4636-B1C1-75BFF0394A5B.jpeg
 
Great setup,but the silicone may cause some issues with the paint fisheyes. Its a good idea to spray test panels, it should show up then if it’s going to be a problem. The next couple of days is decent weather for spraying, or as good as it gets this time of year. It sucks not having heated makeup air in the colder months. Good looking project. Hope to see it on the road next summer.
 
Jeffs rite hope you wait till that silicone really sets up a shop l worked in had a car ruined cause some one spayed some silicone out in the shop and it got into the paint booth had to resand car and repaint You'd be surprised how far silicon travels in a shop so do a couple test pieces be for you paint. Ya mite want to cover the silicone with a water base paint before you start painting auto paint. Just my opion.
 
Thanks for the heads up in silicone guys - I had not come across that problem before. I laid down some paint over the weekend to test things out and I think all is okay.

E7A2705A-3B01-452D-8962-B9C18DB75C65.jpeg
53D2A17A-B662-471D-B778-2D9DB24B161D.jpeg
8AFB0B0E-7E1B-4546-9F58-24EB8D9F19D5.jpeg
 
What is the long blue cylinder on the wall for?
I like the booth, thanks for posting
 
Where is the 1st one, by the compressor?

yeah, for regular day to day use in the garage I have a dryer and a filter after about 25' of hose from my compressor - so my existing set up looks like this:

Compressor > 25ft house coiled up > dryer / filter combo > 50ft hose reel
 
Change in plans! Was using a eurothane single stage for the first spray out. With the metallic in this plum crazy there is no way to really work with it to take out any peel or imperfections. Switched up to base clear and resprayed today; happier with the result and colour and with lots of clear applied I can work the surface the way I want. The chassis moves into the booth tomorrow for prep!!
9791F3AA-A252-4620-8B04-FB28686F1E90.jpeg
8C22E726-FB09-401A-95CA-8EEA6B8FFB48.jpeg
7B3FE145-9DE7-41C4-967A-3F2E9DE228F3.jpeg
 
The paint looks great! Just run some good duct tape over the silicon.
 
Last edited:
Auto Transport Service
Back
Top