• When you click on links to various merchants on this site and make a purchase, this can result in this site earning a commission. Affiliate programs and affiliations include, but are not limited to, the eBay Partner Network.

Turn signal mechanism

Vanderstel

Well-Known Member
Local time
10:05 PM
Joined
Jun 9, 2021
Messages
182
Reaction score
133
Location
Escondido, CA
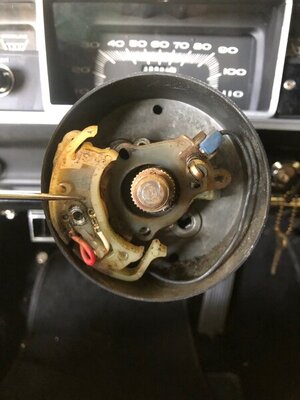
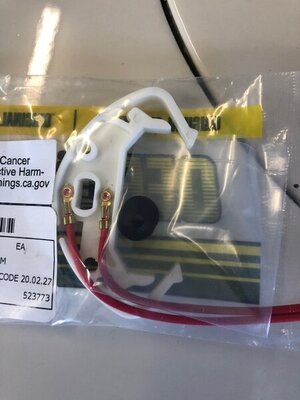
I'm confused. The plastic turn signal cancel mechanism seems to be in two pieces, I have a new "top" piece from Classic Industries, see picture.
image.jpeg
The lower and top piece seem to be attached with a bushing, see next picture? The whole assembly is loose but the wires aren't long enough to allow me to pull it far enough to get to the wires attached from the back side, or separate the two halves. Do the two halves just pull apart?

image.jpeg
The top piece, that I have a replacement for, is broken as you can see in the picture. Do I also need to replace the bottom piece? It seems ok

Second problem, in an attempt to remove the surrounding housing I unscrewed two larger screws, see picture...
IMG_5740.jpeg

Removing the screws did not allow me to remove the housing, when I attempt to replace the screws, there's nothing behind them!

Any help would be appreciated.
IMG_5741.jpeg IMG_5738.jpeg
 
A free service manual from mymopar.com will go a long way to helping you. On that note, you are going to have to disconnect the wiring harness at about the middle of the column, and remove the wires from the connector plastic. Once done, the turn signal assy can be pulled out. It is a shame that the chineese replacements today don't include the complete switch assy, but require you to reuse the lower half.
 
I have a copy of the service manual for my 67 Satellite, information about this part of the assembly is very thin.
 
Even in days of old you could buy JUST the "repair" cancel arm. I put an NOS one in my Bee and it lasted 10 actuations. Do yourself a favour and replace the entire switch as an assembly, as pulling the wheel multiple times gets old in a hurry!
 
What about my 3rd picture? The two large screws, what do the go into? Has something dropped behind? They don't thread into anything right now.
 
You don't have to remove those screws. Just remove the plastic connector from the wires and pull the whole assy out. Install in reverse...
 
But since you removed those screws, I'm sad to tell you that you most likely have to pull the column to get the "nuts" back in on the bottom. Those screws hold the upper and lower bowl together on the the shift tube. The nuts slide in and keep the shift tube in place. I'm not aware of how to get them back in the right place without taking the assembly apart. Can you look through the holes and see the nuts or their threads?
 
I tried looking in the holes and I can't see a thing, but clearly something was behind each screw, maybe I'll try again to remove the 'bowl' and see what I can figure out.
 
No luck, I removed the cir-clip but the bowl didn't come loose. I can't see anything inside that might attach to my two screws.
LowBuck Mike is correct. The nuts have fallen down. They fit into a pocket. I did this repair about 1986. Once I separated the housings I think I used grease to hold the nuts in place to put things back together.
 
That is a repair cancel cam. It just replaces the top part that will pull/pry off.
The short wires are to be spliced into the existing wires.

An entire new switch will have the lower plate with horn button roller, and should have the long wires with terminals that plug into the plastic electrical socket.
should look more like this:
https://www.classicindustries.com/shop/search/?q=MD2139#mz-expanded-view-11710411088
 
Getting the short bolts back in place is pretty easy..... Insert them into the upper bell, thread the nuts on just a couple threads to hold them but allow them freedom to move around.... Slip the upper bowl into place & tighten the nuts... The pocket is designed in such a way that the bolts automatically pinch together & grab the tube....

I've never had good luck replacing just the cam, the repair never lasts long... It's to much work to cut corners.... Fact is I haven't had very good luck with the current aftermarket replacement switches either.... I just a couple weeks back bought an NOS turn signal switch for my 68 Coronet cause I don't like having to dig back into a steering column once I've restored it...
 
When we were rebuilding Mikes' Coronet he mentioned he shopped around for a quality replacement. Forgot where he got it, but he said there were alot of complaints about the reproduction ones like I pictured from Classic? I can't confirm the quality, Last time I bought a replacement was 30+ years ago.
 
Slantsixdan has the best replacement switch. Daniel Stern Lighting is his web site.
 
Lots of good input, I'm a little slow or I'm not seeing what you're seeing, this is a 67 floor shift automatic, I don't know if that makes a different in later models or column shift, but I'd think so.

I'm trying to remove the cover at the top, see picture. I've got the C clip out, but the cover does not want to come out, the pressed center bearing seems to be keeping it in place?
It doesn't rotate either, well, maybe just a little back and forth.
IMG_5744.jpeg
I'm thinking if I can get the cover off, I'll be able to see where the missing nuts are and how to thread the screws back in, I hope. I'm thinking about taking the whole column out, but still, if I can't get the cover off what good will taking the whole column out.

Here is a side view
IMG_5745.jpeg
 
Yes, the bearing is holding you up. I made a tool to pull the top collar. They are sold as well, but pretty easy to make.
 
Auto Transport Service
Back
Top