• When you click on links to various merchants on this site and make a purchase, this can result in this site earning a commission. Affiliate programs and affiliations include, but are not limited to, the eBay Partner Network.

Fuel Pressure Regulator - STUMPED!

Grabinov911

Well-Known Member
Local time
11:56 AM
Joined
Jan 27, 2012
Messages
558
Reaction score
245
Location
Southern California
Guys I'm stumped! This has occasionally happened to me on this project and I've always found someone to rescue me.

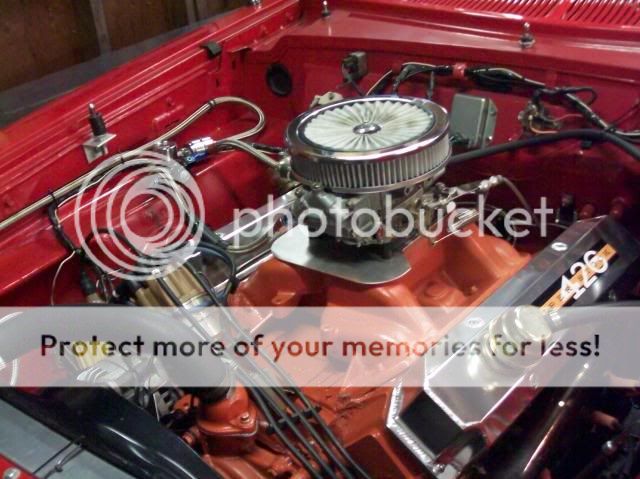
Project car is my 1970 Roadrunner with a carbureted 493 stroker. Carb is a Quickfuel 850. Basically a Holley Double Pumper. You guys know the car.

I have a brand new custom aluminum fuel tank (fits in stock location) with an internally mounted electric fuel pump and fuel gauge system. It is plumbed with 6AN fittings for the fuel line and return lines, and has a bung for the tank vent and a drain. I purchased it from Hot Rod City Garage and it is pretty as can be.

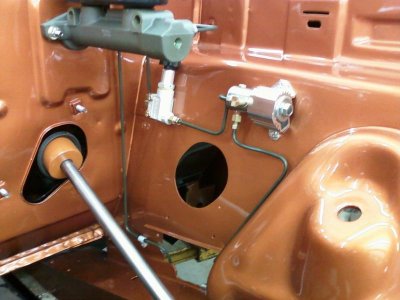
I planned to run aluminum hard line from the tank to the fuel pressure regulator in the engine compartment and back again for the fuel return line. I have a very nice Aeromotive fuel pressure regulator and all the fittings to convert from short flexible braided lines at the tank to flared aluminum tube and then back to flexible lines at the pressure regulator. But I'm stuck!

I have good hand tools for tube straightening and tube bending (the Easton ones) and started by attempting to make the section of the hard fuel line which would run from the Fuel Pressure Regulator flex-line toward the back of the car (fuel line or return - they are the same). The problem is that the hard lines take on very complex shapes, and the bends in the aluminum line are much less tight than those in the factory steel fuel lines, making it impossible to duplicate the factory shape. Add to that the fact that I need two matching lines for each section of hard-line, one for fuel and one for return, and the process of creating the lines has gone over my head.

I have all but given up and decided to run flexible lines the whole way, but I need to know where to start, or end! I simply cannot decide where to put the Fuel Pressure Regulator. I have seen them mounted to the fuel log between the two carb bowls. I have seen them mounted on the firewall, on the fender wall, even in the trunk (which I heard was not ideal).

Talk to me boys. Is it ok to go with braided flex ones the whole way? (Pretty sure the answer is yes.)

Where is the best place for the Fuel Pressure Regulator?

Two lines from the regulator to the carb bowls or one to the fuel log?

Send pix!

Greg
 
Don Gould at www.4secondsflat.com has some great examples. I think it makes good sense to put the reg. and bypass at the end of the line past the carb a ways and then back to the tank. seems to work well for me. good luck
 
I think it makes good sense to put the reg. and bypass at the end of the line past the carb a ways and then back to the tank.

Now THAT is a setup I haven't seen. I suppose that it LOOKS exactly like the a setup with the Regulator before the carb, but with the fuel flowing the other way!

Any pix?
 
Just some ideas -
The Moroso 65145 is nice solution for a return type regulator but that doesn't address your question about mounting. I know guys that run them. It regulates the pressure after the carburetor. Seems to work fine.
Jegs has a regulator mounting system (Part Number: 555-15081) that I have used before. I used it because I didn't have any fender wells to attach a regulator to and the rules state you can't attach any of the furl system to the firewall. It worked well for me. The flex line and the carb lines stay out of the way when dealing with valves, plugs and headers. The hard lines to the carb solves the problem with bending flex lines close to the carb.
 
My pictures are not much better but they're all I could find. The issue will be matching the bracket to the regulator you buy or having to buy a regulator to match the kit. Both Jegs and Summit have mounts for different regulators but the key is getting the short fuel line segments to fit if you just buy the bracket alone. The pre-bent steel lines in the Jegs kit fit take care of that and make a better looking installation. Your project is going to have a lot of fabrication involved anyway.
Jegs bracket.JPG
 
You could do like I do. I run the stock gas tank with the Holley black electric pump. I run braided flex fuel line from my tank to the pump and then I run aluminum line to the front as I put it in the stock location until it gets to the front and then I ran it up inside the pass wheelwell and bring it in the eng compartment through a hole I made in the pass side wheelwell as this keeps alot of eng heat away from the fuel line. Then I flared the end of the aluminum line and slid the braided flex fuel line over the aluminum line and clamped it. And then as you see here I use the braided line to the fuel pressure regulator and carb. I did not want to put the aluminum line up to the regulator as aluminum line can crack when you flare and bolt it to a flare so thats why my aluminum line is not bolted to any hard flares as I flared both ends and slid the braided flex fuel line over the ends and clamped them. Ron

409849854.jpg


Here is another pic.

100_2369_zpsa69d05f7.jpg
 
You could do like I do. I run the stock gas tank with the Holley black electric pump. I run braided flex fuel line from my tank to the pump and then I run aluminum line to the front as I put it in the stock location until it gets to the front and then I ran it up inside the pass wheelwell and bring it in the eng compartment through a hole I made in the pass side wheelwell as this keeps alot of eng heat away from the fuel line. Then I flared the end of the aluminum line and slid the braided flex fuel line over the aluminum line and clamped it. And then as you see here I use the braided line to the fuel pressure regulator and carb. I did not want to put the aluminum line up to the regulator as aluminum line can crack when you flare and bolt it to a flare so thats why my aluminum line is not bolted to any hard flares as I flared both ends and slid the braided flex fuel line over the ends and clamped them. Ron

Ron, just curious. Are the braided and clamped unions holding up? I was led to believe that clamping braided lines was iffy. Why didn't you go with the AN to tube adapters fittings?
AN to tube.jpg
 
I've bent lines for a long time. It's hard to build one long line front to back. easier to build one from the back and one from the front and put a coupler in the middle. Add to that a second line running parallel will take some experience or multiple tries. You need to know exactly how you want to lay it out before starting. Know where to start a bend to get the next leg in the correct position. Then learn how much stretch is in a bend as that will change your length. Some short scraps marked with sharpies at .250" intervals before bending will give you the answers you need. Measure after you bend and you'll know. Nothing looks nicer than nicely bent hard lines. Badly bent ones stick out like a sore thumb. brake line examples.
Doug
 

Attachments

  • S43.jpg
    S43.jpg
    51.9 KB · Views: 307
  • S44.jpg
    S44.jpg
    54.3 KB · Views: 311
You could do like I do. I run the stock gas tank with the Holley black electric pump. I run braided flex fuel line from my tank to the pump and then I run aluminum line to the front as I put it in the stock location until it gets to the front and then I ran it up inside the pass wheelwell and bring it in the eng compartment through a hole I made in the pass side wheelwell as this keeps alot of eng heat away from the fuel line. Then I flared the end of the aluminum line and slid the braided flex fuel line over the aluminum line and clamped it. And then as you see here I use the braided line to the fuel pressure regulator and carb. I did not want to put the aluminum line up to the regulator as aluminum line can crack when you flare and bolt it to a flare so thats why my aluminum line is not bolted to any hard flares as I flared both ends and slid the braided flex fuel line over the ends and clamped them. Ron

Ron, just curious. Are the braided and clamped unions holding up? I was led to believe that clamping braided lines was iffy. Why didn't you go with the AN to tube adapters fittings?
View attachment 298361


Actually most of my braided line connections use the AN fittings to hook it up. The lines at the carb and fuel pressure regulators use the AN fittings and no clamps. But I did clamp it at the fuel filter under the hood and where it hooks to the aluminum line where it comes through the fenderwell to under the hood. Its also clamped at the fuel sending unit at the tank but it has AN fittings at the electric fuel pump. I have never had any tech problems with this setup. I also used a pipe bender to install my 3/8 fuel line in the stock location. I had to stretch some of the holding clamps to get the 3/8 line to fit since they were used with the stock 5/16 line.

Also I dont use a return line setup as so far this has been ok but if I have any major problems with this ethanal in the pump gas boiling I may consider going to a return line setup. Ron

- - - Updated - - -

You can see the AN fittings at the carb and fuel press regulator better in this pic. But this was taken before I changed the fuel line and ran it up in the pass wheelwell to keep eng heat away from it. Ron

410768812.jpg
 
Here's where I ended up. I did use aluminum line for a ways - to the frame rail just at the base of the firewall, then flex up to/from the regulator.

IMG_3417.jpg

IMG_3416.jpg
 
That looks real good. Nice and clean and out of the way. I noticed you have a liquid filled pressure gauge. They can be temperamental. Especially in the engine compartment with the heat.
 
That looks real good. Nice and clean and out of the way. I noticed you have a liquid filled pressure gauge. They can be temperamental. Especially in the engine compartment with the heat.

Never even thought of that! I DID have a different problem with it this morning. I unhooked to fuel feed line to tighten the fitting at the regulator, and by doing that introduced a little air into the system. With the engine shut off (floats bowls full and float valves closed) and the fuel pump running, the little bit of air that got to the gauge caused it to "tap" and bounce. Then I noticed it had a bleeder on top. That must be what it's for - solved the problem instantly!
 
I ran aluminum hard line front to back, no return though. The only thing I can say is I did it in 3 sections: section one goes from tank to frame rail, section 2 is basically straight shot along frame rail and punches through an existing hole in the trans cross member (with a bit of fiberglass sleeve to take care of any rubbing). Section 3 then connects to the regulator (or in my case, mechanical fuel pump). There is no easy way about it - it's a real bitch to get all the bends right and will never look 100% stock. I bought 2x the tubing and ended up short lol.
 
Never even thought of that! I DID have a different problem with it this morning. I unhooked to fuel feed line to tighten the fitting at the regulator, and by doing that introduced a little air into the system. With the engine shut off (floats bowls full and float valves closed) and the fuel pump running, the little bit of air that got to the gauge caused it to "tap" and bounce. Then I noticed it had a bleeder on top. That must be what it's for - solved the problem instantly!

I've seen guys chase their tails with pressure issues that ended up being a liquid filled gauge. I'm one of them and my gauge was mounted outside on the cowl. We were discussing the issue around a table at the track. A great friend of mine who had raced for about 50 years calmly looked at me and ask if my gauge was liquid filled. When I said yes he quickly responded, "Get rid of it". Needless to say, it's gone.
 
Auto Transport Service
Back
Top