• When you click on links to various merchants on this site and make a purchase, this can result in this site earning a commission. Affiliate programs and affiliations include, but are not limited to, the eBay Partner Network.

Charger no charging (still)

I believe in 74 they still routed power to the ammeter via the bulkhead.

still on later years. The change was the use of shunted systems since 75 ( 76 on A bodies ). But still wires running through the the bulkhead. However now just to feed the car loads no matter where it comes, not anymore the charge load thought.

amm reading become on a remote reading on loads going through the shunt wire on engine bay.
 
Hey all,
So we spent a good amount of time this weekend re-cleaning grounds, checking wires and whatnot - and per the diagram FrankMopar provided a link for - we discovered that one of the field wires (one blue, one green) was routed somewhere incorrectly, and some other, lighter gauge wire green colored, was on the field terminal at the Alt. We switched those up, and by golly I think we are getting somewhere! It still is not a strong 13-14 reading continuously but it definitely lives above 12a on the cheapo meter i have.

Thanks to all for the education - it has been a great help!
 
The ammeter still reads DISCHARGE however - not sure what that's about. Time for the MAD upgrade i guess.
 
I would still bypass the ammeter. I have seen enough melted gauges that I wouldn't even consider keeping them hooked up, especially with unknown wiring issues.
 
Welp - I think we are back to square one again... I don't think it's charging, or not nearly enough to keep up with the demands... barely at 12V. UGH!!!
 
I never saw an ammeter take a **** without melting a bunch of wires!! Take that power away from the ammeter and the stupid route it takes through the ignition switch!!
 
I have a '73 Charger and have had to replace the voltage regulator a number of times. When I first got it running back in '01 I had to replace the voltage regulator 2 or 3 times as they kept immediately failing (I can't remember what, if anything, I did to fix it). Since then it seems like every few years the voltage regulator fails.
The only real problems I've had with this car have been electrical. Today I'm going to try to figure out a new and mysterious cranks but no fire when hot condition.
Does your car still have the ground cable that goes from the back of the block to the firewall?
Are you sure you have the correct alternator and that it is wired correctly?
how did you test for a bad VR? Yes there's a ground from the block to firewall...
 
We tried a new alternator - the kid is thinking still no charge - gonna verify again when I get home. UGH!!!!!!!!!!
 
need to do some testing to find the problem...

TROUBLESHOOTING---BOOK----

NO-LOAD TEST
This test will determine whether or not the system is charging the battery and, if not, whether the alternator or regulator is at fault. It requires a voltmeter capable of measuring at least 16 volts, down to tenths of a volt.
If the charging system on your car has an externally mounted regulator, warm up the engine before performing the following test:
1. Turn off the engine, lights, and all other accessories.
2. Attach an engine tachometer according to the manufacturer’s instructions.
3. Connect the voltmeter to the battery by attaching the positive lead to the positive terminal and the negative lead to the negative terminal.
4. Note the voltmeter reading. If it is less than 12 volts, charge the battery. Then note the voltage reading again and record it.
5. Start the engine and slowly increase the speed to 1,500 rpm.
6. Note the voltmeter reading again. If it exceeds the engine-off voltage by more than 2 volts, the system has a faulty regulator, a poor regulator ground, or a short circuit in the wiring between the alternator and regulator.
7. If this voltage reading exceeds the engine-off voltage by less than 2 volts, perform a load test.
LOAD TEST
1. Keep the tachometer and voltmeter connected as they were for no-load test.
2. Note and record the voltage reading.
3. Start the engine and turn on the heater (or air conditioner) at high speed. Turn on all lights and accessories.
4. Increase the engine speed to 3,000 rpm and note the voltmeter reading.
5. If this reading exceeds the engine-off voltage by 1/2 volt or more, the charging system is functioning properly.
6. If his reading exceeds the engine-off voltage by less than 1/2 volt, perform a full-field test.

FULL-FIELD TEST
When the regulator’s control function is bypassed, the alternator runs full-field. The method of bypassing the regulator differs, depending on the type of vehicle. For this reason, Step 1 of the full-field test changes from car to car, while the remaining steps are the same for all models.
1C. Chrysler models. Turn of the engine. Locate the green wire connecting the alternator field terminal to the regulator; disconnect this wire from the alternator. Connect a jumper wire from the alternator field terminal to a good ground.
2. Once the regulator has been bypassed, repeat the load test.
3. If the full-field voltage exceeds the engine-off voltage by 1/2 volt or more, the regulator is defective and must be replaced...............do not jump the green wire to anything.
REGULATOR REPAIR
Once it has been determined that the problem is with the regulator and not the alternator, you can find out if the source is the regulator itself or its wiring or ground.
1. Check the wiring between the regulator and alternator for heat damage or wear. The regulator is usually mounted on the firewall or on the finder under the hood.
2. Remove the bolts from the voltage regulator.
3. Use sandpaper to clean off the area around the bolts and the spot where the voltage regulator mounts on the car. This will assure a good ground.
4. Clean, reinstall, and tighten the bolts.
5. Perform all of the troubleshooting procedures again to see if the problem still exists.
6. If so, the problem is either in the wiring or the regulator itself. If you have already inspected the wiring, try replacing the regulator

The Quick and Dirty Charging System Test

Remove the (+) FLD wire from the alternator.
Put a temporary jumper wire from the same (+) FLD terminal to the large output post on the alternator (battery +).
Start the car and see if it charges. If it does… good alternator. If not … bad alternator. If it did charge, then the voltage regulator is the problem child.
Turn the ignition key to the on position. Check for power on the small IGN terminal of the regulator. If there is, then see if there is any power on the other voltage regulator post to the alternator. A bad ground on the voltage regulator case is a very common problem. If not then you need to chase down the IGN power issue.
 
Some advice here. Thinking there is just one thing that is causing your problem, may be the problem. It is totally plausable that you have many things contributing to the problem. Wiring and bad grounds are at the top of the list.
 
need to do some testing to find the problem...

TROUBLESHOOTING---BOOK----

NO-LOAD TEST
This test will determine whether or not the system is charging the battery and, if not, whether the alternator or regulator is at fault. It requires a voltmeter capable of measuring at least 16 volts, down to tenths of a volt.
If the charging system on your car has an externally mounted regulator, warm up the engine before performing the following test:
1. Turn off the engine, lights, and all other accessories.
2. Attach an engine tachometer according to the manufacturer’s instructions.
3. Connect the voltmeter to the battery by attaching the positive lead to the positive terminal and the negative lead to the negative terminal.
4. Note the voltmeter reading. If it is less than 12 volts, charge the battery. Then note the voltage reading again and record it.
5. Start the engine and slowly increase the speed to 1,500 rpm.
6. Note the voltmeter reading again. If it exceeds the engine-off voltage by more than 2 volts, the system has a faulty regulator, a poor regulator ground, or a short circuit in the wiring between the alternator and regulator.
7. If this voltage reading exceeds the engine-off voltage by less than 2 volts, perform a load test.
LOAD TEST
1. Keep the tachometer and voltmeter connected as they were for no-load test.
2. Note and record the voltage reading.
3. Start the engine and turn on the heater (or air conditioner) at high speed. Turn on all lights and accessories.
4. Increase the engine speed to 3,000 rpm and note the voltmeter reading.
5. If this reading exceeds the engine-off voltage by 1/2 volt or more, the charging system is functioning properly.
6. If his reading exceeds the engine-off voltage by less than 1/2 volt, perform a full-field test.

FULL-FIELD TEST
When the regulator’s control function is bypassed, the alternator runs full-field. The method of bypassing the regulator differs, depending on the type of vehicle. For this reason, Step 1 of the full-field test changes from car to car, while the remaining steps are the same for all models.
1C. Chrysler models. Turn of the engine. Locate the green wire connecting the alternator field terminal to the regulator; disconnect this wire from the alternator. Connect a jumper wire from the alternator field terminal to a good ground.
2. Once the regulator has been bypassed, repeat the load test.
3. If the full-field voltage exceeds the engine-off voltage by 1/2 volt or more, the regulator is defective and must be replaced...............do not jump the green wire to anything.
REGULATOR REPAIR
Once it has been determined that the problem is with the regulator and not the alternator, you can find out if the source is the regulator itself or its wiring or ground.
1. Check the wiring between the regulator and alternator for heat damage or wear. The regulator is usually mounted on the firewall or on the finder under the hood.
2. Remove the bolts from the voltage regulator.
3. Use sandpaper to clean off the area around the bolts and the spot where the voltage regulator mounts on the car. This will assure a good ground.
4. Clean, reinstall, and tighten the bolts.
5. Perform all of the troubleshooting procedures again to see if the problem still exists.
6. If so, the problem is either in the wiring or the regulator itself. If you have already inspected the wiring, try replacing the regulator

The Quick and Dirty Charging System Test

Remove the (+) FLD wire from the alternator.
Put a temporary jumper wire from the same (+) FLD terminal to the large output post on the alternator (battery +).
Start the car and see if it charges. If it does… good alternator. If not … bad alternator. If it did charge, then the voltage regulator is the problem child.
Turn the ignition key to the on position. Check for power on the small IGN terminal of the regulator. If there is, then see if there is any power on the other voltage regulator post to the alternator. A bad ground on the voltage regulator case is a very common problem. If not then you need to chase down the IGN power issue.
THANK YOU!
 
how did you test for a bad VR? Yes there's a ground from the block to firewall...
I never tested the voltage regulator. When the ammeter shows a constant discharge and I test the voltage at the battery with the engine running I am pretty sure it's the voltage regulator. At least, on this car.
I haven't had any problems with the alternator over the years.
 
Follow Pops1967 GTX's # 31s very descriptive and thorough analysis of the troubleshooting matrix needed to isolate your troubles. Also consider a defective alternator IF the troubleshooting procedures outlined do not pan out. Is the existing alternator a round back gtounded brush or isolated field unit OR a square back alternator with an isolated field? As I've previously mentioned, IF one diode has failed (open), the capacity of the unit is severely reduced (in both low voltage AND amperage) by half of the published amps. This is because the alternator has a three phase full wave diode bridge and the loss of any diode will result in low output. The square back units are susceptible to diode failures. Another possible solution seems to be the installation of a Powermaster one wire unit, where the voltage regulator is internal to the alternator. Take your time and follow the troubleshooting guide. Just my opinion of course.
BOB RENTON
 
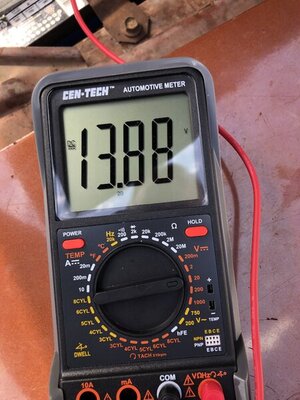
You guys! It’s charging!!! Big boy and I went through all of these tests and bottom line determined that my ‘new’ voltage regulator was toast. Put another new one in and she’s charging at 14 1/2… So incredibly happy that this mystery is finally solved. Thank you so much to everyone who contributed to our dilemma
 
I also spent a few bucks and got a good multi meter and let me tell you what a great purchase.

4A80BF38-2D78-4483-88B8-75DE24E8A247.jpeg
 
Hey all,
we discovered that one of the field wires (one blue, one green) was routed somewhere incorrectly, and ....!

what is what I have being saying since the begining ?

If you found that sure there is more. We are talking about a 46 years car in not original conditions, where everybody despites the wiring as the less important part of the car and makes continuous bad patching jobs everywhere.

and no, you don't need to bypass the amm like everybody is saying, just make the things correctly. And with nice correctly made upgrades.
 
edited my last reply while you quoted me.

yes you can get more issues around but if the basic is damaged or wrong you'll never find the next problems
 
Auto Transport Service
Back
Top