• When you click on links to various merchants on this site and make a purchase, this can result in this site earning a commission. Affiliate programs and affiliations include, but are not limited to, the eBay Partner Network.

1968 Plymouth GTX

NICE work! I have the same color coded GTX. It’s going to be rotisseried next month. My father bought it in 1982 for $750 and drove it home. I had it painted but got screwed so decided to have it done correctly. QQ1 with light blue door frames and headliner. Same color dash as yours also. Mine is factory console 4 speed, power disc brakes, tach, black vinyl top, white side stripes & performance paint on the hood.
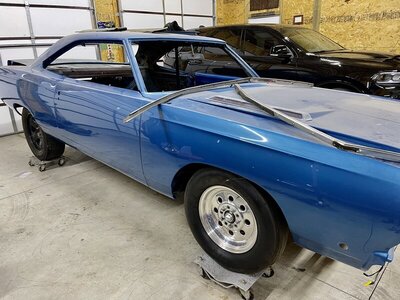
1AE6B434-DAF6-400D-8C59-ADBD78A41F05.jpeg
 
@B5 roadrunner
Thanks, I know you'll be glad once your car is in the correct color. QQ1 is a head turner for sure.

@moparedtn
"The 1968 Sport Satellite/GTX finish tail panel is a tough deal - they're pretty much all pock-marked up and rough if original and take a lot of hours to restore as a result - and of course, it's a one-year deal to boot.
(That tail panel is also why you don't see much of any model kits or diecasts of '68 GTX's, too).

Like many of us were, you're left with either a)restoring what you have (or finding a nicer donor to do so on), or b) fessing up the huge money the reproduction fetches (that is, if it exists even - Classic Industries has shown it to be "coming soon" for years now - at $840!)."


Yes, I am having a hard time finding anyone who sells these new. I would rather purchase the tail panel and tail light bezels as a set but it is looking more and more like restoring is the only option.
 
Last edited:
I decided to put the passenger door on hold for a while. Gets a bit frustrating when shooting for perfection with an amateur skill set.
Straight edge tells me I'm close but I can still feel imperfections when running a cloth over it.
Some Progress 2.JPG


Clamped the left drip rail into place and marked and drilled plug weld holes.
Drip Rails Preparation 1.JPG


Clamped it back into place and started welding before calling it a night.

Welding Left side.JPG


Takes me a while to get the welder settings dialed in but hopefully after getting this side done, things will going much better. LOL

Drip Rail Left Installation.JPG
 
The left front drip rail was quite badly dented and deformed. I tried installing the chrome trim on it and it would not clip on properly near the top.
So I replaced it with one I had laying around. One of those things that I couldn't bring myself to throw away.
Left Front Drip Rail Replaced.JPG


Got the holes drilled and the metal prepped for installing the Right side drip rail.
Drip Rail Right Installation.JPG


So far everything seems to be measuring good from side to side. Near the back window corners I am less than 1/8" difference. With the right side being the larger of the two.
These were the areas that I had to replace some metal on the support structure due to rust.
Roof Structure Sail panel Rust 1.JPG


Sailpanel Structure Patch Right.JPG
 
Drip rails are in and I decided to lay the roof skin into place and check the fit.
Roof Skin Test fit.JPG


Roof Skin Test Fit 1.JPG


Front looks good, as does the right sail panel.
Roof Skin Test Fit Front.JPG


The back looks really good as well, however I am not happy with the left sail panel fit.
Roof Skin Test Fit Rear.JPG


The right side lines up real nice and a straight edge proves it to be spot on. The left side however needs some help.
The upper portion of the left quarter panel doesn't seem to have the same angle as the right side does.
I did notice some bronze(?) filler material when I was media blasting and it all may need to be replaced with good metal.

Welding Material Unknown.JPG
 
At the recommendation of another Mopar guy, I made a cardboard template to check the profile.
Right side:
Template Right.JPG


Flipped over and in place on the left side.
Template Left.JPG

It doesn't look near as bad as I thought it would.
There does seem to be a slight outward bow in the left sail panel on the roof skin. My plan is to remove the skin, after I mark the center locations front and back, and inspect the structure for any high spots that might be preventing it from laying down all the way.

Then I will clean everything really well, apply the dampening material, set the skin in place and begin spot welding from the center outward on both the front and rear of the skin. My thinking is this will help it to lay properly upon the structure.
 
I did find a couple of places to "adjust" so that the roof skin fits better on the left side.
Also found that one of the corners on my front roof support wasn't welded in place. Appears to have been that way from the factory.

Drilled a few holes today.
Drilling spot weld holes rear.JPG


Ordered the deck filler panel and stud kit, plus the two lower window corners today.
 
I did find a couple of places to "adjust" so that the roof skin fits better on the left side.
Also found that one of the corners on my front roof support wasn't welded in place. Appears to have been that way from the factory.

Drilled a few holes today.
View attachment 1294332

Ordered the deck filler panel and stud kit, plus the two lower window corners today.
Stud kit?
 
Finally got the roof skin welded into place:
Drip rail spot welds.JPG


Started grinding the welds down along the rear window:
Roof Skine Rear Window Welds.JPG


The deck filler pan and lower window corners are patiently waiting for me. LOL
 
Got the drip rail and front welds ground down today.
Drip Rail Welds Ground.JPG


Decided to start removing the old rear deck filler panel. Got a few spot welds drilled but the thing wasn't loosening up, then I found this:
Brazing holding panel in place.JPG


Tried to heat it up with Mapp Gas but couldn't get it hot enough.
Will need to get the Acetylene torch out for this stuff and there is lots of it.
Brazing Everywhere.JPG
 
That's brazing. Sheesh, lots of heat to melt it, that sucks. Good luck.
 
After some major hassles, I was able to remove the old panel.
Old Panel Removed.JPG


Left side supports:
Left side support brackets.JPG


Right side supports:
Right Side Support Brackets.JPG


Decided to test fit the new panel:
Test Fit new Panel.JPG


The left seam is okay but the bottom portion doesn't fit into place and lay down properly:
Test Fit Left Side.JPG


The right seam is very tight at the top and this causes a slight bow in the panel:
Test Fit Right Side.JPG


My thinking is to replace the lower window corners before making any adjustments. There is heavy amounts of brazing in each of the window corners which may be affecting the panel fit.
 
After a lot of inspection and measuring, I found a small locating tab that was 1/8" too long. Trimmed it and then test fit the panel again.
Test Fit Left Side 1.JPG


Test Fit Right Side 1.JPG


It made a major difference in the fit. Also notice the right lower window corner patch is setting in place. The gaping holes around it were from removing the brazing material. Now I have some serious patching to do.

Also notice in the next picture the shape of the outer corner on the patch appears much rounder than that on the original quarter panel. It also appears to sit about 1/8" low to the surrounding metal at the lowest point.

Lower Right Window Corner Test Fit.JPG


Did I mention how much fun this is turning into?
 
Okay, I think the light finally came on as to what my issue is with the window corners.
I tried putting some 18 ga. sheet metal under the new inside corner patch and it was still low:
Window Corner Height difference after adding 18 ga. under.JPG


After questioning why these parts didn't line up while all the other ones did, I started searching for some threads started by others and viola, there it was.

I ordered the "inside" corners, which I now believe are there to support the outside corners which I did not order.

Anyway, I contacted AMD today and will await their answer. In the mean time, I will media blast all the rust away and apply some epoxy primer to the bare metal.
 
Looking good so far. I found a bunch of brass in the same area as you in my car. I also had fitment issues with my filler panel and new AMD trunk gutters.
 
Looking good so far. I found a bunch of brass in the same area as you in my car. I also had fitment issues with my filler panel and new AMD trunk gutters.

It is a complex area of compounded angles and bends. Having to remove the brazing just created more to deal with.

I like to post pictures of my projects, mainly to provide help for others but also to solicit help and support from those who have previously gone down this path.

Floor pans and quarter panels I have done a few times before, however the roof skin, drip rails and this area I am now working on are brand new to me.
 
AMD got back to me this morning. My assumption was right, there are inner and outer patches that work together to provide complete replacement of the rusted out corners.

I will order the outer corners today.

By the way, they did say I could return the inner corners if I wanted to. However, since I had to remove so much brazing and rusted through metal, I need to install them anyway.
 
Auto Transport Service
Back
Top