• When you click on links to various merchants on this site and make a purchase, this can result in this site earning a commission. Affiliate programs and affiliations include, but are not limited to, the eBay Partner Network.

1972 Roadrunner Firewall Rust Issue Suggestions

plymouthman72

Well-Known Member
Local time
6:58 AM
Joined
Dec 3, 2013
Messages
738
Reaction score
642
Location
Dallas-Fort Worth
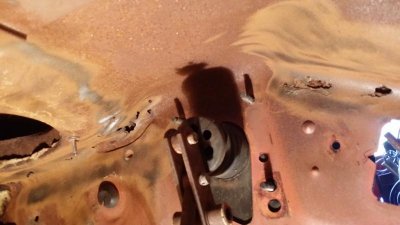
Well I am getting underway on my restoration and I have to say my heart sank when I finally got around to taking off my brake pedal assembly and saw what I saw. I started sanding some to see how bad it is and it got even worse. Now I am not sure what to do. I honestly do not have the money or know how to replace a firewall but don't want to neglect something that could be a serious issue down the road. Would anyone have any suggestions to an easier fix to this problem? so far it only appears to be in the crease where the firewall is on top but I havent gotten to much further into it for fear of damaging it further. My idea was to finish getting out the rust then seal the metal and possibly use body filler but I don't want to half *** it either. I am just thinking that no one will see it and its not something that will be as weathered as say a quarter panel. Is that something I could patch with metal given its location? Any ideas or suggestions would be much appreciated. I am so down about this right now I am think gas and a match but I could never commit murder on a chrysler :). Also, one more dumb question, does anyone have a how to on how to get the emergency brake assembly out? it looks to me as if the bolts go into the fender but I just dont see how that would be possible. Thanks again guys for reading my post and sharing your thoughts with me.
 

Attachments

  • 20140524_153458.jpg
    20140524_153458.jpg
    42 KB · Views: 636
looks like its right along the seam that the 2 panels come together,very common,you can find used panels to replace it,would need lower cowl panel,also the e-brake has 2 bolts that run inside the drivers side wheel well,usually has a bunch of road grime on them,clean them with a wire brush,and wd-40 the crap out of them,and hope they dont break when you take the nuts off.
 
Grind it as best as you can. You want to get rid of all the loose rust that’s in there. Epoxy or etch prime it. Then cut a piece of sheet metal and fabricate it to fit. You could weld it in or use this stuff that works great called Fusor. I used it. It’s a two part caulking that you would need the gun for it. I would also check under the cowl screens for any other rust.
 

Attachments

  • lord-fusor-180b-109b.gif
    lord-fusor-180b-109b.gif
    22.5 KB · Views: 350
  • lord-fusor-301-gun.gif
    lord-fusor-301-gun.gif
    13.3 KB · Views: 345
Where would I find used panels for that? Would that be something an amateur could do or would I risk really messing things up. I am decent at welding now but it's the cutting that has me concerned.
 
The first thing you need to do is get the silly nonsense that using Bondo is half-assing a repair out of your head. Body filler has been an industry standard for what... 40 years or so now? Yeah, there are some purists out there who think repairing a car with anything but OEM sheet metal is a cardinal sin, but they are a minority... and more importantly they aren't paying your bills. :)

There's nothing wrong with using fillers, or fabricating non-original pieces, especially for an area like this. Unless you're doing a concourse restoration or have some other reason to keep the car as original as possible, it's just foolish to throw away your money, and often your project, on making state-of-the-art repairs, especially repairs that will never be seen.

Hate to say it, but I've seen dozens of project cars for sale, with their owners losing thousands of $$$, because of stupid stuff like this. You spend $500 or $1,000 making a $10 repair a few too many times and that project car ends up by the roadside with a For Sale sign in the window pretty quick. :(
 
Bruzilla, I 100% agree with you and hope I didn't offend you. My main fear of using filler was a long term fear of how well it would hold up in that spot. This is probably one of the most secluded areas of the car so I am not concerned so much about looks but strength and durability. The brake pedal is right there and was worried about pushing against it. My boss was awesome enough to offer and shape some metal for that crease. He said to cut as little as possible seal it and patch that bad boy. Thanks for reminding me that it's not all about perfection though. I see all these awesome rotisserie restoration projects going on here and think I have to do it but I don't have the space or tools for a perfect restoration. I just wasn't sure the best course of action was.
 
A guy like you could never offend me. :) The guys who offend me are the purists who are one of the big reasons so many projects fail. They love to look down their noses at anything they consider imperfect and just demolish the morale and enthusiasm of a lot of owners. I don't care if you cut a section of an old pizza pan out and pop rivet it in to make a fix. I would much rather see a car with a lot of "bad" repairs and even pizza pan panels out on the road and being enjoyed than another dead project car sitting with a For Sale sign or on craigslist with an ad saying "All body work done but don't have money or interest to finish it."

The most important thing for an owner to do with a project car is get it back on the road!!! Nothing affirms your decision to get into this hobby more than taking your car out, having some fun, getting some compliments, and feeling on top of the world. You can always go back and redo the short cuts if need be.
 
Bruzilla, thank you for the reminder. "Good enough" is just that. Sometimes I need the reminder on my own projects, since I suffer from engineer's disease (letting the perfect become the enemy of the good enough).
 
Cut out the rust weld in a new piece from 16ga sheet metal... rent a welder and prime with a rust encapsulation primer and paint so it doesn't come back replace the original insulation with a product that doesn't absorb water and check for where the leak is that caused the problem like the windshield weatherstrip
 
Depending on what your skill set is, I agree with all of the above posts. You don't need to go all ape sh*t crazy on this. Odds are it will never be seen and like with my rig- she ain't NEVER gonna be 100% perfect or concours worthy. So just cut out what you can, clean off the rust as best as you can, stitch weld a new section in and call it good. If you can't do that or don't wish to (I wouldn't blame you if you didn't) then hit it as best as you can to get rid of whatever loose scale is there and to get rid of whatever weak metal is there. Personally I'd hit the good metal left over with POR-15 or Rust Bullet and then either fill or glue what you can to make it right. I've had a hole in my Jeep CJ upper cowl that I just cleaned up as best as I could and filled with a filler that had alum in it to make it stronger than bondo and it has been right as rain for 8 years now. Then again I could get to the back side of it. In this case (I don't know your body style horribly well), I'd say do as best you can, kill what rust you can and fill it. You'll be fine.
 
I do have a mig welder I am pretty handy with. I am going to clean as much out as I can and see about welding in a few small patches. If I can't I am going to kill the rust and seal and fill it in. Thanks for all the advice guys. It's nice to be able to bounce ideas off others and get some bearing as to what to do.
 
If interested you should check out my post on my floor board patch. It was a 1st time outing for me and it turned out okay. Seems as though a willingness to do the job right is the main ingredient. :icon_winkle:
 
That rust could be A LOT worse.

The cowl on 71-74 cars is a leaf and dirt catcher, and lots of them are rusted around the vent opening, where yours is not.

For the size of those holes, I agree that cleaning and durable filler or epoxy could work, if you can't get your hands up in there to patch with metal.

A friend of mine (who's much more patient and a better welder) just removed the top cowl panel, and fixed his lower.
That's way beyond my skill set right now.

One trick is going to be getting some sort of sealer (and cleaning, for that matter) on the top side.
 
My firewall and floors were a lot worse than yours, I patched mine with some stainless steel sheet metal I had laying around, a little filler, pop rivet and sealed it all up. I would love to someday cut it out and replace the firewall, but not in the budget, I now drive mine everyday!!!!
 
Bruzilla, thank you for the reminder. "Good enough" is just that. Sometimes I need the reminder on my own projects, since I suffer from engineer's disease (letting the perfect become the enemy of the good enough).

I feel your pain brother! :) I'm a recovering sufferer myself. My one-step plan is simple. Before I do anything, I ask myself "would I have done this in 1980?", which was when I had my first well-used 1973 Road Runner GTX. Back then if I needed something and it fit, and I could afford it, it went in. If I needed a door panel and there was one from a Charger that fit, it went in. If I needed a radiator and I could get one from a Satellite station wagon, it went in. If I needed something in black that I could only find in blue, it got painted and then went in. :)

And I'm happy with the results. I'm working on my front seats right now. I had originally priced out having to buy new cores since the seats were missing when I bought my car, new foam, new backs, and new covers, so I was staring at about $1,000 just in parts. Instead I bought two buckets out of a 76 Aspen for $45, which use the same frame as the 71-75 seats, and I found a set of like new Legendary covers for 1972 seats that came with excellent foam and seat backs for $300. :) I paid $17 for a pair of hog ring pliers and hog rings, and I'm going to do the work myself, so I'm into the seats for $362, and I learned from looking for after-market covers for FMJ seats that there are no reproductions to be had, so I'm going to sell the covers, foam, and seat backs off the Aspen seats and I'm banking I can get between $300 and $400 for them, which would mean I'm picking up a set of like new 1972 Road Runner buckets for free and maybe making some money on the deal. :)
 
Bruzilla, can you send me the link for the 72 seat covers and pads you got? That is something I need to get as well. I found a set of 73 seats in perfect shape for 250 but it's not the right pads or covers so I was going to replace those things.
 
No link is available. I found them on Craigslist from a guy who's restoring a really nice 72 GTX and had his rear seat cover fall apart after he thought it was ok, and even though the front seat covers were like new, he wanted to replace all the seat covers so there was no risk of a color mismatch. I just got lucky on that one.
 
I know this is an older thread, but I found some good info here. My 71 Charger 500 needs alot of patch work...meaning it has so much filler and fiberglass in it it'd probably not set off an airport metal detector. Now I feel alot better about having to patch the areas the way I'm doing it. I may be losing the place I keep my car (Dad's farm, he's looking to move) so I need to get it driveable and somewhat presentable ASAP until I have the time, place, and money to do a full blown resto. We live in an apartment and they are picky about the cars that are parked there. This thread gave me some good ideas to help us along. Thanks.
 
Auto Transport Service
Back
Top