• When you click on links to various merchants on this site and make a purchase, this can result in this site earning a commission. Affiliate programs and affiliations include, but are not limited to, the eBay Partner Network.

71 Road Runner Restoration Started

I think there is only one horn. I have some pics saved of survivors somewhere on an external hard drive. I'll try to locate them. Anyway, here are some pics of mine. I already removed mine, so I don't have any pics of it on the inner fender:

012.jpg

011.jpg013.jpg View attachment 141388017.jpg

My horn was mounted where the original paint (gold) is showing. I hope this helps.
- - - Updated - - -

- - - Updated - - -

Found a few:

rr engine bay b5blue.jpg
rr engine bay.jpgrrenginebay.jpg

- - - Updated - - -

I'm not sure why that last pic is there and I can't get rid of it.
 

Attachments

  • 014.jpg
    014.jpg
    45.6 KB · Views: 568
Just what I needed!!!! Thanks Big time!!!!

THANK YOU!!!!!
That is exactly what I was looking for. I received several PM's about this and you all are GREAT!!!
Now I will order one or two of the NOS ones that I found. They apparently have a stash of them, but they are not cheap. When they come in I'll post up some photos. I will give them a thorough exam & test them before I recommend them to anyone. They are supposedly made by Sparton.

Thanks again. We have a great bunch of people here on FBBO !!!!!!!!

- - - Updated - - -

OK. Just pulled the trigger on a horn. I couldn't afford two right now. Here is a photo from the add.
Thanks again!!!!
 

Attachments

  • image.jpg
    image.jpg
    46.2 KB · Views: 542
This is going to be great. I am following your build closely. I am still in the tear down stages of my Charger, your thread is really helping me.
 
I don't think you should have two horns. The whole point to dual horns is to have them each play a different note so the end result is a tone in harmony. The 'Voice of the RoadRunner' horns are all the same note, two of them would be redundant.
 
One horn for sure

You are absolutely correct. I plan on installing only one horn in the car thanks to the information generously provided by our fellow FBBO members. The only reason I was thinking about purchasing another horn was to have a spare on hand.
After all.... The horn is one of the distinctive hallmark items on a road runner that is so cool!!! The horn just has to work. Beep beep
Thanks for the input. Greatly appreciated.
 
Major Disassembly Started on the Bird!!!!

image.jpg

- - - Updated - - -

This is how she looked today around noon. It has been hibernating in the trailer while I was finishing up the Duster. I have been very anxious to get started back up.

- - - Updated - - -

image.jpg

- - - Updated - - -

Started out by removing the back bumper and then the rear lower valance.

- - - Updated - - -

image.jpg

- - - Updated - - -

I then removed the trunk lid too. The rear valance removal made it a lot easier to get to the nuts on the rear leaf spring shackles.

- - - Updated - - -

image.jpg

- - - Updated - - -

Then I removed the lower shock nuts, cut the rubber brake hose and disconnected the emergency brake cables. The last thing was removing the 4 nuts on the front spring hangers. It's best to support the rear end housing just enough to take tension off the leaf springs. It's a good idea to tie the shock absorbers up now too. If you don't the will hit when the complete housing with springs is pulled out from under the car.

- - - Updated - - -

image.jpg

- - - Updated - - -

Then I went to the front end and removed the nose clip.

- - - Updated - - -

image.jpg

- - - Updated - - -

This was followed by both doors and then the windshield was cut out.

- - - Updated - - -

image.jpgimage.jpg

- - - Updated - - -

Here is how she now looks.

- - - Updated - - -

image.jpg

- - - Updated - - -

The rear of the car is now supported by these caster wheel assemblies that I built a while ago for the Duster. I had to modify the upper bolt pattern a little to fit B/E body cars. My good friend who restores cars professionally gave me this idea and it works out great.

- - - Updated - - -

image.jpg

- - - Updated - - -

Hopefully if things go as planned tomorrow I will remove the front suspension, dash and steering column. Will post more photos then.

I also ordered new stainless steel gas tank straps and J bolts today for the new gas tank.

Stay tuned!!!

- - - Updated - - -

PS The back half of the car was supported by jack stands until the caster wheels were bolted in place. You can barely see them in one photo but trust me, they are there. I also had on safety glasses and heavy duty gloves on my hands. They were especially handy when removing what was left of the windshield.

Safety First !!!!!
 
wow a lot of work there thanks for sharing and keep posting :blob1:
 
Great thread and I am sure the shell has been anxiously awaiting this moment lol. All the smaller parts you have already restored have turned out awesome.

- - - Updated - - -

We've been looking forward to this .. WOOOOOOOOOOOOOOOOOOOOOOOOOOO!

X2. This will be a good one to watch.
 
Progress on Day Two

Today I had some errands to run before I could get started back on the car. Because of this I didn't get started on it until around 3PM. I was able to remove the steering column and the K-Frame. I didn't get to pull the dash though. Hopefully that will happen Wednesday. I made sure to take a TON of photos along the way, to be used later in documenting the car, but mainly to help with re-assembly. So if there are any particular photos of certain areas that you are looking for, just shoot me a PM and I will check to see if I have anything available.


So here are a few photos showing today's progress.

- - - Updated - - -

IMG_7039.jpg

- - - Updated - - -

Started out by removing the roll pin on the steering coupler.

- - - Updated - - -

IMG_8071.jpg

- - - Updated - - -

Then the three bolts that hold the steering column to the firewall.

- - - Updated - - -

IMG_4173.jpg

- - - Updated - - -

There are 3 bolts that hold the steering column in place against the dash. One of them also grounds out the steering column and has a black wire connecting the column to the dash frame. These come out next.

- - - Updated - - -

IMG_2897.jpg

- - - Updated - - -

This allows the column to drop down from the dash. Then it's easier to get at the 2 wiring connections that need to be un plugged in order to remove the column from the car.

- - - Updated - - -

IMG_2241.jpg

- - - Updated - - -

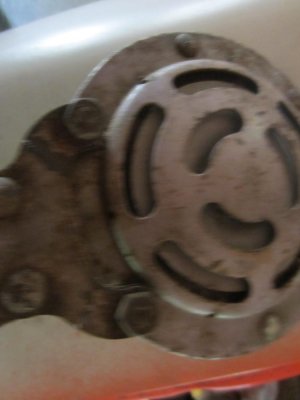
Now is a good time to check the condition of the plug connectors. About 90% of the time, the 12 GA. red wire from the ignition switch will be burned like shown in the picture. It will show up as a discoloration on the plastic.

- - - Updated - - -

IMG_0508.jpg

- - - Updated - - -

Then it's simply a matter of twisting / rotating the steering column in order to remove it completely from the car. This is the end result.

- - - Updated - - -

One other thing....... If you have a column shift car, or if your car has a neutral safety interlock system (1970 B and E bodies) and you haven't disconnected the linkage from the selector shaft, you will need to do this before you can remove the column.

- - - Updated - - -

Always Bag & tag bolts as you remove them. There are several different length bolts that are specific to the location where they belong. They may have the same thread size, and will physically screw into the opening, but the length will differ. Now is the best time to save yourself a bunch of headaches later........

- - - Updated - - -

There are also different diameter captured washers on some bolts. This is particularly true with the 3 bolts that secure the column flange to the firewall.

- - - Updated - - -

IMG_6039.jpg

- - - Updated - - -

Next I went on to remove the front K-member. The first thing I like to do is remove the spring clips at the rear of the torsion bar anchor. If you do not, the torsion bar will NOT come out. (unless you pull it forward).

- - - Updated - - -

You need to jack the car up and support it with a good set of jack stands. I also leave the floor jack in position under the K-frame as a back up safety.

- - - Updated - - -

The front wheels need to be completely off the ground.

- - - Updated - - -

Remove the front tires, and locate the torsion bar adjusters.

- - - Updated - - -

IMG_8609.jpg

- - - Updated - - -

Spray some good penetrating oil on the threads. Loosen them up by turning them counter clock wise, and relieve the pressure on the torsion bars. Using a 1/2" drive impact gun makes life a lot easier here.....

- - - Updated - - -

IMG_8086.jpgIMG_3817.jpg

- - - Updated - - -

Then remove the upper shock absorber nuts and unbolt the front bracket that is secured to the lower radiator support.

- - - Updated - - -

View attachment 142181IMG_1537.jpg

- - - Updated - - -

Spray some penetrating oil on the upper control arm caster / camber adjusting bolts. Then remove them and pry the upper control arm away from the frame rail.

- - - Updated - - -

IMG_2399.jpg

- - - Updated - - -

If you plan on re-using your existing rubber front brake lines, disconnect them before you pry the arm away from it's normal position. If you don't, you can see in this photo how much strain it puts on the flexible line. I always install new lines on everything.

- - - Updated - - -

IMG_5903.jpgIMG_7384.jpg

- - - Updated - - -

Then remove the clip that secures the line to a bracket on the frame rail.

If your not planning on reusing the lines, you can just simply cut the rubber section and worry about removing the brake line fitting from the bracket later.

- - - Updated - - -

As you can see in this picture, the brake line compression nut simply twisted off because it was so badly rusted. This is normally what happens .

- - - Updated - - -

IMG_3292.jpgIMG_8385.jpg
 
This next little trick is how to remove torsion bars if you don't have the proper tool to pull them. You want to make certain that you do not nick the torsion bars or they WILL break at a later date. Trust me on that one.......

Spray penetrating oil on the nut that holds the lower control arm in place on the K-Frame. This nut is actually tightening the lower control arm pivot. If your car has bad lower control arm bushings, the pivot may simply spin as you try to remove the nut from the shaft. If this happens you will have to apply pressure between the K-Frame and lower control arm. Even then sometimes the nut will still spin.

Spray penetrating oil on the front strut rod nut and roll pin. Drive the roll pin out and remove the nut.

- - - Updated - - -

IMG_7876.jpg

- - - Updated - - -

Pry back on the lower control arm. This will push the torsion bar out of the rear cross member without damaging them. They will still be in place on the front end where they slide into the lower control arm. NOw you can go under the car and simply pull them out from the rear.

- - - Updated - - -

IMG_5482.jpg

- - - Updated - - -

Now remove the plastic shields.

- - - Updated - - -

IMG_5321.jpgIMG_8823.jpg

- - - Updated - - -

Make sure your car is still supported properly on the jack stands, especially if you have been prying a lot on it. Position a floor jack below the center of the K-Frame to support it while you remove the mounting bolts.

Now unbolt the 4 large bolts that hold the K-Frame to the frame rails. They are normally 1 1/16" bolt head size. Here again a good impact gun will come in handy....

- - - Updated - - -

IMG_2536.jpgIMG_1212.jpg

- - - Updated - - -

Lower the floor jack carefully. Having an assistant here helps to keep the assembly from falling off the floor jack.

- - - Updated - - -

IMG_3446.jpg

- - - Updated - - -

This is the end result.......

- - - Updated - - -

IMG_0087.jpgIMG_2135.jpg

- - - Updated - - -

I got this Idea from my Mopar restoration buddy. It bolts in place using 2 existing K-Frame bolts. It has an added advantage in that you can crank the ride height up or lower it depending on how you need it to be. It's simply a trailer tongue jack and a good heavy duty piece of channel iron.

- - - Updated - - -

Now you can roll your car around easily. One person will have no problem using these rollers.

- - - Updated - - -

I know a lot of you all will know how to do this with your eyes closed. I wanted to post something to show others how simple K-frame removal actually is. This will come in handy if you want to swap from a Slant 6 to a V-8, or a V-8 to a HEMI. This gives you the general idea though.

- - - Updated - - -

IMG_4221.jpg

- - - Updated - - -

This is how she looks after Day 2.......
 
I have not see that T bar removal method before and that single wheel up front is cool. does it get tipsy at all?
 
No it's actually pretty solid. When everything is removed up front on the car, you can manually lift the front end up really easy.

I made this set up for use with the Duster but made it wider and elongated the mounting holes to accommodate the wider B and E body cars.

I made a mistake though when it was bolted on the Duster. I towed the car over to my neighbors house to use his lift and install the engine / transmission. I used the front bumper mounting bolts as the anchor point to tow from, so the front castor wheel was not supported.

Everything was good until I drove from a grassy surface to concrete. Just before the transition between the surfaces, the front wheel dug into the soil and it folded under the car. Luckily nothing was hurt.

This system works great on a hard surface. I would strongly recommend installing larger pneumatic tires on it if you plan on taking it " off road".

- - - Updated - - -

The lower the jack is the more stable it is as you push or pull the car around.

- - - Updated - - -

In these pictures I have it cranked up pretty high.
 
Thanks. Possibly another item for your future 'venture' with kickback to your buddy of course.
 
Great post. I'm going to be doing this to my car this weekend, and now I have step-by-step instructions. Thank you :VB toast: !!
 
Great post. I'm going to be doing this to my car this weekend, and now I have step-by-step instructions. Thank you :VB toast: !!

X2 .. was just telling a couple buddies about the T bar loosening method so me too, maybe not this weekend but pretty soon :VB toast:

You got beers stacking up on ya 71AG
 
Auto Transport Service
Back
Top