A helpful guide to quarter window installation. 66/67 Chargers

dieseldazzle

Well-Known Member
Local time
2:04 AM
Joined
Aug 31, 2014
Messages
2,667
Reaction score
1,929
Location
California
Seems only power window cars had it in 66 and maybe all of them in 67
 

Speedbird

Bird of Pray
FBBO Gold Member
Local time
2:04 AM
Joined
Jun 24, 2013
Messages
3,042
Reaction score
2,735
Location
Status Quo
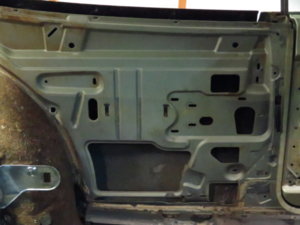
This is the down stop... a small rubber bumper pops into the hole at the bottom.
View attachment 418560

View attachment 418561


This is good news.
Now we know what the stops are supposed to look like.
IT appears to be a casting with a part number.
Before I saw this post, I spent some time Friday making some out of an old "come a long" handle.
And I was looking through my junk to see what I might use for bumper stops.
(Lower control arm bumpers come to mind.)
Instead of an independent bumper, I'll just put some rubber hose and poly on the stops themselves like I did on the stops that were actually in the car.

But based on what you have provided, it looks like the glass may go down further than what I was planning in the picture. I would need to shorten my "stops".
If the stops may be unnecessary when windows are cranked manually, perhaps I'll rethink it.
What do you think about my proposed downward travel limit based on your car?
I figure less is better for less wear on the assemblies.
Does your glass go down further then?
I would think your glass does go down further.
And I wonder why there is more than one slot in the frame.

20170429_140304 (Large).jpg
20170429_140534 (Large).jpg
20170429_140623 (Large).jpg
 
Last edited:

munger77

FBBO Gold Member
FBBO Gold Member
Local time
3:04 AM
Joined
Apr 25, 2015
Messages
353
Reaction score
261
Location
Atlanta, GA
Thanks for the tip on gluing the molding back on to the front facing edge of the glass using Locktite PL S30.
 

Speedbird

Bird of Pray
FBBO Gold Member
Local time
2:04 AM
Joined
Jun 24, 2013
Messages
3,042
Reaction score
2,735
Location
Status Quo
Thanks for the tip on gluing the molding back on to the front facing edge of the glass using Locktite PL S30.

For general information, I should note that Soft Seal CH1023 is the rubber seal that I used for the leading edge.
It is about 1/2 too long and has to be trimmed.
The flocking on it extends into the grove and makes it hard to pull in.
Removing that little bit of flocking helps ease installaion.

I get Locktite PL S30 at my Home Depot.
Lowes does not seem to carry it here.
It also comes in white which I have used for drip rail sealant.
I've found it to be a very handy product to glue things together.
Unlike silicon, it doesn't ever come loose and it can be painted.
I have two A bodies that I salvaged the rubber mat from junk yard cars.
It was the two color imitation carpet pattern.
One was green and black. The other was blue and black.
I thinned the black polyurethane with mineral spirits and rolled it on the mat to make it black.
It also repaired tears in the rubber.
 

67 Mopar

Well-Known Member
Local time
3:04 AM
Joined
Jan 16, 2013
Messages
812
Reaction score
1,943
Location
Randolph, NH
The rear glass should retract all the way down to the felts, just like the front door glass.

Side Shot.png
 

Speedbird

Bird of Pray
FBBO Gold Member
Local time
2:04 AM
Joined
Jun 24, 2013
Messages
3,042
Reaction score
2,735
Location
Status Quo
I'm working my driver's side now and I will also have to use screws on the fuzzy.
No way that side is going to stay in without the screws.


If someone is reading thread.
The following needs to be emphasized.
Ask me how I know.:BangHead:


Also be careful once the fuzzies are in. They want to catch on the chrome frame that is on the quarter window. Right where the fuzzy ends at the door pillar. What I do is file them lightly. When you take them out of the package, especially top cat, they are sharp from being machine cut. I bend them back very slightly away from the window frame direction and then file lightly.


Don't use any power tools to file it because it will catch the tiny little metal strip in gack it up....trust me I hammered a set doing that
 
Last edited:

Speedbird

Bird of Pray
FBBO Gold Member
Local time
2:04 AM
Joined
Jun 24, 2013
Messages
3,042
Reaction score
2,735
Location
Status Quo
Well, I got the things in and adjusted.
I have trouble with long step by step instructions when I'm trying to do something like this.
I hope the pictures help.
The only thing I might ad is now that I KNOW the clips on the fuzzies won't work on the double thickness of the stainless and body, I might pre-drill the stainless before I put the glass in. But that sounds tricky. The holes might not line up when I was done and I hate drilling stainless anyway.
So to be brief.
What I discovered is the regulator and unstops will adjust the quarter seal to door glass.
The tracks will move the whole glass in or out.
Or the track adjustments will move the top of the glass in and out if you need that.
It's all a balancing act.


20170603_150544 (Large).jpg
20170603_150745 (Large).jpg
20170603_150614 (Large).jpg
20170606_095033 (Large).jpg
20170606_103802 (Large).jpg
20170609_153055 (Large).jpg
20170609_100108 (Large).jpg
20170606_094728 (Large).jpg
 
Last edited:

Hemi31

Well-Known Member
Local time
3:04 AM
Joined
Jun 5, 2013
Messages
49
Reaction score
42
Location
Oh
I did mine about a month ago and wish I had seen this in advance. One of the most frustrating things I have ever done but they go up and down smooth now. Thank god its an air car cause I am never opening them again for fear I might have to do this again someday. :)
 

moparnation74

Well-Known Member
Local time
2:04 AM
Joined
Mar 27, 2014
Messages
10,505
Reaction score
17,775
Location
OHIO
This thread should be a sticky....Very informative and helpful in an area that can cause a headache...

Good job onlyone,:thumbsup:
 

Speedbird

Bird of Pray
FBBO Gold Member
Local time
2:04 AM
Joined
Jun 24, 2013
Messages
3,042
Reaction score
2,735
Location
Status Quo
This thread should be a sticky....Very informative and helpful in an area that can cause a headache...

Good job onlyone,:thumbsup:


upload_2017-8-1_9-17-39.jpeg


IF I had gotten a second Gen Charger for my son, I wouldn't have to spend so much time researching things that don't exist.
And would be finished by now and on to the Road Runner.
But he liked the Charger.
I've got a headlight rewire/mod working since I can't find (sensible) parts.
I'm still researching but I've completed the wiring diagrams and have some buddies at work proofing my relay contacts.
 

kiwigtx

Henchman #4 and Jack-Stand Racer #2
Staff member
FBBO Gold Member
Local time
8:04 PM
Joined
Jun 12, 2012
Messages
29,042
Reaction score
68,479
Location
NZ - just short of the South Pole
Thank you to the guys suggesting this thread become a sticky - some great information and marvelous pictorial instruction here.
I am quite sure a lot of members can benefit from this type of thread.:thumbsup:
 

Moparstyle

Well-Known Member
Local time
12:04 AM
Joined
Apr 23, 2017
Messages
852
Reaction score
892
Location
Nevada
I've got a 66 coronet 500 how do you get the side rear window out of the car I've been working on mopars since I was a kid roadrunners and barracudas and this one is kicking my butt getting it out lol
 

Maxrat

Well-Known Member
Local time
3:04 AM
Joined
Feb 13, 2018
Messages
383
Reaction score
288
Location
Virginia
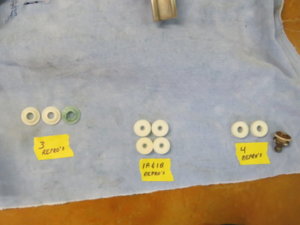
For clarification-- 66 Chargers did not have a down stop. I rebuilt the "triple rollers" and they function so much better. As usual, the roller kit I bought didn't have all the right pieces (this was previously discussed) -- make sure you trial fit all the rollers prior to assembly. Today is my day to put all of this back in.

042.JPG 044.JPG
 

Maxrat

Well-Known Member
Local time
3:04 AM
Joined
Feb 13, 2018
Messages
383
Reaction score
288
Location
Virginia
Also, I forgot to mention --- the Purple Power works miracles on the shift selector electroluminescenes.

013.JPG 015.JPG
 

Maxrat

Well-Known Member
Local time
3:04 AM
Joined
Feb 13, 2018
Messages
383
Reaction score
288
Location
Virginia
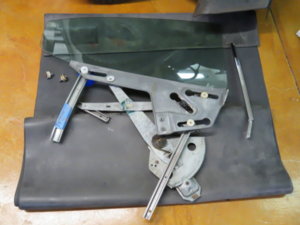
Lessons Learned: Yesterday we put in the passenger side quarter glass. What a day! 1. Installed the glass & frame - this was easy. 2. put the long track for the two triple rollers in from the bottom. 3. installed the two triple rollers into their slots -- then slid the track onto the rollers. 4. installed the rear short curved track loosely (the bottom of this track has more curve - top is straight) Note: the double "wobble" roller for the short track goes in later. 5. lifted the window up - installed the regulator through bottom opening. 6. inserted the forward regulator roller into the window frame slot (we put the clip onto this roller outside of the car and it worked really well (pre installed clip)). 7. inserted the rear regulator arm stud through the window frame, inserted the nylon bushing on the back side. note: used a sized socket to fit over the clip, then used channel locks to squeeze the socket against the clip and onto the stud. 8. inserted the thin short straight track and affixed it to the regulator arm. 9. took the double "wobble" roller and inserted it into the window frame & rear track (we assembled the double roller and put the clip on prior to installing it in the car -- this worked out really well). I wish I knew a better way to do this -- my friend and I spent six hours working on that *****. Keep everything loose until done. Once finished, I told my friend we'd have been fired at a Dodge assembly line (six hours on one window). I wish there was a video showing factory regulator installation.
 
Last edited:

Maxrat

Well-Known Member
Local time
3:04 AM
Joined
Feb 13, 2018
Messages
383
Reaction score
288
Location
Virginia
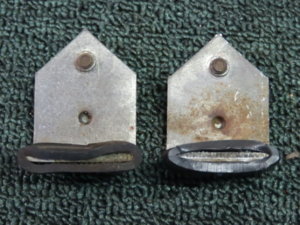
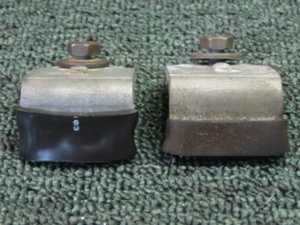
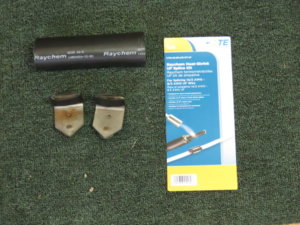
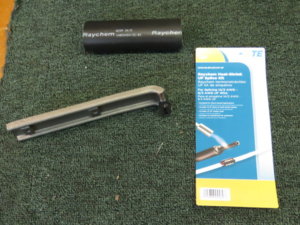
Is the rubber on your quarter window up stops brittle, cracked or gone. Without it, there's a big chance you could scratch your windows. Here's an easy solution. Go to Home Depot, spend $10 bucks, and buy Raychem Heat Shrink UF Splice Kit. It comes with thick walled heat shrink that fits right over the up stops. Cut to your desired width, get your wife's hair dryer (unless you have your own), turn it on and shrink it down. While your at it, don't forget about the front door window up stops -- they have the same rubber. There's enough shrink tubing in the kit to do all four.

004.JPG 005.JPG 008.JPG 010.JPG
 
Last edited:

Maxrat

Well-Known Member
Local time
3:04 AM
Joined
Feb 13, 2018
Messages
383
Reaction score
288
Location
Virginia
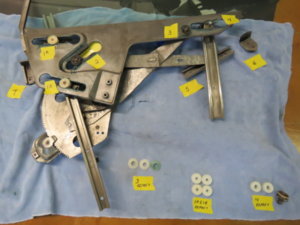
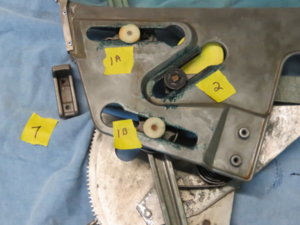
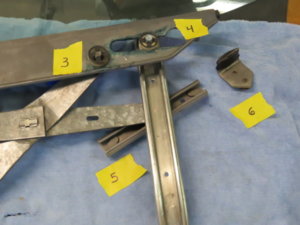
Installation of quarter window. Start with taping all metal edges and tape cardboard to the glass (double tape the stainless steel window trim). Lay a towel or rag at bottom of window well to prevent dropping something into the well. 1. Install forward up-stop #7. This will not get in the way of installing the window and frame. 2. Install window (with frame attached). 3. Install triple rollers 1A and 1B into window frame slots. 4. Raise window up and insert the long track through triple rollers 1A and 1B. 5. Install window regulator through bottom opening. 6. Insert regulator roller #2 into slot #2 (we put the roller and clip on prior to putting the regulator in. 7. Install the track for wobble roller #4 -- leave it loose. Do not install wobble roller at this point. 8. Now the hard part. Insert nylon bushing at #3, insert regulator stud through bushing, insert the second bushing on the other side, install the clip. I used a socket sized to fit over the clip and used large channel locks against the socket and frame to press the clip on. 9. Install the small regulator roller into the short track #5 and mount the track loosely. 10. Insert the wobble roller into track #4, manipulate the window and insert the wobble roller into the window slot #4. We made up and installed the clip onto the wobble roller outside of the car. 11. Roll window all the way down and install up-stop #6. Adjust the window and tighten it all up. Almost all the reproduction rollers did not fit and had to be modified.

002.JPG 003.JPG 004.JPG 005.JPG
 
Last edited:
Top