• When you click on links to various merchants on this site and make a purchase, this can result in this site earning a commission. Affiliate programs and affiliations include, but are not limited to, the eBay Partner Network.

Build Thread- 64 Fury Convertible

Looks like a nice body to start with. That's half the battle.

I noticed your oil pan and if you're using the factory steering components you might have clearance issues with the center link. The pan I used measured 2 5/8" tall where the center link passed under and it was just starting to touch. Anything measuring less than 2 5/8" would be fine. FYI

https://www.forbbodiesonly.com/mopa...p-new-residence.114133/page-34#post-911534354
Hmmm, Not sure My car qualifies as a ' Nice" Body....Its been hit on both sides, Rocker is shoved in on the Passenger side. Both doors are replacements, we have a lot of rust repair to do,Lower quarter, wheelwell arch, floors are going to need work as well, Both Lower front fenders need patches..... I hope my Oil pan os OK, I was told by the seller that it would work on a 64 B Body with a 440.....
 
Mud and a coat of lipstick hide a lot of surprises. Unless you know the history of a car, you can pretty much guarantee there are going to be surprises like what you found. Once they are found you are committed to clear the junk out of the way and fix it correctly or cheap out and do fresh mud and lipstick. As you have showed by your discoveries, this is what changes the cost of work drastically on body/paint work. The only way you know for sure what's under the paint is to gut the car and get it stripped. From there you know your path. Some will choose, wrongly and/or by their wallet, to cheap out and put a fresh layer of mud and paint on. Thats their right. Others will bite the bullet and get the work done correctly, like you. This is a great time to have the skills to do the work, have a friend that does, learn them or do labor trades with someone who does. Labor trades work very well. I traded some vehicle work with a friend of mine for his house contractor skills. Win win for both of us. Keep at it, it is going to be bitchin when its done.
 
Thanks we plan on doing all the metal work correctly. I wish I could find some better patch panels, haven’t been able to get any AMD ones, just the Shermans. I’m getting ready to search the forum, and I thought I remembered seeing a guy that was making the lower quarter patch panels on here. I could tell when I bought this car, that there was going to be a fair amount of this kind of work. You could see the wavy mud and I could tell that the patch panels that were put in the floorboards were riveted in etc. etc.… I got into it OK and mechanically it’s fairly sound. We’ll just see how it goes, But it’s just some metalwork, fortunately my buddy knows how to weld, and I’m learning…
 
Last edited:
I get the I'm learning. I've had to learn wood skills for my garage project. I built the deck thats on the topside. The contractor thats helping us with the build got me started on the deck then said see you in a few weeks. Just had to nut up and dive into it. I'm sure there are some issues somewhere and those that do that kind of work daily could pick it apart but I got a bid for $30k+ to do 600 sq ft of deck in redwood.
My contractor mentor said he and I could do it for less then $15k with me helping. I did most of it and kept it under $10k. I still consider myself as a wood butcher. Kern Dog and other contractor types know what that is.
 
I sent you a PM about M body parts. As for patch panels, I made my own. Rolled them under 10" PVC clamped tp the bench . The corners of the wheel well I hammer for from 3 pieces and welded them together. these were stretched 4". This behind the RR opening.
Doug

B25.jpg
B22.jpg
B26.jpg
B31.jpg
 
Last edited:
If there are any hot rod guys in the area, see if someone has a English wheel, shrinker stretcher and bead roller. Using those you can make up some of the more complicated areas.
 
Now I've reread this... Do you mean the actual seat Frame ( Under the Upholstery Metal framework) ??

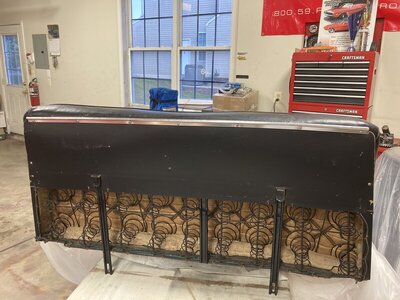
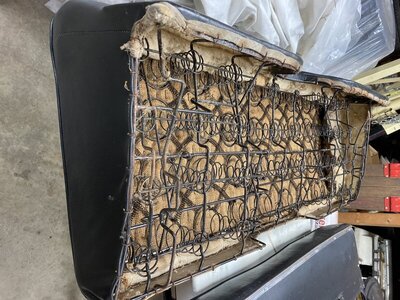
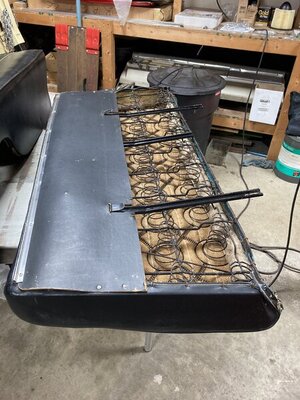
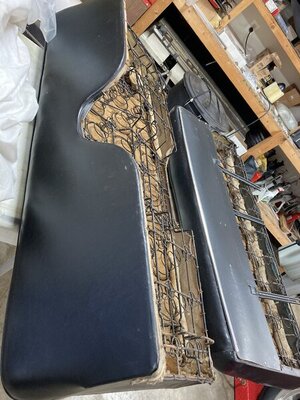
Hi Earl.... I mean what do the rear seat frames look like? Here's several pics of a friends 64 Dodge Polara convertible rear seat. I'm curious to know if your car has the same size seat frames with just Plymouth vs. Dodge upholstery over them? Thanks!

IMG_2441.jpeg IMG_2450.jpeg IMG_2454.jpeg IMG_2451.jpeg
 
Hi Earl.... I mean what do the rear seat frames look like? Here's several pics of a friends 64 Dodge Polara convertible rear seat. I'm curious to know if your car has the same size seat frames with just Plymouth vs. Dodge upholstery over them? Thanks!

View attachment 1052949 View attachment 1052950 View attachment 1052951 View attachment 1052952
Hi Steve,
I just took a pic of the lower frame so far....Here it is...I probably need to get it out to get you a better photo...
IMG_7699.jpeg
 
I sent you a PM about M body parts. As for patch panels, I made my own. Rolled them under 10" PVC clamped tp the bench . The corners of the wheel well I hammer for from 3 pieces and welded them together. these were stretched 4". This behind the RR opening.
Doug

View attachment 1050226 View attachment 1050227 View attachment 1050228 View attachment 1050229
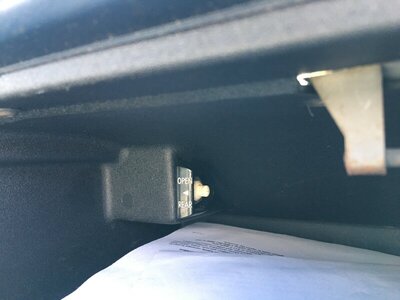
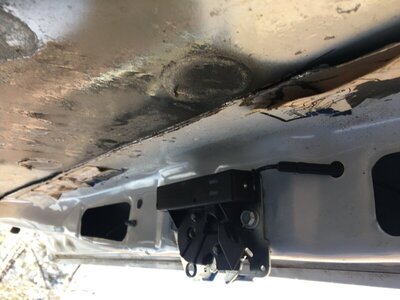
Very nice work on the metal here !!! Do you need the latch only, or the wiring and Glovebox switch etc etc from the M Body ??

IMG_7755.jpg IMG_7756.jpg
 
More progress today on the 64... Pre fitted the trunk drop down. Cleaned, painted inside of rocker patch area with rust protectant,welded in Rocker patch. Finished cleaning pass side inner wheel well, cleaned out behind rust hole and painted inside with rust protectant paint, etch primed inner fender, and painted inner fender with rust protectant top coat. Painted Frame on drivers side inner fender... Still have to strip, clean, patch and paint the inner fender splash guards... everything will also be under coated in this area later... I’m just cleaning everything to bare metal in search of any/All rust and repairing !!
772661_n.jpg?_nc_cat=100&ccb=2&_nc_sid=0debeb&_nc_ohc=wQSMJRhNKjMAX_y1_-F&_nc_ht=scontent-iad3-1.jpg
622529_n.jpg?_nc_cat=106&ccb=2&_nc_sid=0debeb&_nc_ohc=WIarkJJ01nEAX9klB3o&_nc_ht=scontent-iad3-1.jpg
998893_n.jpg?_nc_cat=109&ccb=2&_nc_sid=0debeb&_nc_ohc=dGlXAa99JQEAX805ViL&_nc_ht=scontent-iad3-1.jpg
240204_n.jpg?_nc_cat=102&ccb=2&_nc_sid=0debeb&_nc_ohc=uELeYBah8eUAX_ullGR&_nc_ht=scontent-iad3-1.jpg
241458_n.jpg?_nc_cat=108&ccb=2&_nc_sid=0debeb&_nc_ohc=AFFSSFh4buUAX9TdtS_&_nc_ht=scontent-iad3-1.jpg
709679_n.jpg?_nc_cat=106&ccb=2&_nc_sid=0debeb&_nc_ohc=s8I7ATZAzmkAX_kqDA9&_nc_ht=scontent-iad3-1.jpg
074631_n.jpg?_nc_cat=110&ccb=2&_nc_sid=0debeb&_nc_ohc=M2g12DGL2zQAX8tjjVT&_nc_ht=scontent-iad3-1.jpg
 
I have Trunk Drop downs, Rocker Panels, Lower fender Patches.... I had gotten two lower quarters from Carid ( Shermans) but man they were rough... I'm returning them.... What are my options on lower quarters...I havent seen an AMD one anywhere. Was there a guy making them on this forum?? Earl
Stay away from Sherman metal, usually always junk and never fits.
 
Nice project. Two things I would suggest since you are getting that involved. #1 is boot the old wiring/electrical system. Old electrical with sketchy connections/grounds etc don't play well with EFI. Time for some updates and add a bunch of grounds, replace switches/senders/sockets etc. #2 is if you are putting frame connectors in, do them with the drivetrain out and the car gutted if you are going to use a two post lift. When using a two post the car sags when you lift it and its fully loaded which causes door problems if you put frame connectors in. If the car is empty it won't sag on the lift. And having a ragtop makes it an even bigger issue with the sagging. If you can't empty the car out, use the lift to elevate it some and then set the car down on its wheels with them resting on some tire stands and make sure the doors work. That way when you do the structural, the car will be loaded/doors can open close normally and you won't have to fight the sag issue preventing normal operations of the doors. The picture shows some of the stands I built being used to support my deck while I was working on it. To give you an illustration of the amount of sag you will experience, jack the car up on the front and put jack stands under the car where the lift pads would be on the front, roughly the front frame rails and t-bar crossmember junction. Set it on the stands, let the jack all the way down and TRY to open and close the doors. With all that weight and no roof structure its really going to sag.

View attachment 1049343
Nice cribbing
 
The cribbing I did with the left over lumber and scraps from the garage build. Have 3 sets. Back to the 64. One thing you might consider is to get some of the rust encapsulating sprays, with the wands, from Eastwood or similar and hose down as much of the backsides of the inners panels/rails/structures etc as possible. Absolutely no manufacture did and coatings to the backsides of cars/trucks until maybe late 80's early 90's I believe. Newer vehicles have multiple dips and treatments before any paint or primer goes on. Old stuff got whatever overspray on them or the dealer undercoat add ons but still inner areas were bare. You can punch holes in if needed to spray down an area then put in the plastic plugs when done. Some of the sprays harden up but some are like a spray wax. The wax stuff is always creeping but it can cause problems where you might be painting because of that and cause fisheyes or poor/no adhesion for paint/filler. If you look at some of the German stuff, like V-Dubs, that are maybe 20 years old and are in areas where it gets hot you'll see where there are dust and goo trails on the lower doors and other areas from the material getting soft and liquified. Good for corrosion bad for cleanliness.
 
Stay away from Sherman metal, usually always junk and never fits.
Understood..... But theres No AMD stuff anywhere.... and the guy on here that made pieces vanished, and i dont have a parts car, and hand making the panels is above my skillset, and I have a source for hand made stuff, but they are expensive... So far, we've been able to Massage, and Hammer dolley the pieces into submission that shouldn't need to much filler.
 
The cribbing I did with the left over lumber and scraps from the garage build. Have 3 sets. Back to the 64. One thing you might consider is to get some of the rust encapsulating sprays, with the wands, from Eastwood or similar and hose down as much of the backsides of the inners panels/rails/structures etc as possible. Absolutely no manufacture did and coatings to the backsides of cars/trucks until maybe late 80's early 90's I believe. Newer vehicles have multiple dips and treatments before any paint or primer goes on. Old stuff got whatever overspray on them or the dealer undercoat add ons but still inner areas were bare. You can punch holes in if needed to spray down an area then put in the plastic plugs when done. Some of the sprays harden up but some are like a spray wax. The wax stuff is always creeping but it can cause problems where you might be painting because of that and cause fisheyes or poor/no adhesion for paint/filler. If you look at some of the German stuff, like V-Dubs, that are maybe 20 years old and are in areas where it gets hot you'll see where there are dust and goo trails on the lower doors and other areas from the material getting soft and liquified. Good for corrosion bad for cleanliness.
Yeah, I have been putting the various rust encapsulators, brush on Spray on and the nozzle type on a hose that sprays inside of inner panels everywhere i've opened one up......
 
Hi Steve,
I just took a pic of the lower frame so far....Here it is...I probably need to get it out to get you a better photo...

Hi Earl. Thanks for the photo of your lower seat. No need to post any add'l photos cause I can see from that one pic that the '64 Plymouth rear seat bottom frame is totally different than the '64 Dodge seat frame.

Thanks again, and good luck with your project!
 
Hi Earl. Thanks for the photo of your lower seat. No need to post any add'l photos cause I can see from that one pic that the '64 Plymouth rear seat bottom frame is totally different than the '64 Dodge seat frame.

Thanks again, and good luck with your project!
Sure Steve, I could see that as well. Good luck with yours as well my friend !!
 
More progress this evening. Got the rocker patch finished. Finished a patch for Pass inner fender vent area, coated everything in that area with rust prohibitor inside and out. Finished the small patch over the wheelwell on drivers side. Removed Hood trim & Most of trunk trim. Finished stripping the quarter down to Bare metal...this car had three paint jobs on it, so i'm stripping everything off to bare metal with the exception of under hood and trunk which are still factory color...If theres no rust anywhere on the undersides ( and for now, I don't see any ) I wont strip the undersides all the way back to metal.
604386_n.jpg?_nc_cat=103&ccb=2&_nc_sid=0debeb&_nc_ohc=Vz_y_voPlJoAX8L4erA&_nc_ht=scontent-iad3-1.jpg
nc_oc=AQlWQIEOnxk0VPGXfL8iXXogQekqZ6Fi8VUmUfNNY6vsBanmLjBhO5UPwJP0HOH4Pec&_nc_ht=scontent-iad3-1.jpg
469493_n.jpg?_nc_cat=103&ccb=2&_nc_sid=0debeb&_nc_ohc=y_7Qhl_VVpoAX-wRc3z&_nc_ht=scontent-iad3-1.jpg
756176_n.jpg?_nc_cat=104&ccb=2&_nc_sid=0debeb&_nc_ohc=XAeJ1NZeQqoAX9EUBPs&_nc_ht=scontent-iad3-1.jpg
750266_n.jpg?_nc_cat=107&ccb=2&_nc_sid=0debeb&_nc_ohc=PlZYR7WTIjQAX_vQNnV&_nc_ht=scontent-iad3-1.jpg
 
Hey Guys,
I scored on a great find this weekend. A perfect front fender for my Passenger side !! Mine was rough. It was leftover from a build, and the best part was it was $100 !!! I just had to drive 5 hrs in the snow over the mountains to get it LOL !! I also was able to get a Wheelwell arch Patch from a local friend who had it, and two nice Inner splash shields... Mine were full of holes, saving me some work there as well...We then started to disect the rear wheelwell area to see just whats under the Bondo, and Spray foam.... we found this ?? Has any of the Body men here seen anything like this? it looks machine made, and was used as a form for the inner wheel lip....then they coated it with Bondo ??? I have a lower quarter patch, and a wheelwell patch & a trunk drop down, Now i'm shopping for a wheelwell tub, instead of trying to make it all....
385765_n.jpg?_nc_cat=106&ccb=2&_nc_sid=0debeb&_nc_ohc=fbcjUsNwXycAX_H_Vkl&_nc_ht=scontent-iad3-1.jpg
772747_n.jpg?_nc_cat=100&ccb=2&_nc_sid=0debeb&_nc_ohc=BGEac8a3_A8AX9JWWZs&_nc_ht=scontent-iad3-1.jpg
024578_n.jpg?_nc_cat=105&ccb=2&_nc_sid=0debeb&_nc_ohc=F4jd5tv-xVAAX89kCZ3&_nc_ht=scontent-iad3-1.jpg
360983_n.jpg?_nc_cat=100&ccb=2&_nc_sid=0debeb&_nc_ohc=_KtTl9AifCkAX9RbG_N&_nc_ht=scontent-iad3-1.jpg
540278_n.jpg?_nc_cat=102&ccb=2&_nc_sid=0debeb&_nc_ohc=QVxd5s1mJYUAX8blqez&_nc_ht=scontent-iad3-1.jpg
 
Auto Transport Service
Back
Top