• When you click on links to various merchants on this site and make a purchase, this can result in this site earning a commission. Affiliate programs and affiliations include, but are not limited to, the eBay Partner Network.

Drillin Da Spot Welds

moparmarks

I'm just a guy with a screwdriver.
FBBO Gold Member
Local time
3:08 PM
Joined
Jul 31, 2011
Messages
9,165
Reaction score
4,327
Location
Western Colorado High Desert
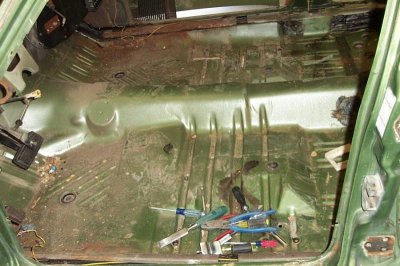
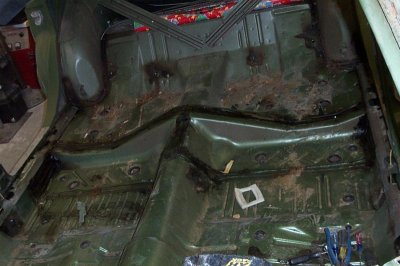
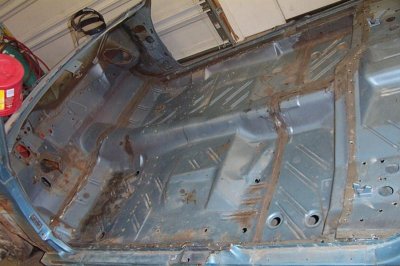
A few people are taking on the task of metal re-placement. Beings how spot welds are my cup of tea, I thought I'd post some info on the subject.
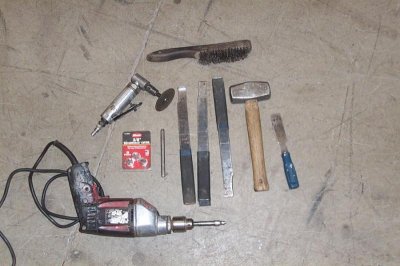
Here are some of the tools that you will need. In addition a set of torches and a sawzall are a must as well as gloves and eye protection.
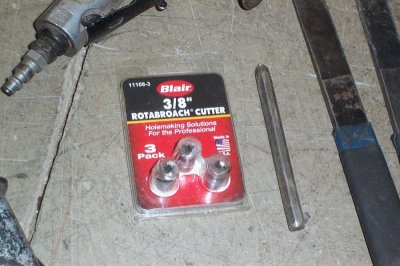
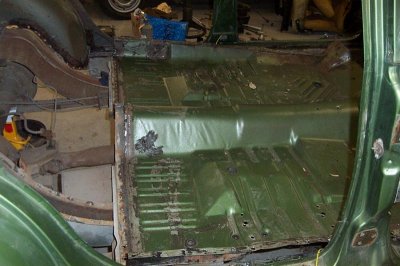
Buy the Blair Rotabroach cutters. Don't waste you time and money on any others. A good variable speed drill motor. The trick with spot welds is low RPM. Like 200-300rpm on the drill.
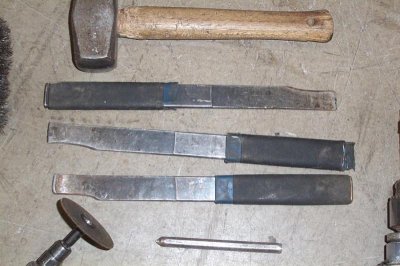
Get a few Seam Splitters knife blades and a good 2lb single jack[hammer]. I curve one right and one left for getting into corners and tight spots. There are a few areas that you can't get a drill in there and thats where the seam splitters come in.
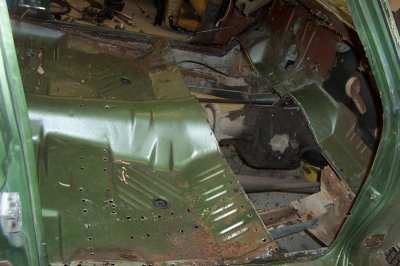
There are a few seams that have lead or brass, thats where the torches are needs.
 

Attachments

  • DCP_0001.jpg
    DCP_0001.jpg
    62.5 KB · Views: 750
  • DCP_0002.jpg
    DCP_0002.jpg
    72.3 KB · Views: 730
  • DCP_0003.jpg
    DCP_0003.jpg
    70.2 KB · Views: 767
Nice! Just make sure to use the proper respirator equipment when heating lead.
 
Are you actually gonna do a how to on this? I could use it as I am fixin to replace a piece of floorpan.
 
Well I was going to try and show some steps and tricks. I'm really bad on this box. Much better with a tool in my hand instead of a mouse.
 
Here is some floor pan removal.
First remove all the seam sealer. I use a chisel with a hammer when needed. Also use a wire brush, the hand type, not a power wheel brush. Takes me about an hour to remove all the sealer from the car.
Carefully drill out the wire channel along the rockers.
Go crazy on all the spot welds along the rockers, rear tubs and frames.
Drill out the floor to firewall seam. I use a seam splitter blade over the hump usually. Sometimes I use a blade across this entire seam.
Now with all the welds drilled out the pans need some encouragement to come out. Go around all the seams with a blade and hammer to knock things loose. Blade is also great for finding the welds.
As with removing any part, you need to look it over front and back, top and bottom to see where all the welds are and then plan your attack.
Really the only time I cut with a Sawzall or torch is to remove unwanted metal out of my way. You can do this when removing your old rusted pans and such. Cut around the frames removing sections of the pans. That gives you more room to hammer a blade across the top of the frames.
As for drilling the welds, like anything it takes time and practice. Use a center punch. After a while you'll be able to do most of them without a punch. Drill SLOW. 200-300rpm. I only time I use oil is on the rusty welds. Just a couple drops.

- - - Updated - - -

Here is another. All the B-body 62-74 uni-bodies are pretty much the same design wise.
 

Attachments

  • DCP_6942.jpg
    DCP_6942.jpg
    77.1 KB · Views: 654
  • DCP_6943.jpg
    DCP_6943.jpg
    62.9 KB · Views: 656
  • DCP_6983.jpg
    DCP_6983.jpg
    66.3 KB · Views: 658
  • DCP_6982.jpg
    DCP_6982.jpg
    65.4 KB · Views: 650
  • DCP_0002.jpg
    DCP_0002.jpg
    70 KB · Views: 670
  • DCP_0004.jpg
    DCP_0004.jpg
    66.7 KB · Views: 640
  • DCP_0179.jpg
    DCP_0179.jpg
    65.3 KB · Views: 645
  • DCP_0178.jpg
    DCP_0178.jpg
    66.8 KB · Views: 652
  • DCP_0181.jpg
    DCP_0181.jpg
    69.7 KB · Views: 669
  • DCP_0182.jpg
    DCP_0182.jpg
    69.5 KB · Views: 648
  • DCP_0183.jpg
    DCP_0183.jpg
    69.3 KB · Views: 660
You make it look easy. What year is the green car?
 
Well my arms hurt all the time now days. Its really not hard, just hard on me.
Green one was a 69 and the blue one a 64. 2 of many.
 
in that amazon link is the BLR11096 cutters the ones to get

thx
 
So floor pans from a 66-67 4 door and 2 door are the same? I was thinking that was the case and I know the 62-65 are the same but I wanted to verify.
 
Mark ... thanks for the excellent info in this post.

I am needing to do a front pan replacement and perhaps the rear as well on my 64. I noticed that you really don't have the green car supported off the ground and the torsion bars are supporting the front end weight. I am afraid of the body twisting or sagging if I did it that way. Have you ever had any problems doing it that way?

P.S. If you ever need a break from the frigid Colorado winter give me a call ... you can always pack up your tools and drive down here to Phoenix and give me a hand.
 
So floor pans from a 66-67 4 door and 2 door are the same? I was thinking that was the case and I know the 62-65 are the same but I wanted to verify.

They are. 62-70 the pans are mostly the same. 71-4 the rear foot well and trunk pans are longer.

- - - Updated - - -

Mark ... thanks for the excellent info in this post.

I am needing to do a front pan replacement and perhaps the rear as well on my 64. I noticed that you really don't have the green car supported off the ground and the torsion bars are supporting the front end weight. I am afraid of the body twisting or sagging if I did it that way. Have you ever had any problems doing it that way?

P.S. If you ever need a break from the frigid Colorado winter give me a call ... you can always pack up your tools and drive down here to Phoenix and give me a hand.

I'm not worried about that beings how I'm parting these cars out. In your case though yes you need to make sure the car is sitting flat and level. On a H/T or post car should not be big problem, on a ragtop yes. Can leave the doors on as a guide to see if the body is moving.

I live in the high desert so the winters aren't toooo bad here. Been a few years since I've been to Phoenix. Wouldn't mind a trip to the low desert.
 
Thanks guys.
I'll be adding more. Tail panels, firewall/cowls, frames and such. If anyone has any questions please post them and I'll try to answer them. Metal replacement is one of the most costly stages of a build. Can be very labor intensive.
 
Auto Transport Service
Back
Top