• When you click on links to various merchants on this site and make a purchase, this can result in this site earning a commission. Affiliate programs and affiliations include, but are not limited to, the eBay Partner Network.

"Gauging" My Factory Coolant Temperature Gauge

Dibbons

Well-Known Member
Local time
9:50 PM
Joined
Nov 29, 2014
Messages
4,753
Reaction score
5,471
Location
La Paz, B.C.S., Mexico
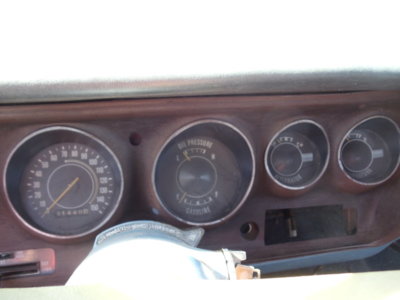
The '71-'74 rallye dash factory coolant temperature gauge only has two marks. Up to the first mark seems to be when the motor is considered "cold". Between the two marks seems to be considered "normal range." Anything past the second mark seems to be considered "overheating". That's how I see it anyway.

Before I had my gauges professionally restored (including the ammeter to voltmeter changeover) at operating temperature the needle would go past the first line indicator by a little bit.

Now I notice (after the "restoration") my coolant temperature gauge reads just a little bit lower at operating temperature (needle seems to ride directly over the first line indicator). Not a big difference.

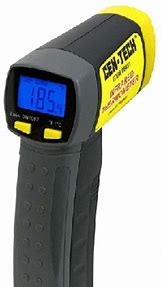
I brought out my Autozone purchased infrared thermometer to verify what was what. After a twenty-minute drive and a few more minutes idling in the driveway, I got these readings:
a) on the upper radiator hose about an inch above the hose clamp that holds it onto the water outlet/thermostat housing (which is rubber) 190 degrees.
b) on the base of the thermostat housing (which is metal) 205 degrees.

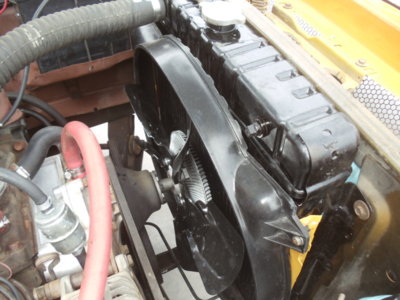
I forgot to mention I am running a Mopar performance five-blade viscous-drive fan, aftermarket repro shroud, aftermarket replacement 22 inch radiator, no coolant recovery system.

In warmer ambient temperatures, obviously the coolant temperature will ride more in the center of the gauge. It will be interesting to compare that reading during the summer months to get some idea of how "hot" the middle of the gauge reading really is.

I don't remember what thermostat is installed (whatever the Pep Boys girl gave me for a 1972 Plymouth Satellite Sebring Plus 318/auto no A/C).
DSC00041.JPG centech.jpg DSC01099.JPG
 
I'd suggest going directly to the source. Gauge reads off the temp sender, so try your temp gun on the sender itself, to get an idea what the gauge is reading.
Radiator hoses, inlet/outlet, will give different temps simply because of locations.
 
You can also read the ohms across the sender and see what you are getting at start-up and normal operating temperature. Our gauges are on a resistance range of 80-10 ohms (80 ohms being low end of the gauge, 10 ohms being high end of gauge). From information I have read, 23-25 ohms should put your needle in the middle of the gauge (I know,... It's not linear). It won't tell you what temperature you are running, but it will let you check the calibration of your gauge. (Keep in mind I did all my testing on '69 rally gauge set-up)

In other words,... you can see what the ohms reading is at your sender, and make a fair judgement of about where your needle should be expected to be. I set mine up so 75 ohms puts me just under the low line and 10 ohms puts me just over the high line.

So if your sender is giving off 75 - 80 ohms at start-up, the needle will be below the line, possibly pegged at the bottom. As it warms up, ohms will drop and needle will rise. You are saying that at operating temp, you are just over the line. I would expect to see somewhere around 50-60 ohms at the sender if the gauge is calibrated properly. If you are getting around 25 ohms at full operating temp, and your needle is just over the line, something is off.

Voltage to the gauges could be a little high or low (depending on how your voltage limiter is working) to cause things to be off, the ohms through the sender could be off, or the gauges may just need a little tweaking. If memory serves,.... the voltage to the gauges should be around 5 volts, but it's hard to measure because the OEM limiters pulsed the voltage to give an average of 5 volts. I tested my gauges with a DC power supply set to exactly 5 volts and used a series of resisters (10 ohm, 23 ohm, and 75 ohm) to test low mid and high on the gauges.
 
If our gauges are a little off, how are they corrected? Bend something somewhere?
All you can really do is add resistance (try adding resistors of different values in line with the sender wire until you get it where you want) but obviously this only helps if the gauge reads too high. You can't really remove resistance from the circuit if it reads too low, the only real option is to try another sending unit. I tried 3 different ones before I got one that reads where I want it to... (this is assuming the sending unit wire is in good condition, because it can have a higher resistance if it's corroded, etc)
 
If our gauges are a little off, how are they corrected? Bend something somewhere?

I can't speak for the non-Rally gauges, because the rally gauges are all I have ever messed with, well... other than the temp and fuel gauges on my Chev C-10.

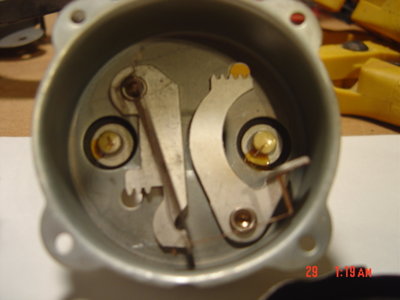
On the rally gauges though, there are two little openings in the back of the gauge that expose a "Star" like tab (See attached picture of a gauge with the face taken off). You can take a small standard screwdriver and slightly turn each of those to change the upper and lower positions. Kind of like adjusting drum brake adjusters. It's touchy though. If you change one, you may have to tweak the other. Go back and forth til you get it balanced best as you can.

The link below taught me how to go through and test, repair, and calibrate my gauges. The person that wrote it put a TON of information into the thread, and has since disappeared from the site. It REALLY is worth reading through the whole thing though. I learned a lot from it.

http://www.dodgecharger.com/forum/index.php/topic,37999.0.html

25blgog.jpg
 
I can't speak for the non-Rally gauges, because the rally gauges are all I have ever messed with, well... other than the temp and fuel gauges on my Chev C-10.

On the rally gauges though, there are two little openings in the back of the gauge that expose a "Star" like tab (See attached picture of a gauge with the face taken off). You can take a small standard screwdriver and slightly turn each of those to change the upper and lower positions. Kind of like adjusting drum brake adjusters. It's touchy though. If you change one, you may have to tweak the other. Go back and forth til you get it balanced best as you can.

The link below taught me how to go through and test, repair, and calibrate my gauges. The person that wrote it put a TON of information into the thread, and has since disappeared from the site. It REALLY is worth reading through the whole thing though. I learned a lot from it.

http://www.dodgecharger.com/forum/index.php/topic,37999.0.html

View attachment 685078
Thanks for the link! There may be such an adjustment on the non-rallye gauge, but it's not anything I can see with the cluster installed..maybe it's in there if you completely disassemble it though.
 
Thanks for the link! There may be such an adjustment on the non-rallye gauge, but it's not anything I can see with the cluster installed..maybe it's in there if you completely disassemble it though.

On the rally gauges, the openings are on the backside of the gauge. You cannot see them from the front
 
On the rally gauges, the openings are on the backside of the gauge. You cannot see them from the front
Can you see the back of the gauge when the cluster is all put together? On the standard there are two threaded studs sticking through the circuit board in the gauge location and that's it...unless I'm seeing the wrong thing. Maybe it's in there but everything needs to be disassembled?(trying to peek at it from the back with a mirror and flashlight LOL)
 
Nope,.... You couldn't on the rally gauges. The two posts went through the housing of the rally gauge cluster. They also went through the circuit board. No chance of seeing the openings I was describing. It would need to be disassembled.

You could still check ohms of the sender as I described to see how your gauge is reading though. Then only tear into it to calibrate if you really need to.

It's very possible that you're sender is reading higher in ohms than normal, causing your gauge to read low. I would test that before pulling anything apart. From what you saw on your IR Thermometer, it doesn't sound like you have an issue with temperature
Thanks for the insight... mine works very well since I (got lucky?) and put the matching sender in it, though I do check it with an IR temp gun frequently(obsessively?) but this is all good info! Good luck Dibbons getting it straightened out!
 
Found this old thread and hoping the people on it are still active. I have a 1971 roadrunner with a 440. I had been running a mechanical temperature gauge until I added AC and needed to remove the thermostat housing spacer with temperature ports for compressor clearance. That made me have to use the port for my mechanical gauge for my electric fans and force me to go back to the factory gauge. I replaced the temperature sending unit with one from O’Reilly and gauge was reading very hot when motor was at idle. I figured it was a cheap sending unit so I bought one from Classic Indisties and have the same issue. Previously my gauge worked fine but I wanted a “true temperature reading” so I went mechanical.

Currently my testing is as follows:
-Wire off temp sending unit, gauge reads all the way cold.
-Ground temp sender, gauge reads all the way hot.
-At initial start of cold engine, temperature gauge reads cold but quickly moves to the hot side. At normal operating temperature of 200° the resistance is 54 ohm and gauge nearly pegged hot
-I rigged up some resistors to creat 25 ohms and the gauge reads just above the first hash above cold at normal range.
1707165970211.png

Is this the correct position for 25 ohms? Trying to figure out if the issue is my gauge or my sending unit.

Appreciate any help!
 
That photo with the temp gauge about 1/3 of the way up is about correct for my parent's new (special order) 1971 383 auto Road Runner when it was new and also correct for my 1972 Plymouth Satellite Sebring Plus 318 Auto which I purchased about 10 years ago.

As I already mentioned in post #1: Unfortunately, when I sent the '72 SSP dash panel away to convert the ammeter to a voltmeter, my temp gauge now reads too low (it rides on top of that second vertical line (of four lines). And somehow my speedo is now not accurate anymore (and I paid a bundle to have the dash gauge panel renewed at the same time of the voltmeter conversion).
 
54 ohms shouldn't peg a gauge. 10 ohms is "full" scale. 74 is "empty" = cold.

A good, room temperature, temperature sender generally has about 360 +/- ohms resistance.
 
Auto Transport Service
Back
Top