• When you click on links to various merchants on this site and make a purchase, this can result in this site earning a commission. Affiliate programs and affiliations include, but are not limited to, the eBay Partner Network.

Header install questions...could be dumb ones.

Al K

Well-Known Member
Local time
4:18 PM
Joined
Nov 15, 2009
Messages
2,116
Reaction score
612
Location
In the garage. Under the hood. Again.
Kind of two(three?) questions in one thread;gotta economize where you can...

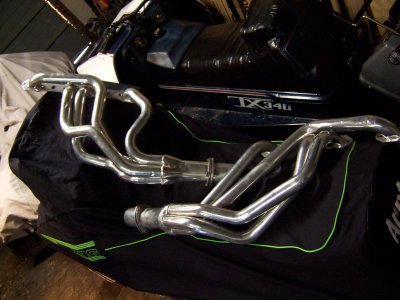
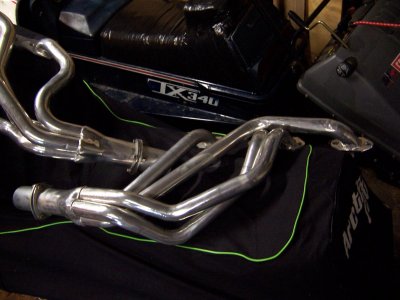
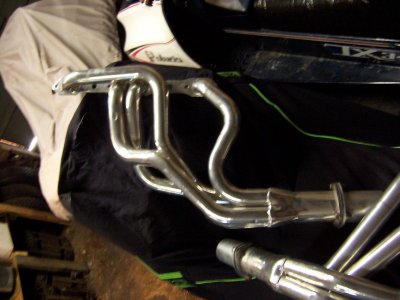
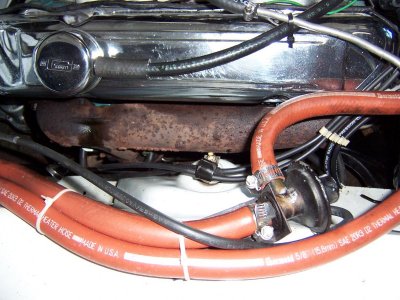
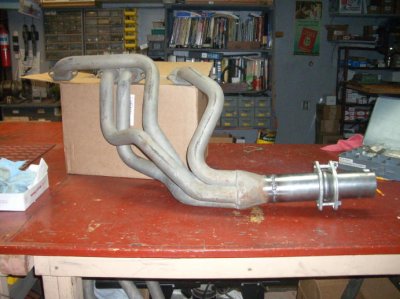
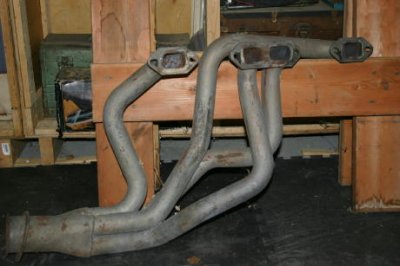
First,below are the headers I plan to install on the '64. Supposed to be Hedman's(1-3/4" o.d.);they look like their stuff. Supposed to be for 62-5 B's with a big block. OK,they look like what I've seen for that app. Are they? It's looking like I'm going to have to raise the engine,at least on the passenger side,but probably the whole mill in order to remove the old(Chrysler) manifolds. Any suggestions and tips are appreciated;this is a power steering and power brakes car as well.

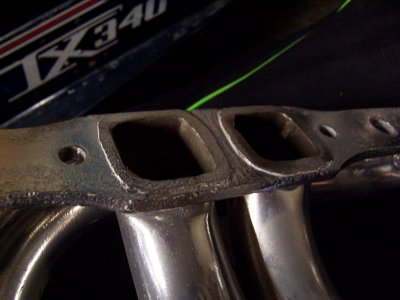
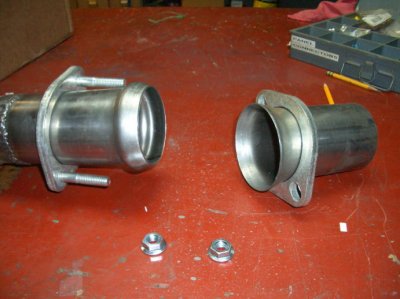
Next...Would you cats recommend getting the header flanges machined flat for a better seal? There's a bit of weld material(as can be seen) that seems would prevent a good seal. Gasket suggestions are welcome as well-thanks!

Ok,third(fourth? fifth?) question: I do need to replace or remove/repair the steering box;should I remove it before I pull the old exhaust? Looks like the header install would be easier without the box in place(doh!),but then there's the steering box re-install. Would that be easier with or without the left header in place?

That's all for now;these things always turn into an adventure for me,so I see the possibility of some humorous pics-without car damage or bodily harm,I hope.
 

Attachments

  • 100_2711.jpg
    100_2711.jpg
    116.4 KB · Views: 879
  • 100_2713.jpg
    100_2713.jpg
    103.9 KB · Views: 888
  • 100_2714.jpg
    100_2714.jpg
    105 KB · Views: 868
  • 100_2715.jpg
    100_2715.jpg
    91 KB · Views: 867
  • 100_2718.jpg
    100_2718.jpg
    167.7 KB · Views: 812
  • 100_2717.jpg
    100_2717.jpg
    183 KB · Views: 769
Exactly the same setup that I just removed from my '65 in favor of '68-'69 hipo manifolds. I had manual steering so I can't be sure of a power steering setup, but it will probably fit the same. It worked best in my case to remove the rocker covers because on the left side you have to work them up from the bottom with the starter at the same time, and get them over and behind the dipstick tube. No room with the rocker covers on. I also dropped the steering from the pitman and the idler arm. You have to put the starter up at the same time as it is "captured" by the headers. You can use a standard starter. Be sure to use sealant on the header bolts going in to the heads. If you have steering box work to do, do it when there is no exhaust manifolds or headers. The right side I put in from the top after removing the right engine mount bolts and jacking that side of the engine up. You may not have to do that, but it keeps things from getting scratched up. I also had to dimple the left side for the torsion bar. Take your time, be safe, and make sure that the car is in the air.
 
I have the BlackJack 1-3/4" headers, listed for '66-'72 B-body big block in my '65 and they fit just fine even with power steering. They go right in from the bottom. I believe they're almost identical except my flanges don't run across all four tubes.

Get the nose of the car up on jackstands as high as you can safely go.

Remove your existing manifolds and starter. Remove the nuts holding the motor mounts to the k-frame (both sides). The install is MUCH easier if you pull the steering column and it seems that my mini starter can go in after the headers are installed with the column out of the way.

Do the drivers side first. Raise that side of the engine and put in the header from the bottom up. I hung it on two bolts temporarily. Lower the engine. The passenger side goes in without raising the engine. I have a set of Remflex (thick soft graphite) gaskets that will go in afterward. Everybody I've spoken to has good things to say about them. I did true up the flanges with a large flat file just to be safe.

You DEFINITELY want to do anything you have to do with the steering box first. I don't see it coming out with the headers installed. It doesn't get in the way of the header install.

I modified my collector flanges for ball and socket type - no gaskets to blow out down there.
 

Attachments

  • CIMG2266_3_1.JPG
    CIMG2266_3_1.JPG
    63.5 KB · Views: 740
  • CIMG2264_1_1.JPG
    CIMG2264_1_1.JPG
    73.1 KB · Views: 723
  • IMG_8050_4_1_1.JPG
    IMG_8050_4_1_1.JPG
    34.7 KB · Views: 706
You guys did a great job with the install procedure.........I would only add removing the spark plugs, I know seems like a given but I've seen guys struggle trying to wrap the headers around the plugs.

Have Fun !!!!!!!!!!!!!!!!!
 
You also asked about the high spots on the flange,they dig into the gasket when you tighten the flange to the cylinder head:idea1:
 
Hey folks;THANK YOU for ALL the advice and help and suggestions. It really is appreciated!

So...looks like I should remove the old manifolds and part of the exhaust first before dealing with the steering box removal,eh? Hmmm,I see another episode of "So Easy,A Polish Caveman Could Do It". Pics alone won't do;might have to get video for this adventure. I'll have to figure out how to delete the swearing that may(?) occur. Perhaps a warning at the beginning would be in order;something like:

"The following video contains strong language,violence,tool abuse and bodily harm. Not recommended for women,children under 17,people with heart conditions,mimes,Chevy owners,or non-mechanical types. Do not attempt these stunts without parental supervision. Void where prohibited by law. All rights reserved."

That should keep the lawyers at bay.

I need to get on this soon;I'm not going through last year's adventures. I'm plan to be driving again when the weather is better-as in "dry,salt-free roads". That should be,oh,about June around here...
 
OK;a little update...

Driver's side manifold/exhaust pipe,starter removed. Because there's studs,rather than bolts holding the manifolds on,the passenger's side will require lifting the motor. Still have to disconnect the column from the box;which means removing the bracket on the firewall. No biggie? Well,I can't open the driver's door fully-seems there's this shelf full of parts-so crawling into the foot well could be an adventure. I'll call one of you guys if I get stuck,OK?

Let me get some pics(I'm taking a break now) and show you what I'm dealing with. I need a bigger garage! But,I've got one. There were many years a long time ago when all my auto work was done outside. We've all been there,so I ain't lookin' for sympathy:eusa_boohoo::eusa_boohoo::eusa_boohoo:...
 
We have pics! This might help in the advice(for which I'm very appreciative-THANK YOU!) department.

First: To remove the plug shields requires removing two head bolts from each head;can I just remove them,remove the shields and replace the bolts and torque back to 70lbs/ft.? If not,what do you recommend?
100_2831.jpg


Second;it also looks the engine is going up to 1)remove the pass. side manifold,and 2)of course,install the header. Where is the safest place to lift the mill? I'll be using a floor jack and probably wooden blocks,and would like to use a jackstand to hold it up and get the floor jack out of my way.
100_2836.jpg


It's also looking like the trans dipstick may have to come off,and maybe the engine tube as well.
100_2830.jpg

100_2835.jpg


I had considered my engine hoist;no room to get it in the garage. Working space is somewhat,uh...limited:
100_2838.jpg

100_2833.jpg

100_2837.jpg


Like I said;it could be worse. I could be outside...Oh wait;I might have room to move! Oh wait;it's supposed to rain like a bee-otch in the next couple of days. I'll stay inside,thank you.
 
Don't throw the spark plug sheilds away they are getting hard to fine,if you ever restore back to stogk!
 
Hey Al I'll do you a favor and take them signs in the front of your car off your hands. That should gain you some extra work space.:icon_axe:
 
Hey Al I'll do you a favor and take them signs in the front of your car off your hands. That should gain you some extra work space.:icon_axe:

Joe;they don't take up THAT much room! The nails that hold them there are a pain in the ***. And arms. And back. And... You should have seen the pre-divorce collection. That was nice...

I'm calling it a night;I plan on getting some work done this week. Steering box is still in the car. @#$%. &*%@. Oh well.
 
Header install questions-could be dumb ones(update!)...

Well,the steering box is in;heavy,but went in fairly easily. Haven't raised the mill yet. Took the driver's side header and without the starter,it went in so-o-o-o easy. OK,let's try it while installing the starter. Bad word time! On top of that,the #1 and #5 pipes are,or will be touching the starter. No hammers;but it's looking like mini-starter time. If I recall(must activate brain!),the preferred unit is a Dodge Dakota/360 engine piece-is that a "mini-"starter? Is it the right one? Or is there something else? I had the starter and header knock my noggin(that effin' hurts!) falling out of position. Ain't going there again. I haven't disconnected the center-link;looks like I may have to.

As far as the passenger's side;I will have to raise the motor,even to get the old manifold off. I'd like to keep the studs in there,but could go the bolt route on that side if necessary. The studs aren't really a problem on the driver's side,clearance-wise.

So...Any help/suggestions/hysterical laughter while saying "better you than me..." would be appreciated. I've had good ones already;thanks!
 
Last edited:
Back in the day.....I found that cutting the flanges between the pipes drasticly cut down on gasket leaks. Anyone still do that? Those shown above look like they're made that way. Cool.
 
Back in the day.....I found that cutting the flanges between the pipes drasticly cut down on gasket leaks. Anyone still do that? Those shown above look like they're made that way. Cool.

YY1;I had one side with a full flange and one side with the separate flanges. I don't know why... A little hacksaw work on the driver's side,and they're identical now.

Found some PN's for starters on another thread;I'll check on those tomorrow and let folks know what I find out. Then,I'll try the install again,and maybe get pics-no,I had better get pics. This is important educational information!
 
Al,my 91 dodge pickup with a 360 has a mini starter and are suppose to fit the BB engines.I just replaced it and it was $40 with a core
 
Jay;just called my local auto parts store,and they've got one in stock. I'll grab that before work and get on it tomorrow. Three weeks until the Bearing Burners show and swap in the Detroit area;I want to DRIVE my car down there!!!
 
Welcome to the thread that will not die! Actually,if this helps anyone else out,it's earned its place in history.

So,I get the starter,and it wouldn't go on properly. A tip from HEMI-ITIS helped tremendously,and now both the starter and header are on(the driver's side,anyway),and here's some pics and tips:

First,the starter;there's a plastic terminal that's attached to the solenoid that needs to be removed-that was my interference issue mentioned in my "Mini-starter" thread.
100_2914.jpg


Remove that,and the unit falls right into place. I laid under the car,feet forward,and after getting the header and starter held together,slipped them into place. Yes,they DO have to go in together. I did not have to remove the centerlink;just placed the collector on my chest as I worked the starter into place. Once it was there and secured,the header itself was pulled into place from the top.
100_2918.jpg

100_2919.jpg


More than enough clearance. Though not tightened down yet,I don't foresee any other serious clearance issues.
100_2921.jpg

100_2925.jpg


However...When it came time to put the collector adapter in place,I found out that the one I wanted to use(3" with a 3" t0 2.5" adapter slid over it) won't work.
100_2922.jpg


Looks like the short one will have to be used. These pipes don't hang down(I like that),but because of the tight fit to the floor,and the placement of the crossmember notches,I'll have to place an "S" bend immediately after the short collector adapter to connect to the existing exhaust system.
100_2924.jpg

100_2923.jpg


Not a difficult job,and I thank ALL of you for your help and advice. Now,on to the passenger side pipes. I'm going to try and just raise that side;carefully,of course,and see if I can get the old manifold off and the new pipes on. Of course,I'll have questions,and you'll have answers and balance will be maintained in the universe...

THANKS AGAIN!!!
 
You'll probably have fun putting the wires to the starter like I did.:bootyshake: Keep up the good work Al.
 
Put different headers on my Charger last summer. They are Hooker's and were they ever a sum bitch.
I had to take out the right side motor mount bolt and jack that side up too. I did the drivers side first because I knew that was going to be a pain. The right side was just as bad. Glad that job is done.
See you used copper header gaskets. Knock on wood, havent had any leaks with the stock gaskets. If I do, going to use the copper gaskets. I used plenty of Utlra Copper RVT on the gaskets, that seems to work well.
My old headers were on the car for 17 years. I think it was time for new ones.

IMG_0679.jpg
 
Auto Transport Service
Back
Top