• When you click on links to various merchants on this site and make a purchase, this can result in this site earning a commission. Affiliate programs and affiliations include, but are not limited to, the eBay Partner Network.

IT CAN BE DONE!!! Swapping a 69 Satellite/Roadrunner Grill to a 68 (or reverse)

VitaMeVas

Well-Known Member
Local time
10:14 AM
Joined
Jul 8, 2020
Messages
165
Reaction score
237
Location
Elkhorn, NE
If you have a 1968 or 69 Roadrunner or Satellite and would like to change the front grill to the other year, many will tell you it's impossible or it's too much a 'Pain In The Arse' (PITA)..... and they're very right. BUT...it can be done. I've done it and can walk you through the gates of hell to do it. Interested?? Read on. Not your thing .... tell me to 'f**k off'.

BUT WHY WOULD YOU DO THIS?? A few years ago, I bought a 1968 Plymouth Satellite with the original 318 stroked to 390 and just started cutting my teeth on Mopars. I didn't understand any of the differences between 68 and 69 and the car I bought had the front clip (fenders/grill/upper cross bar (or hood latch) from 1969. The tail end was 1968 and the dead giveaway is the turn sign markers/lights (square vrs round) and of course the grill. The seller told me about it, but I didn't care. I was just happy to have my project. **see idiot below**

JeJaSatie 062020-2.jpeg


And yes...I'm a dork. I wear flip flops year round and when welding.... a plaid shirt .... and cargo shorts. I'm generation X and don't really give a s4*t what others think of me. I'm happy to be alive... married.... have kids... and a car to bleed all over. I've never been cool .... I'll never be cool ..... and my fly is probably down. If you want to see me struggle with a project.... READ ON YOU SADISTIC PERSON.
 
Last edited:
So what does this look like? Keep in mind that this whole thread refers to Roadrunners and Satellites. The GTX was different and I don't know if any of this info applies. For the uninitiated... here's a 1969 front end.

OE 69 grill 100422.jpeg


And here's a pic from the car my 'new' 68 grill came off of.
Satie New OE 68 grill 100422.jpg

This particular car was a GTX that the owner wanted to have a 'GTX specific grill' on ....which is why he sold it to me. Also, to my knowledge, you can't buy a 1968 grill from any aftermarket manufacturer (Classic Industries, etc..). Why? I have no idea. At this time (2022), you need to get it from a junkyard or recycler. I believe the 1969 grill can be ordered from a catalog.

What you should also know is that the grill comes in 3 pieces (a left headlight bezel, center section, and a right headlight bezel). You're not just replacing the center section. The headlight bezels are different between 68 and 69 and mounting them is also an issue (we'll cover that later **author takes deep swig off tequila bottle**.

Here's what the 68 headlight bezels and center section look like.
Plymouth 68 Headlight Bezel 100122.jpeg

Plymouth RR 68 grill 100122.jpeg


And here's what the 69 headlight bezels and center section look like.
Plymouth 69 Headlight Bezel 100122.jpeg

Plymouth Front Grill 69 100122-1.jpeg


Lastly....if you scroll up and compare the two pictures of 68 grills. You'll see that one's center section is shiny chrome and the others is painted a flat grey color on the little rectangles. I BELIEVE that the roadrunner's had the flat grey color and the chrome was used on the Satellites. I'm sure someone will chime in with more info on this and how I'm not quite right (but you get the picture :p )
 
Last edited:
I have found over the years, several things on these old cars and trucks that the experts say can't be done...can be, and with out half azzing it either. sweet Plymouth!
 
As easy as these grilles and headlight bezels are to find and buy why would you bother? Use your time for some other “recreation”

yes it can be done, and they make boys into girls these days also, same question, WHY?

I totally understand going on your own path, but you may want to rethink a bit of safety in your life. For the older version of you.
 
Ok....I'll leave the headlight bezels for last because you need the center section installed to align the bezels correctly.

So....you unbolt the 69 center section and bolt in the 68. WRONG!!! It looks like it should do that but what it's mounting to is a 'T' piece of metal called an "Upper Cross Bar" or I've seen it called a "Hood Latch Tray". I copied this from 'the internet'. This piece is different from 68 to 69. You WILL NEED to find one from a junkyard or online used parts place. The "Lower Grill Panel" (see pic) is the same in 68 and 69.

Upper Cross Bar.jpeg


Here's a picture of the upper portion of the cross bar on mine (this is a 69 cross bar)
69 Hood Latch Tray Satie.jpeg

The difference in 69 include a different hood latch (the metal piece you grab to pop the hood) because its shaped differently. The big square hole is shaped differently and maybe moved over a tad. It has only 4 holes drilled across the very front of it where the grill center section screws to it. The locking retainer for the "Hood Latch Safety Catch" (we'll define this later) is bolted on with two bolts and is the same for 68 and 69. It's the part that can be adjusted up or down to make your hood latch tighter or not.

I found some online pics of sandblasted examples of upper cross bars on the 2 years. They're zoomed in so you can see the difference in the square hole and the lack of metal on the front of the 68 upper cross bar in comparison. Here's the 69 like what's picture above on my car.
69 Hood Latch Tray.jpeg


And here's the upper cross bar from 1968. Notice that it has less metal on the front of it, the squarish hole is more rounded in the front, but the two mount holes that hold the latch release are in the same place.
68 Hood Latch Tray.jpeg


Here I used some else's pic (probably from this forum) and drew arrows to indicate the upper cross bar on a 'finished' car. Also note that the 68 grill has 6 front mounting screws instead of 4 on the 69.
68 Hood Latch Tray 2.0.png


And finally after finding the upper cross bar for my project, I took a comparison picture. Funny thing was that it was also sunfire yellow (and rust).
Satie 68 Hood Latch Tray 101122.jpeg


And then I found some SS1 Sunfire Yellow paint for it after I sandblasted it. Yes... I know it won't match perfect and the rest of the engine bay is a mess. Like Johnny Cash said ....."One piece at a time".
Paint2 LatchTrayPaint 101922-2.jpeg
 
Last edited:
As easy as these grilles and headlight bezels are to find and buy why would you bother? Use your time for some other “recreation”

yes it can be done, and they make boys into girls these days also, same question, WHY?

I totally understand going on your own path, but you may want to rethink a bit of safety in your life. For the older version of you.
Please provide me a link for a 1968 Roadrunner or Satellite grill that is mass produced or 'repopped' I'd like to see that.
 
So now remove the older upper cross bar (2 bolts above each headlight bezel, 2 bolts attaching it to the lower grill panel, and 2 bolts at the bottom holding it to the lower radiator support. Start them all loose, then snug down. Then attach your 1968 hood release lever with the 2 philips head screws and make sure it causes the hood latch receiver to open when you pull the hood release lever.

Next we move onto the "Hood Latch Safety Catch"!!! It's this guy.
Hood Latch Safety Catch ??.png


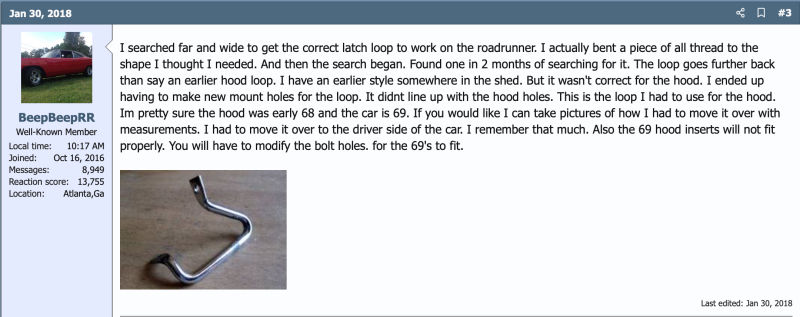
Depending on which hood you have or how your 'safety catch' is bent, it probably won't line up with the latch receiver. It's also easiest to figure this part out BEFORE you mount the grill center section in place so you can SEE it line up. If I were a lucky man, I'd find one from a junkyard that lines up well. Also, I read a thread on this forum that showed you can redrill the mounting holes over 5/8" towards the driver side to make the original one work. Here's a comment from BeepBeepRR on what I'm talking about.
Hood Latch Safety Catch 1.png

I ended up taking a piece of steel rod (either 5/16" or 3/8") and spent some time with a torch and hammer to make my own. I flattened out the ends and drilled a mounting hole. I ain't pretty, but it works.
69 Hood Latch Safety Catch 111522-1.jpeg

69 Hood Latch Safety Catch 111522-2.jpeg


Now you can spend a little time adjusting the hood latch receiver so it's lined up right, your hood gaps are even and the height of the hood is flat when closed.

And now the Grill Center Section.
 
Last edited:
I never typed those words.

I’ve not noticed them repped, yet. Here is one for sale. I have 68 bezels I don’t use

FOR SALE - 1968 Plymouth Roadrunner Grille
True. You didn't say that. You said:

As easy as these grilles and headlight bezels are to find and buy why would you bother? Use your time for some other “recreation”

Where I'm located (NE) these aren't easy to find. And I like to put my hands and eyes on something when I buy it. Not everyone is trustworthy. Why once...... I even heard of a person who sold a car part that they didn't even own. They took somebody's money and never gave them nothing. They called it a 'scam' I believe. Was the darnest thing. I'm sure there's no one else on here whose had that happen, but man.... that would be my luck. As far as 'why bother'? When I looked for advice on someone else doing this, I couldn't find anything to lead me in the right direction or let me know exactly which parts I would need. So I thought I'd do a write-up on it. Maybe 10 years from now when my mind is gone I can look back at this and laugh. Or my kids could read something about their dad when I'm gone. Or maybe ..... just maybe.....

....pause for emphasis....

.....I might help one person out who's struggling with the same thing.
 
Yes I was thinking nation wide shopping. There isn’t much on a local lever here either.

Yes there are scammers out there. Talk to the seller, get photos, etc. Use PayPal goods and services and you have some buyer protection.
 
The 69 grill center section mounts to the upper cross bar with 4 screws across the top and then has 4 mounting bolts that attach across the bottom to the lower grill panel using 4 U-type extruded clip nuts. This places the 69 center section almost directly on top of the lower grill panel with no spacing. Here's a pic of my 69 grill tilted with blue towels to highlight how this sits.
Plymouth Front Grill 69 100122-2.jpeg

U-type extruded nut clip example
U-Type Extruded Clip Nut (1:4-20) 2.png


On the 68 grill center section, it now mounts with 6 screws across the top. There are 5 tabs that stick out the bottom of the center section that create a space between the center section and the lower grill panel. The lower grill panel is the same for 68 and 69 and has holes in it already where these 5 tabs line up. Once again, it uses 5 bolts and 5 U-type extruded clip nuts. It helps to keep everything a little loose to get it all lined up before you snug it down. The 6 screws across the top are a 10-24 thread and I bought some that were 3/4" long at Ace Hardware.
 
Last edited:
Now that the upper cross bar and grill center section are locked down, we can finish with the headlight bezels. Once again... here's the 68 headlight bezel.
Plymouth 68 Headlight Bezel 100122.jpeg

and here's the 69 headlight bezel.
Plymouth 69 Headlight Bezel 100122.jpeg


Note that the chrome rings surrounding the headlight glass is round in 68 and square in 69. The black paint detail is also a little different.

You can also see that there are screw holes in 4 spots on each bezel (2 inner towards grill, 2 outer towards fender edge). The 2 on the inner side line up (and attach) with the center section of the grill, the two on the outer screw into a bracket welded inside the lip of the fender headlight indentation. BUT THEY AREN'T THE SAME ON 68 AND 69 FENDERS!! This is one 'modification' you'll have to make if you have the wrong fenders for the grill you're using (like me). And before you say it.....Yes I know my fender side marker lights are still square and I'm going to have to change that out too. Yeah.. Yeah...I know. That's for another day.

Back to the fender headlight indentation with bracket. Here's my left (DS) side assembly with the 2 painted tabs on the bracket.
DS Headlight Bezel 69OE 101222-1.jpeg


You can't see exactly what I'm pointing at? How's this?
DS Headlight Bezel 69OE 101222-2.PNG


There are U-type clips that the screws thread into and sit over the tabs and are centered on the tab 'hole'. I ended up using some U-clips from a glove box project that worked great from me. I got them from Classic Industries and took a pic.
Headlight Bezel Clips 112822.jpeg

Part #11429 67-72 GM Glove Box Clips

While we're at it, I also used some chrome headed screws from Classic Industries and here's a pic of them.
Headlight Bezel Screws 112822.jpeg

Part #R492 through OER. I used 8 of these for the both sides of the headlight bezels. Paint them black of you want them to blend into the bezels.

Alright.....now pay attention! Keep these pictures in mind and scroll to the next post! You have to 'modify' the tabs on those little fender brackets. And by 'modify', I mean get your needle nose pliers, needle nose vise grips, a little pry bar, a hammer, and likely a BFH ...and beat them to where they need to be.
 
So here's the 69 fender pocket with bracket/tabs again.
DS Headlight Bezel 69OE 101222-1.jpeg


And again.
DS Headlight Bezel 69OE 101222-2.PNG


Now use your tools and bend the little tabs forward so they're sticking out straight. Then clamp onto them further back with a needle nose vise grips and rebend them back in so the new bezels can sit further into the fender pocket. You may have to bend them angled up and down and Beat them in and out to get them to sit right. Keep checking your progress by holding your 'new' 68 headlight bezel in place. I had to use some tin snips to trim off the extra length of metal to clear the bends of the headlight bezels themselves. Check the gaps between the headlight bezel and the sheet metal above and below the bezel as well as how far the bezel sits in the pocket. You'll want to have the 2 inner screws attached to the mounted center section to help with alignment. Once you get it right (or close enough) the tabs may look like this.
DS Headlight Bezel 68Mod 112822-1.jpeg


S4*t!.... I forgot about your crappy vision and bifocals. Maybe this??
DS Headlight Bezel 68Mod 112822-2.jpeg


I know it ain't pretty, but it works. You can see that after I got the tabs where I needed them (by placing the bezels over the modified metal tabs .... aligning my gaps.... then marking the future hole with a sharpee) I drilled some holes and placed the U-type clips over the 'modified' tabs.
 
FINALLY!!! Get out the screws from above post #15 and install both headlight bezels for the last time and you're done.

Here's what I started with (1969 grill version):
Satie69 Grill 100622.jpeg


And here's the finished product, a 1968 Plymouth Satellite with a 68 grill and headlight bezels.
Satie68 Grill 112822.jpeg


And if you're wondering how well my SS1 Sunfire Yellow paint matched from my 68 upper cross bar. It didn't. My car's paint is so faded and in need of bodywork that it ended up like this.
Satie 68Grill ColorSS1 112822.jpeg


But oh well.... that's life. Some day I'll cut out the front fender side markers and put in the correct 68 circular functional turn signals. But that's for another day.

So that's what it takes just to change out the grill. Was it worth it? For me, yes .... but it was way more work than I had hoped for. Likely most people would never do this or they would order a new set of fenders OR find a whole new front clip from a 68 b body. But now you know what it takes and whether you should take it on. And now you know that IT CAN BE DONE .... IT JUST REALLY SUCKS. Best of luck to you!!!

Now let's get those trolls out to tell me what I did wrong or how they could've done it better.
 
Last edited:
As easy as these grilles and headlight bezels are to find and buy why would you bother? Use your time for some other “recreation”

yes it can be done, and they make boys into girls these days also, same question, WHY?

I totally understand going on your own path, but you may want to rethink a bit of safety in your life. For the older version of you.
I don't understand the motivation for this response.
The OP isn't forcing anyone to do anything. It seems like he is just doing some "show and tell" on his project.
The content here is of no use to me since I don't own a Plymouth like his but this may benefit someone else. I see his storytelling style is similar to mine. He uses some humor and pictures to tell the story. The forum can benefit from more members that share their projects with others. I like knowing that some member has learned something from my experiences with my projects. I know that I have learned plenty from others.
Good luck, Corn dude!
My post was #6. I had no idea he already had it done. Yes he did a great job. I like everything about the job and his humor.

Now KD, and with all the bullshit posts you have made and been on vacation from several forums for it, you call me out? LOL. Thanks. Carry on.
 
My post was #6. I had no idea he already had it done. Yes he did a great job. I like everything about the job and his humor.

Now KD, and with all the bullshit posts you have made and been on vacation from several forums for it, you call me out? LOL. Thanks. Carry on.
Bullshit posts.......

1 laugh.jpg


Go ahead and show me where I've been critical of someone's creativity in a tech topic. My conflicts are most often due to politics. This isn't that.

I've seen members post something they did or a video they made and some dork pops in to criticize their effort. It always seems to be from some dullard that never did anything creative in their life.
This may not be you at all.

1 hmmmm.jpeg
 
Auto Transport Service
Back
Top