• When you click on links to various merchants on this site and make a purchase, this can result in this site earning a commission. Affiliate programs and affiliations include, but are not limited to, the eBay Partner Network.

Need timing instructions for a slant six

74Satellite

Well-Known Member
Local time
2:36 AM
Joined
Nov 18, 2008
Messages
628
Reaction score
5
Location
Syracuse, NY
I have my engine torn down and the cylinder head removed. rotated the crank till the #1 piston was at TDC and popped the distributor cap and verified that the rotor was pointing at he #1 wire...which it was. I then pulled he harmonic balancer and timing cover off and noticed a problem.... was expecting to see the two alignment dots pointing at each other and they were not. The crank gear was correct, however th cam gear's dot was pointing to the left (opposite of where it should have been pointing.) I removed the chain and rotated the cam gear till the alignment dots were in the same vicinity but now the rotor is pointing the wrong way.

I have ZERO confidence when it comes to timing and looking for someone to give me step by step instructions on how to get this done correctly before I put this back together tonight. I would like to have the timing set before reinstalling the head and balancer etc.

Someone please help, I dont want to screw anything up so am at a standstill


Josh
 
Last edited by a moderator:
If your sure number 1 is at top dead center and ready to fire, make where ever it's pointing number 1. and then go around the dist in the correct direction and firing order.
 
Is this right?

Ok so this is where I have got it right now, and I need confirmation if its right or not before I start slapping it back together...i rotated the cam gear till the dot was pointing at the dot on the crank gear and then pulled the distributor and rotated the rotor till it was a little past the 1, because when I put it back it rotated a little.

So as of right not, the #1 piston is all the way up, the dots on the chain are pointing at each other and the ignition rotor is facing the #1 plug wire according to the cap.

This should be proper timing correct?
 

Attachments

  • timing 031.jpg
    timing 031.jpg
    110.5 KB · Views: 4,097
  • timing 032.jpg
    timing 032.jpg
    123.5 KB · Views: 7,041
  • timing 033.jpg
    timing 033.jpg
    117.4 KB · Views: 6,883
#1 piston at TDC. Both valves closed. Rotor set to fire on #1. The foregoing is required to run an engine, HOWEVER, when the dots on the timing chain are facing each other valve timing for cyl #1 will be on the overlap position.
 
#1 piston at TDC. Both valves closed. Rotor set to fire on #1. The foregoing is required to run an engine, HOWEVER, when the dots on the timing chain are facing each other valve timing for cyl #1 will be on the overlap position.

What does that mean exactly? The manual says they should be facing each other. Should they not be?
 
Yes, they should be to install the chain assy. Just put the chain on like you have it in the pic with the dots lined up. When it comes time to put in the dizzy, and if you are doing this with the head off where you can't verify compression, roll the crank one full turn and put the dist rotor to #1 plug tower. Ignore what the timing chain dots are doing at that point. Don't even look there!
 
Yes, they should be to install the chain assy. Just put the chain on like you have it in the pic with the dots lined up. When it comes time to put in the dizzy, and if you are doing this with the head off where you can't verify compression, roll the crank one full turn and put the dist rotor to #1 plug tower. Ignore what the timing chain dots are doing at that point. Don't even look there!

Can you call me? 903-331-two two five zero...or pm me with your # will be easier than typing like mad...I have already got most of the engine back together...I havent moved the crank yet, but I just finished pushing the balancer back on....I have everything back together save the pulleys, belts, fan blade, and radiator..
 
so..if I am reading this right....take the wires, plugs, and distributor back off...rotate the crank by hand 1 full rotation (360 degrees) set the distributor rotor to #1 and reinstall, put in the plugs and wires....reinstall the pulleys, belts, and fan. Say a prayer and hit the key and if everything else is right it should at least start? Then once it has started beg, borrow, or steal a timing light to fine tune it where it needs to be?
 
Thank you Meep for the call and Brian for the video....I set it up just like I was told and after all this work and money that I have put into it....the car still wont start....still cranking just like the original symptom. Im looking for any ideas or if anyone is in longview area that can come over and take a look at this with me.

I need a car badly...and if I cant get this running very soon I am going to have to sell it to buy another car and I do not want to do that at all but something has to give...I dont know what else to try and I am just flabbergasted
 
If you have fuel and spark you may have a bad ballast resister, take a test light (12VOLT) and put on + side of coil, ground other end, turn the key to on position, it should light up, turn to cranking and it should get brighter, if it doesn't the ballast is bad, if you don't have a test light hook a wire from + side of coil and run to positive side of battery and see if it runs. Try this maybe it will help.
 
sorry to hear it but I must have missed the original thread about what you did to troubleshoot it. I know its a pain in the a$$ but try to tell us what you did again and and how you got to doing what you did in this thread. Timing chain?

Aside from that Ron points out some good places to start but would be good to know how we got here.
 
Ill give that a try in the AM Ron! I already replaced the ballast resistor as a precaution but that doesnt necessarily mean its good though

Brian, I will retype the whole scenario once the kids go to bed tonight and I will start from the beginning till now
 
Ok here goes, with the prayer that someone can figure this out without actually being here!

This 74 satellite has been an extremely reliable vehicle over the years...never so much as a hiccup and up until 3 weeks ago, the engine had never been opened to even so much as replace a valve cover gasket. Everything on her is original right down to the coil and fuel pump. It was never meant to be a daily driver but a couple layoffs and no money forced me to sell my Dakota R/T and call the Satellite into service. It performed admirably and easily made the drive from upstate NY to East Texas once the wife found a job and we were forced to relocate. I started school full time and had to take summer courses in Tyler (1 hour drive each way) to keep the GI Bill money coming in since I havent found work yet.

The problems started about 2 months ago just after it had rolled 120,000 miles, during one of the trips to Tyler the engine seemed to stumble a little bit during deceleration but nothing serious and it would quickly recover and I never gave it a second thought. It didnt happen again for a couple weeks and then on a short drive once day, it stumbled a little again and quickly recovered and I thought "that was strange" again but still wasnt alarmed. On that same drive when I got home and put it into reverse to back into the garage the engine really started to stumble and I had to feather the fuel to get it to back up. When I shut the engine off it dieseled a little and made two "tap tap" sounds and stalled letting a little smoke/steam out the air cleaner. (Dieseling wasnt uncommon on really hot days, and this one was a record 110+ day).

I didnt drive it on the weekend and Monday morning when I got in to go to school, I loaded the kids in, hit the pedal 6 times and hit the key, she roared to life as usual and idled up as normal, but as soon as it reached top idle she idled right back down and died. I was able to get her to start a second time but this time it acted like she was running on 3 cylinders and blowing all kids of grey smoke out the tailpipe and she quickly died again. I tried in vain to get it to start again, but she would spit and sputter a little and try to start a few times but wouldnt catch and then eventually would just crank over without any attempt to start. I caught a ride to school that day and wasnt able to do much to her for several weeks.

When I did get around to tinker with her, I was certain it would be something simple and performed the following troubleshooting steps:

1) Replaced the ballast resistor, still crank no fire
2) Replaced the fuel pump and ignition coil (Mainly because they were original and the fuel pump had been making noise for a while anyways), same result--crank no fire
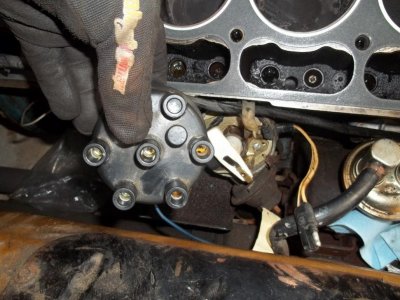
3) Had ignition control module tested at three places...all three said it tested good
4) Took a step back, and went into diagnosing/elimination mode
5) Looked down into carb while hitting excelerator and verified fuel was squirting into the bowls
6) removed fuel line from carb and had wife crank - fuel poured into a cup...so I am getting fuel
7) Next I built a spark plug tester by getting a new plug and opening the gap up to .075 and clamping a wire to it and grounding it to the body with an aligator clip. Plugged it into the wires and had wife crank....blue spark jumping the gap...so I am getting spark
8) Ran a compression test on all 6 cylinders with the throttle propped wide open and all plugs removed. Two cylinders were over 140 with the other 4 below 90 and 2 at 40. Thinking with compression that low the engine wouldnt start.
9) Checking oil (still clean with no signs of water in the oil,checked the cap and it was clean as well. Popped the radiator cap and there was some white foam in it but not much and the coolant looked real murky.
10) Had wife crank engine while i looked through the oil fill cap to verify the chain hadnt broken by watching the rockers move...they did.

At this point Im thinking I have a blown head gasket, so I ordered a full gasket set, new water pump, thermostat, timing chain and gear set, choke thermostat, plugs, wires, dist cap, rotor, upper and lower rad hose, and new heater hoses.

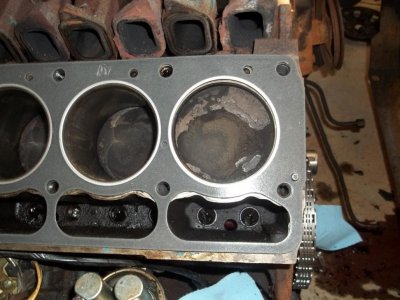
I tear the engine down completely and the head gasket is in 1 piece and looks fantastic with little to no discoloration. Then Im thinking ok, maybe I have a cracked head and take a magnifying glass and go over every inch of the head top and bottom and see no cracks.

Then I tap the valves with a rubber mallet to get a good seal and flip the head over...level it, out the old plugs back in, and fill the combustion depressions with mineral spirits to see if the valves are not sealing....none of them leaked a drop.

Since I had the head off I went ahead and replaced all the valve stem seals.

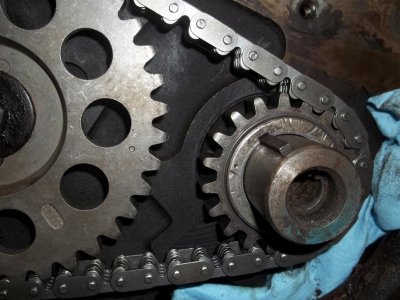
Im now thinking that it may have jumped time so I tear down the front of the engine and pull off the timing cover. I rotated the engine over until the #1 slug was a TDC and verfied that the ignition rotor was pointing at dizzy tower #1 which it was. OnceI got the cover off, both dots on the gears were at the 12 o-clock position, the book shows they should be pointing at each other with the dizzy pointing at 1 so I am relieved thinking I found the problem (Plus the chain was very stretched and practicaly laying down on the gears.

1) Removed the cam gear and chain
2) pulled off the crank gear
3) Reinstalled crank gear
4) Rotated cam gear till the dots were pointing at each other
5) Reinstalled the chain
6) Pulled the distributor and rotated the rotor to face #1 and reinstalled
7) Posted this thread
8) Decided to put it back together
9) Put everything back on up to the harmonic balancer
10) After speaking with Meep Meep on the phone I rotated the crank 1 complete revolution, repulled the distributor, rotated the rotor again and reinstalled.
11) Finished installing all the accessories, fan, radiator, belts, etc
12. Manually pumped the carb linkage till I got fuel into the carb and said a prayer...hit the key, and its still just cranking...not even attempting to start.

I dont know what else to do. All gaskets were replaced all torc specs were done correctly with a torque wrench, I labeled and bagged everthing so I know everything went back on in the right place. I just know it has to be something simple that I am missing or I just didnt get the timing right.

I hope this helps and I am sorry it is so long. Sharing one vehicle with 4 kids is hard on the family and it is starting to affect my wifes job and we cant afford a new car or to pay $80+ an hour for a mechanic to look at it. I can fix it if I know the problem...I just cant find the problem.
 
Would you believe me if i said i was scared to offer any suggestions? You have done everything but wash and wax and ive been where your at and i didn't smile either. Do you have another carburetor you can try?
 
BUMP! Come on you mechanics, he needs this car... Has to be process of elimination...
we've all been there!
 
ok the foam in radiator and the low compression numbers even when cold would certainly make me think head gasket or head. Were the two cylinders reading 40 next to each other? And where were the 2 cylinders reading 90 relative to the two reading 40? You said everything looked good with gasket and head. Did this thing have a major overheat at any point that could have possibly warped the head? I realize that is a bit far fetched but those numbers are weird. Was there any anti-freeze in the cylinders when you pulled the head?

Since you didn't say this I assume you didn't do it... Did you repeat the compression test after putting everything back together and if so what are the results? After doing a normal compression test and getting results squirt some 30 weight oil into the plug holes and repeat the test just to see if the results vary. Just to see if it is rings or valves. I would assume valves based on everything that has been done but just for kicks and grins see what the variations are if any.

Since it is all back together now. Remove #1 plug. Bump the engine until your finger gets blown off. Assuming there is even enough compression for you to feel it... Look at the timing mark and see where it is realtive to zero. 5 degrees BTDC is probably what you want to start or there abouts. Then remove the distributor cap and make sure it is pointing at number one. Also verify that your wires match the following:
vbpgimage.php
 
Auto Transport Service
Back
Top