Funship32
Well-Known Member
Okay B Body buds. Some of you were aware of my previous post about my floor board being rotted out under my go pedal. Thought I'd bring some of you up to speed as to where I'm at with my project since I've not posted a whole lot in the last two months.
"Where have you been?" you ask? Ok...so.... perhaps you haven't asked. But I'ma gonna tell you anyway! I've been up to my armpit in a rust floor board!
After talking to several members I decided to cut out what was bad and splice in a new piece. For me this was scary since my beeper is my prized possession...which I'm starting to hate *wink*...and I didn't want to foul up my prized possession seeing as this is my 1st outing doing sheet metal work. Watched it done plenty of times on T.V. but no hands on.
Well I don't know about the rest of you but I think I'm doing pretty good. Wasn't as bad as I thought and honestly a welder can help make up for some mistakes...like when I got too zealous with the spot weld cutter (1st time using it) and drilled through the frame tab. D'oh!! Oh well...saved the plug, held it in place, welded it and then ground it down. Problem solved!
Attached are some pix of what I'm doing. Not 100% done yet as I've still got to grind down the weld, reweld some missed spots and replace one small spot that was thin and which vaporized when I hit it with the MIG. But all in all I think it is turning out pretty well.
This is the original damage...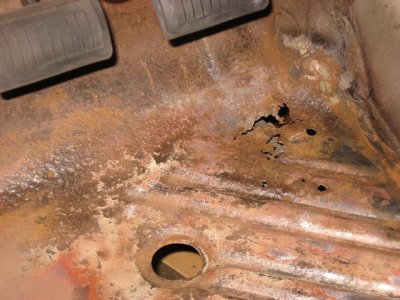
However as I removed and sanded and wirewheeled I found more...and more....until I just figured it all needed to go! So I cut a hole......
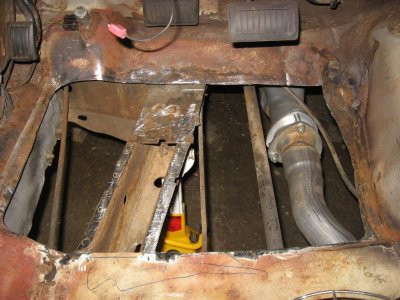
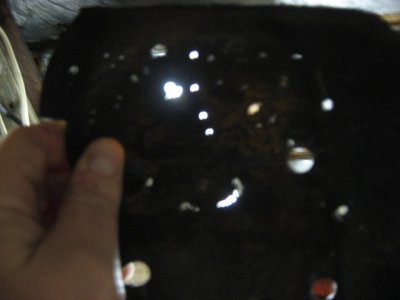
Probably a good thing I did too 'cause once out, oy, it all became apparent.
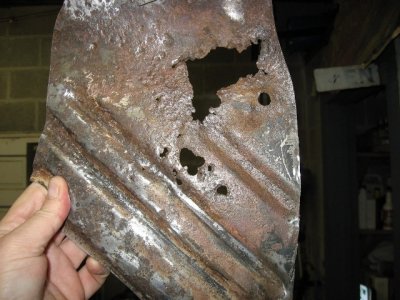
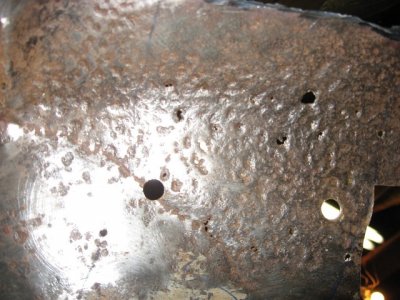
Which is REALLY obvious once light is shone under it. Kinda looks like the sky at night, IMO.
Then came the long and boring part. Getting a new pan, cutting out what I needed. And then trim, trim, tirm and trim some more until I got something to fit so I could butt weld it.
And this is where I'm at now.
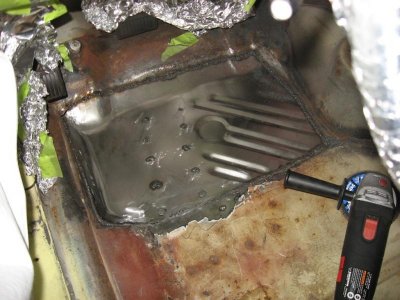
Again I'm not 100% done but I think it is looking pretty good for a 1st time outing. Professional? Hardly. But it is better than it was. And while not an easy or quick job, I can at least say I'm doing it myself. And so far, the hardest part was getting over my fear of doing the job to begin with.
That's all for now!
~Funship
"Where have you been?" you ask? Ok...so.... perhaps you haven't asked. But I'ma gonna tell you anyway! I've been up to my armpit in a rust floor board!
After talking to several members I decided to cut out what was bad and splice in a new piece. For me this was scary since my beeper is my prized possession...which I'm starting to hate *wink*...and I didn't want to foul up my prized possession seeing as this is my 1st outing doing sheet metal work. Watched it done plenty of times on T.V. but no hands on.
Well I don't know about the rest of you but I think I'm doing pretty good. Wasn't as bad as I thought and honestly a welder can help make up for some mistakes...like when I got too zealous with the spot weld cutter (1st time using it) and drilled through the frame tab. D'oh!! Oh well...saved the plug, held it in place, welded it and then ground it down. Problem solved!
Attached are some pix of what I'm doing. Not 100% done yet as I've still got to grind down the weld, reweld some missed spots and replace one small spot that was thin and which vaporized when I hit it with the MIG. But all in all I think it is turning out pretty well.
This is the original damage...

However as I removed and sanded and wirewheeled I found more...and more....until I just figured it all needed to go! So I cut a hole......

Probably a good thing I did too 'cause once out, oy, it all became apparent.


Which is REALLY obvious once light is shone under it. Kinda looks like the sky at night, IMO.

Then came the long and boring part. Getting a new pan, cutting out what I needed. And then trim, trim, tirm and trim some more until I got something to fit so I could butt weld it.
And this is where I'm at now.

Again I'm not 100% done but I think it is looking pretty good for a 1st time outing. Professional? Hardly. But it is better than it was. And while not an easy or quick job, I can at least say I'm doing it myself. And so far, the hardest part was getting over my fear of doing the job to begin with.
That's all for now!
~Funship


