• When you click on links to various merchants on this site and make a purchase, this can result in this site earning a commission. Affiliate programs and affiliations include, but are not limited to, the eBay Partner Network.

A helpful guide to quarter window installation. 66/67 Chargers

MAXRAT!
Thanks so much for the concise, step by step quarter window instructions!
I've been dreading that job since i got the car back from the body-shop. It was an empty shell.
Your instructions were a great help, since the FSM doesn't really help when your starting from scratch. I printed them up and took them into the garage.
They took me about six hours total. The worst part was the main regulator arm clip. Used a big pair of channel-locks and a socket. Its all adjusted up and ready to go.
Thanks again
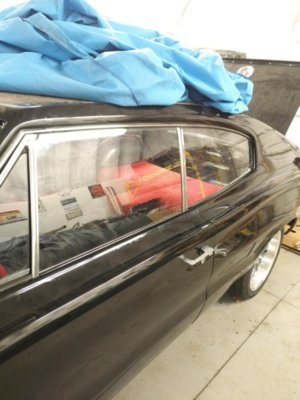
glass.jpg
 
Last edited:
MAXRAT!
Thanks so much for the concise, step by step quarter window instructions!
I've been dreading that job since i got the car back from the body-shop. It was an empty shell.
Your instructions were a great help, since the FSM doesn't really help when your starting from scratch. I printed them up and took them into the garage.
They took me about six hours total. The worst part was the main regulator arm clip. Used a big pair of channel-locks and a socket. Its all adjusted up and ready to go.
Thanks again

View attachment 935269

You're welcome David. We struggled through this and I thought nobody should have to go through it again without instructions --- simple things like lining the bottom with a rag, or putting cardboard on the glass to keep it from getting scratched. I don't ever want to do that job again. It kicked our butts.
 
Will be working on the quarter windows. The double roller swivel is extremely stiff, actually have to put the shaft in the vice and use pliers to swivel or turn it. Long time ago I got the kit, and everything worked well. Will be using some of the old rollers.
An aside, some of our Chargers had the rubber cushion and some didn’t . One non power window car had down stops.
The 67 Coronet down stop bolt holes do not line up with Charger down stop holes.
 
A BIG THANK YOU TO!!!
Onlyone and
Maxrat
Our oldest son and I put the a door and both quarter windows in on December 26th and 27th.
The information was so helpful, especially assembling the rear wobbly roller first. Had a problem getting the passenger door glass lined up.
Now the real fun begins, adjusting the quarter windows. Back in 1996 I did the quarter windows without a book. Younger and fearless. 2017 we did the blue 4 speed using the FSM.
I have one more quarter window to put in another car, so it will be complete, no more quarter window installs for me unless I am a helper.
A question, in my parts I have rollers like the vertical track front rollers, but the plastic roller is fixed and does not swivel. Where or what would these be used in?
No pictures because it just doesn’t work for me. I was successful once, but don’t know what has happened since.

I wish I could assist but I'm not sure what roller you're talking about. The triple rollers on the front track do swivel. The pot metal swells up and makes it seem it wasn't supposed to swivel. I had to drill out the rivets on mine and put a thin spacer in -- and then re- riveted it.
 
A BIG THANK YOU TO!!!
Onlyone and
Maxrat
Our oldest son and I put the a door and both quarter windows in on December 26th and 27th.
The information was so helpful, especially assembling the rear wobbly roller first. Had a problem getting the passenger door glass lined up.
Now the real fun begins, adjusting the quarter windows. Back in 1996 I did the quarter windows without a book. Younger and fearless. 2017 we did the blue 4 speed using the FSM.
I have one more quarter window to put in another car, so it will be complete, no more quarter window installs for me unless I am a helper.
A question, in my parts I have rollers like the vertical track front rollers, but the plastic roller is fixed and does not swivel. Where or what would these be used in?
No pictures because it just doesn’t work for me. I was successful once, but don’t know what has happened since.

You are saying you got the quarter windows in and have left over parts?
Can't imagine what those would be.
And are you talking about the small rollers that follow up the sides of these rails being "fixed"?
I called them rollers in the OP but now I can't say for sure if they actually rolled.
It seems like the may have been more like just guides that looked like rollers.
What ever they were none were included in my kit.

upload_2021-1-3_20-16-47.png
 
I'm not sure what roller you're talking about.

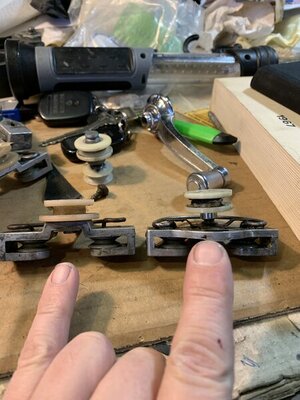
It’s these ones. The one on the right we used and it swivels. The one on the left is similar but does not swivel. And 440 4 speed has a whole bunch of them. I am guessing a coronet part but I am not sure. I helped him put his windows in. I am sure all the parts are in, and he has a lot of parts from several cars, but I do not recall the fixed (non-swivel) roller.

8DCC3E58-C1AB-4869-A0BD-A982DEB4E98E.jpeg
 
Yes.
The one on the left does not go with a Charger quarter.
The little "rollers" to either side of your index finger may be supposed to roll.
But as I recall the ones I worked on did not roll.
Even at the time I thought perhaps they were frozen.
Since they were not included in the kit and the assembly is difficult, I decided to leave well enough alone and concentrate on rollers that I did have which seemed much more important to the function.
Maybe Maxrat or someone that has them still in hand can clarify.
 
It’s these ones. The one on the right we used and it swivels. The one on the left is similar but does not swivel. And 440 4 speed has a whole bunch of them. I am guessing a coronet part but I am not sure. I helped him put his windows in. I am sure all the parts are in, and he has a lot of parts from several cars, but I do not recall the fixed (non-swivel) roller.

View attachment 1050128

I concur with with onlyone that the triple roller on the left isn't from a Charger (1st generation). Also, all three rollers are "rollers" -- one swivels. If you drill out the two rivets, the entire assemble comes apart. Once apart you can clean, resurface and lubricate the parts. I took the two smaller rollers, laid them on some 220 sand paper and sanded some thickness off (helped to make them roll easier). I used Scotch Brite to clean the ball and socket on the "single wobble roller". Add in a small spacer during reassemble to allow the ball and socket to function properly (pot metal swelling freezes up the swivel function). The rollers will roll again like new.
 
Last edited:
I concur with with onlyone that the triple roller on the left isn't from a Charger (1st generation). Also, all three rollers are "rollers" -- one swivels. If you drill out the two rivets, the entire assemble comes apart. Once apart you can clean, resurface and lubricate the parts. I took the two smaller rollers, laid them on some 220 sand paper and sanded some thickness off (helped to make them roll easier). I used Scotch Brite to clean the ball and socket on the "single wobble roller". Add in a small spacer during reassemble to allow the ball and socket to function properly (pot metal swelling freezes up the swivel function). The rollers will roll again like new.
I know the triple fixed roller is for something else, was hoping to find out what for. All of the rollers in the car turn.
 
The little "rollers" to either side of your index finger may be supposed to roll.

The little one will roll. I used a razor blade to create some room along the sides of the rollers, I have taken them apart too and sand if you can, but I also broke one (pot metal). You just have to work and work at it, clean, lubricate, turn, turn, repeat repeat. Gradually they free up. Have to be somewhat gentle on the potmetal and plastic.
 
Last edited:
I need to change out my scratched drivers side quarter window with a nice one I found on fleabay. The FSM says lube everything as you put it back in. What would y'all suggest for lube? And thanks everyone for this thread, it's a big help for us shade tree mechanics.
 
I need to change out my scratched drivers side quarter window with a nice one I found on fleabay. The FSM says lube everything as you put it back in. What would y'all suggest for lube? And thanks everyone for this thread, it's a big help for us shade tree mechanics.

I used regular grease on the tracks -- 3&1 oil on the roller pivots.
 
I need to change out my scratched drivers side quarter window with a nice one I found on fleabay. The FSM says lube everything as you put it back in. What would y'all suggest for lube? And thanks everyone for this thread, it's a big help for us shade tree mechanics.

Mobil 1 synthetic is the only grease you need for everything.
It is high temp, extreme pressure, waterproof and compatible with other greases.
It's more expensive but saves money in that you only need one grease for everything.
I have been using it for years before the internet.
And I believe it now points out some of these characteristics on the container.
 
Last edited:
Moble 1 synthetic is the only grease you need for everything.
It is high temp, extreme pressure, waterproof and compatible with other greases.
It's more expensive but saves money in that you only need one grease for everything.
I have been using it for years before the internet.
And I believe it now points out some of these characteristics on the container.
Thank you for the heads up!
 
There are few typos in the pictures.
Hope this is of assistance to the next poor soul that attempts this.
I'll answer questions if needed and I can.
In the first picture when I said "....put the window in first......"
I meant that the glass is in the hole but not really attached to anything.
This stuff has to move around to get it hooked up.
And test fit the rollers in the slots first.
Some were binding. You might need to dress down the metal with sand paper.


View attachment 415245 View attachment 415246 View attachment 415247 View attachment 415248 View attachment 415249 View attachment 415250 View attachment 415252 View attachment 415253 View attachment 415254

View attachment 415225
Thanks for this it took me 4 hours to get mine on all the time saying someone has to have a tool for doing this? Frustration was an understatement! I found and used the very same tool without the nut and finally got the clips on my arms hurt for days afterwords due to the reaching and rubbing against the inner panels. This was the hardest job on the Restoration of my Charger. I installed all new glass with the Correct PPG and Safety Logos date codes. It was like $10 dollars more for these added. Also someone could make a long Channel Locke style pliars with a circular loop to press these rascals on!
 
Last edited:
I bought the Fuzzies at Classic Industries they snapped directly into the holes. I looked at those you have and realized they were different from origional.
 
Thanks for this it took me 4 hours to get mine on all the time saying someone has to have a tool for doing this? Frustration was an understatement! I found and used the very same tool without the nut and finally got the clips on my arms hurt for days afterwords due to the reaching and rubbing against the inner panels. This was the hardest job on the Restoration of my Charger. I installed all new glass with the Correct PPG and Safety Logos date codes. It was like $10 dollars more for these added. Also someone could make a long Channel Locke style pliars with a circular loop to press these rascals on!

I agree --- someone should have a tool for this. It was the most difficult part of the install.
 
Auto Transport Service
Back
Top