• When you click on links to various merchants on this site and make a purchase, this can result in this site earning a commission. Affiliate programs and affiliations include, but are not limited to, the eBay Partner Network.

71 Charger upper door panel refurb

70chall440

Well-Known Member
Local time
9:25 PM
Joined
Feb 11, 2018
Messages
5,045
Reaction score
7,222
Location
Yelm, Washington
Anyone have any tips or information in refurbishing the upper door panels? I have the new panels from Legendary but I am a little confused by how to attach them to the metal upper part. It loos like there were some type of hooks or something to bite into the particle board and I am pretty sure a fair bit of glue was used. I have done some searching online but as of yet haven't found anything.

I'd appreciate any information, tips, pictures, etc.
 
I took mine to a reputable coachworks business and they did a fantastic job, quick turn around and very inexpensive. I know there's many folks on here who would do it themselves and no doubt do a fine job, but to me I didn't want to risk screwing it up. That job and the headliner install just weren't in my comfort zone, but everything else interior-wise I was good with. To me it comes down to time management...where are you at in your life and how much time can you devote to this wonderful hobby.

Rob
Thanks but that isn't an option that appeals to me. I will figure it out one way or another but I would like to hear from someone who has already done it.
 
Anyone have any tips or information in refurbishing the upper door panels? I have the new panels from Legendary but I am a little confused by how to attach them to the metal upper part. It loos like there were some type of hooks or something to bite into the particle board and I am pretty sure a fair bit of glue was used. I have done some searching online but as of yet haven't found anything.

I'd appreciate any information, tips, pictures, etc.
I have done this to my '71. Bought the new "skins" from Legendary. It is tedious but can be done.
1) originals had the innermost window wipers stapled to the steel. I do not have the capability to staple through steel so I used black rivets from McMaster-Carr
2) you will need to re-use the "teeth" punched in the steel to secure it to the fiber board. When you separate the two you will see thar you will need to straighten out the teeth to be effective.
3) there are several locating holes on the reverse side to get the alignment close.
4) you will need small c clamps and spring style clothespins for clamping while your contact cement fully dries. use trim adhesive spray and brush.
5) when going "around the corners" you only use 1 thickness so when you fold it so you are not pushing the panel away from the mounting position. I think that is what the factory intended so when you examine the originals it should be apparent
6) measure and or mark the original locations with a sharpie.
7) this took me about 1 month to do. Not being in any rush.
8) Window wipes were top cat brand and fit perfect.
9) a lot to do but I believe you are up to the task.
10) I am sure you will have more questions.
11) start with the rear panels, they will be a bit easier, because of the window wipers being smaller. Much luck '71 interior.jpg
'71 charger interior finish 4.jpg
 
I have done this to my '71. Bought the new "skins" from Legendary. It is tedious but can be done.
1) originals had the innermost window wipers stapled to the steel. I do not have the capability to staple through steel so I used black rivets from McMaster-Carr
2) you will need to re-use the "teeth" punched in the steel to secure it to the fiber board. When you separate the two you will see thar you will need to straighten out the teeth to be effective.
3) there are several locating holes on the reverse side to get the alignment close.
4) you will need small c clamps and spring style clothespins for clamping while your contact cement fully dries. use trim adhesive spray and brush.
5) when going "around the corners" you only use 1 thickness so when you fold it so you are not pushing the panel away from the mounting position. I think that is what the factory intended so when you examine the originals it should be apparent
6) measure and or mark the original locations with a sharpie.
7) this took me about 1 month to do. Not being in any rush.
8) Window wipes were top cat brand and fit perfect.
9) a lot to do but I believe you are up to the task.
10) I am sure you will have more questions.
11) start with the rear panels, they will be a bit easier, because of the window wipers being smaller. Much luckView attachment 1853512
View attachment 1853511
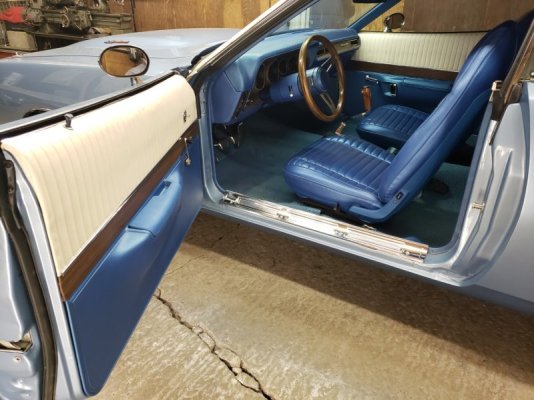
Looks like a clean job!! Nice results
 
I have done this to my '71. Bought the new "skins" from Legendary. It is tedious but can be done.
1) originals had the innermost window wipers stapled to the steel. I do not have the capability to staple through steel so I used black rivets from McMaster-Carr
2) you will need to re-use the "teeth" punched in the steel to secure it to the fiber board. When you separate the two you will see thar you will need to straighten out the teeth to be effective.
3) there are several locating holes on the reverse side to get the alignment close.
4) you will need small c clamps and spring style clothespins for clamping while your contact cement fully dries. use trim adhesive spray and brush.
5) when going "around the corners" you only use 1 thickness so when you fold it so you are not pushing the panel away from the mounting position. I think that is what the factory intended so when you examine the originals it should be apparent
6) measure and or mark the original locations with a sharpie.
7) this took me about 1 month to do. Not being in any rush.
8) Window wipes were top cat brand and fit perfect.
9) a lot to do but I believe you are up to the task.
10) I am sure you will have more questions.
11) start with the rear panels, they will be a bit easier, because of the window wipers being smaller. Much luckView attachment 1853512
View attachment 1853511
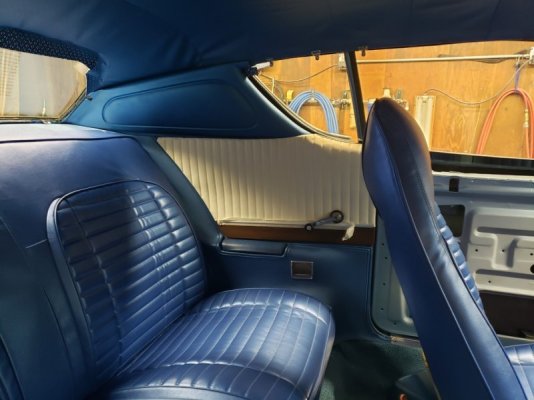
Thank you very much, I greatly appreciate the detailed explanation.

That white and blue interior really pops! looks awesome.
 
I began refurnishing my door panels today and as suggested I started with the rears.

Overall its not that hard however there are some "issues" that have to be dealt with. I figured I would pay back and post some information and pictures for anyone else attempting to do this.

The "issues" are primarily what @Austin Charger stated, the whiskers were stapled on (through metal) originally and the factory used a press affair which drive some round parts of the metal backing into the chip board to I assume help with rigidity.

Here are pictures of the round holes which have the fingers that need to be straightened out (or perhaps removed entirely).

IMG_1943.jpg
IMG_1949.jpg
 
As to attaching the whiskers, I used some very small sheet metal screws that came with a piano hinge from HD (its a continuous hinge that you can cut to length and it comes with a bag of these screws which I think are #4).

I drilled 3/32 holes through the whisker and metal plate, then I ensured that the screws would go in by starting them first. I then drilled out the whisker to 1 size bigger. I think used a small side cutter to cutter and cut 4 little slits into the hole I drilled for the screw, this will allow the head of the screw to "pop" in and once attached will be invisible.

IMG_1961.jpg
IMG_1962.jpg
 
Slightly out of order but I did initially strip the old panel (1 side at a time so I could refer to the other if need be). I also cleaned the metal plate/component and used a coarse Scotchbrite pad on a 3" rollock to remove old glue, rust and debris while leaving a surface that the glue can bite into. (sorry I didn't take an after pic)

IMG_1942.jpg
 
I did a little different approach on the whiskers. I got some steel (stainless?) staples that were close to the width of the original staples and inserted them through the whiskers and holes in the panel and bent them over. Worked well.
Terry W.
 
I did a little different approach on the whiskers. I got some steel (stainless?) staples that were close to the width of the original staples and inserted them through the whiskers and holes in the panel and bent them over. Worked well.
Terry W.
I thought about that (or something close) but the screws seemed like a quicker and easier solution.
 
So to continue, once I got the metal cleaned up I checked the alignment and how it had to go together. As mentioned, there are alignment holes in the metal and the chipboard so its pretty easy to figure out.

At this point I applied some glue to the new panel and the metal plate which gets sandwiched behind the new panel. I limited the glue application to essentially the bottom portion of the plate (both sides) to allow me to get the plate positioned.

I used a glue called AC 50, this stuff is absolutely amazing. It is a professional product and does not play around. You spray one side and the other and then let it sit a few seconds until both sides are tacky and then stick them together. You get pretty much 1 chance, once it is connected you are pretty much done. You might be able to pull it apart once, but that is it.

Once I got the plate in I tried to seat the holes that I had to straighten out. I used a rubber mallet/plastic hammer but to be honest I do not think I got them really embedded but the glue definitely is keeping everything connected. I do notice that you need to tamp down the chipboard onto the metal plate at least some because it will show on the new panel a little if you don't.

IMG_1953.jpg
IMG_1954.jpg
IMG_1955.jpg
IMG_1956.jpg
IMG_1957.jpg
IMG_1965.jpg
 
Once I got the plate positioned and glued I then proceeded to wrap the other part of the panel around the lip. I applied glue on both sides but only did 1 section at a time. I wrapped the panel and then used the clips to hold it down. As you can use I used a lot of butterfly clips to keep the material wrapped but the glue really didn't need a lot of help but I wanted to make sure.

IMG_1959.jpg
IMG_1960.jpg
IMG_1963.jpg
IMG_1964.jpg
 
I am sure at least one person was thinking about the marks that those clips would leave (I was as well), so this morning I went and removed them an of course there were marks. However, with the application of a little heat, they disappeared and the panels look good. Now on to the front after I punch out the window crank holes and locate the 3 mounting holes in the rear panels, oh and add the clips.

IMG_1966.jpg
IMG_1967.jpg
 
Auto Transport Service
Back
Top