• When you click on links to various merchants on this site and make a purchase, this can result in this site earning a commission. Affiliate programs and affiliations include, but are not limited to, the eBay Partner Network.

71 Charger upper door panel refurb

70chall440

Well-Known Member
Local time
10:16 AM
Joined
Feb 11, 2018
Messages
4,997
Reaction score
7,099
Location
Yelm, Washington
Anyone have any tips or information in refurbishing the upper door panels? I have the new panels from Legendary but I am a little confused by how to attach them to the metal upper part. It loos like there were some type of hooks or something to bite into the particle board and I am pretty sure a fair bit of glue was used. I have done some searching online but as of yet haven't found anything.

I'd appreciate any information, tips, pictures, etc.
 
I took mine to a reputable coachworks business and they did a fantastic job, quick turn around and very inexpensive. I know there's many folks on here who would do it themselves and no doubt do a fine job, but to me I didn't want to risk screwing it up. That job and the headliner install just weren't in my comfort zone, but everything else interior-wise I was good with. To me it comes down to time management...where are you at in your life and how much time can you devote to this wonderful hobby.

Rob
Thanks but that isn't an option that appeals to me. I will figure it out one way or another but I would like to hear from someone who has already done it.
 
Anyone have any tips or information in refurbishing the upper door panels? I have the new panels from Legendary but I am a little confused by how to attach them to the metal upper part. It loos like there were some type of hooks or something to bite into the particle board and I am pretty sure a fair bit of glue was used. I have done some searching online but as of yet haven't found anything.

I'd appreciate any information, tips, pictures, etc.
I have done this to my '71. Bought the new "skins" from Legendary. It is tedious but can be done.
1) originals had the innermost window wipers stapled to the steel. I do not have the capability to staple through steel so I used black rivets from McMaster-Carr
2) you will need to re-use the "teeth" punched in the steel to secure it to the fiber board. When you separate the two you will see thar you will need to straighten out the teeth to be effective.
3) there are several locating holes on the reverse side to get the alignment close.
4) you will need small c clamps and spring style clothespins for clamping while your contact cement fully dries. use trim adhesive spray and brush.
5) when going "around the corners" you only use 1 thickness so when you fold it so you are not pushing the panel away from the mounting position. I think that is what the factory intended so when you examine the originals it should be apparent
6) measure and or mark the original locations with a sharpie.
7) this took me about 1 month to do. Not being in any rush.
8) Window wipes were top cat brand and fit perfect.
9) a lot to do but I believe you are up to the task.
10) I am sure you will have more questions.
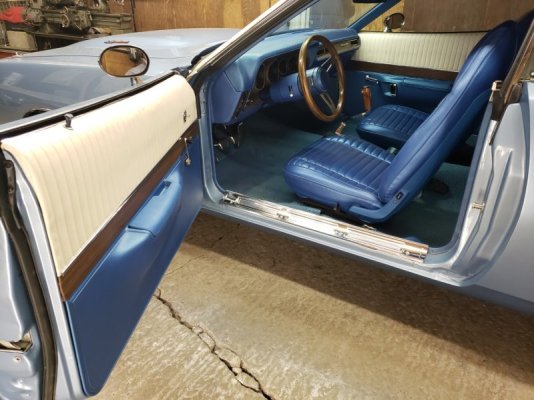
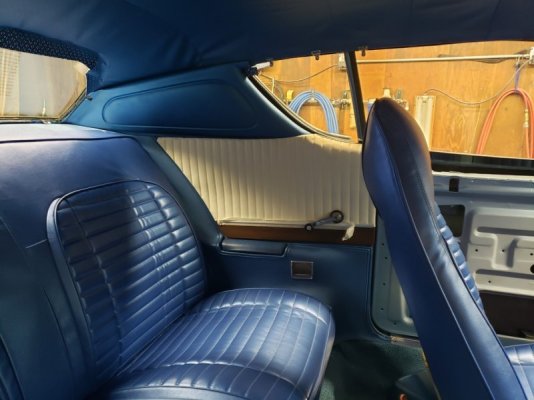
11) start with the rear panels, they will be a bit easier, because of the window wipers being smaller. Much luck '71 interior.jpg
'71 charger interior finish 4.jpg
 
I have done this to my '71. Bought the new "skins" from Legendary. It is tedious but can be done.
1) originals had the innermost window wipers stapled to the steel. I do not have the capability to staple through steel so I used black rivets from McMaster-Carr
2) you will need to re-use the "teeth" punched in the steel to secure it to the fiber board. When you separate the two you will see thar you will need to straighten out the teeth to be effective.
3) there are several locating holes on the reverse side to get the alignment close.
4) you will need small c clamps and spring style clothespins for clamping while your contact cement fully dries. use trim adhesive spray and brush.
5) when going "around the corners" you only use 1 thickness so when you fold it so you are not pushing the panel away from the mounting position. I think that is what the factory intended so when you examine the originals it should be apparent
6) measure and or mark the original locations with a sharpie.
7) this took me about 1 month to do. Not being in any rush.
8) Window wipes were top cat brand and fit perfect.
9) a lot to do but I believe you are up to the task.
10) I am sure you will have more questions.
11) start with the rear panels, they will be a bit easier, because of the window wipers being smaller. Much luckView attachment 1853512
View attachment 1853511
Looks like a clean job!! Nice results
 
I have done this to my '71. Bought the new "skins" from Legendary. It is tedious but can be done.
1) originals had the innermost window wipers stapled to the steel. I do not have the capability to staple through steel so I used black rivets from McMaster-Carr
2) you will need to re-use the "teeth" punched in the steel to secure it to the fiber board. When you separate the two you will see thar you will need to straighten out the teeth to be effective.
3) there are several locating holes on the reverse side to get the alignment close.
4) you will need small c clamps and spring style clothespins for clamping while your contact cement fully dries. use trim adhesive spray and brush.
5) when going "around the corners" you only use 1 thickness so when you fold it so you are not pushing the panel away from the mounting position. I think that is what the factory intended so when you examine the originals it should be apparent
6) measure and or mark the original locations with a sharpie.
7) this took me about 1 month to do. Not being in any rush.
8) Window wipes were top cat brand and fit perfect.
9) a lot to do but I believe you are up to the task.
10) I am sure you will have more questions.
11) start with the rear panels, they will be a bit easier, because of the window wipers being smaller. Much luckView attachment 1853512
View attachment 1853511
Thank you very much, I greatly appreciate the detailed explanation.

That white and blue interior really pops! looks awesome.
 
Auto Transport Service
Back
Top