• When you click on links to various merchants on this site and make a purchase, this can result in this site earning a commission. Affiliate programs and affiliations include, but are not limited to, the eBay Partner Network.

71 Roadrunner Chassis Repair

Rusty Otto

FBBO Gold Member
FBBO Gold Member
Local time
11:55 PM
Joined
Feb 3, 2021
Messages
15
Reaction score
5
Location
Kansas City
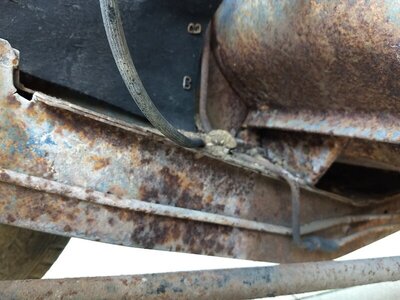
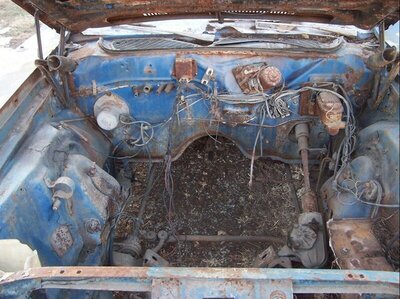
Very new to the unibody world- so pretty concerned about the preferred approach to repairing the frame/chassis on this newly acquired 71 Roadrunner. I have not had much opportunity to dig into the car- but I do know that the front driver's side frame rail appears to be a candidate for replacement. The right-hand side is not nearly as corroded, but the RH side of the torsion cross-member is by far the worst area of that failed component. Anyway, I'd appreciate advice on a safe approach to disassembly of the vehicle in the process of frame repair/replacement. I am unnerved by the nature of unibody construction- even wondering if removal of the bumpers reduces the stability/or increases the chance for the geometry to wander while trying to repair. Same question for the rear bumper, as those subframes appear to be in need of attention, though not sure whether this could be a repair in lieu of replacement. As noted, the torsion cross member has failed, and the front floor area is generally gone ~has some sheet metal riveted atop the rusted-out flooring. That field-expedient improvement appears to have really accelerated the decomposing original floor (...thinking the bench seat may now be a structural element).
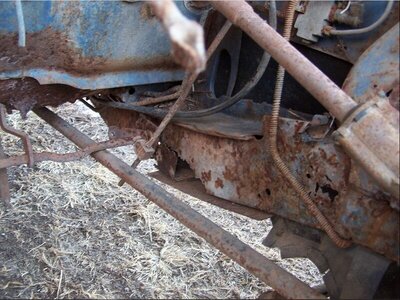
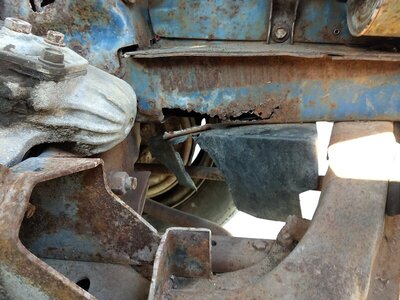
LH Frt Frame.jpg Front LH Frame Rail.jpg Front RH Frame Rail.jpg EngineCompartment.jpg
 
As it sits, the engine cross member has the frame rails aligned more so than the front bumper mounts. Same with the rear frame section - the rear shock mount cross member has the rear frame rails aligned rather than the rear bumper mounts. The good thing is that frame rails are available as is the torsion bar cross member.
It is a big job to change all of that, but now is the time to change it all if you are so inclined.
Check out ct71rr's build that is in the members project section, he's done just about all the stuff you need to do on yours to his Road runner.
 
It’s pretty involved but do-able. I’ve never done this type of work and I was able to get through it. You’ll need to support the unit body and brace the interior before removing any of those pieces. I strongly recommend building a frame jig. Take several images, measurements and check the datums before removing anything. As 71Beeper stated, I just went through it on my build thread. Feel free to PM me, bear in mind, I’m not an expert.
 
Thank you both for the info! This is all new territory for me (this Roadrunner & posting on forum-site). Glad to hear that it's not impossible- I'd prefer to take this on myself as opposed to taking in to a shop- I'd guess hardly anybody at any local shop has even seen on of these before. I'm definitely going to check out the build thread. I really don't want to bug anyone- so I certainly appreciate this and will surely be interested in any available advice as I get moving.
 
If the frame horns are that bad, you should get your hands down in the cowl (through the vent grilles) and feel around the vent stacks as well as closely inspect what you can see of the side panels in the door hinge area.
 
From what little I see here, it looks like the car is a candidate for a strip & dip. What's obvious is, well, obvious. It's what's not obvious is the concern. My old saying is " Where there's rust... there's more. "
 
WoW Otto thats very rusty indeed!

I have spent twenty years de-rusting my 71 GTX and its NOT easy!
I started with TWO good front rails and one very bad rear rail.
A Unibody is very strong once the metal is all good, but once you start stripping back it will have to be well supported!
If you have a flat floor and a pile of jack stands then you can 'go for it'.

Only once the rails and floorpans are replaced can you consider a blasting or dipping job.
Don't waste $1000 dollars on 'full-body' blasting and then throwing most of it away...

Two things that are in your favour...
RIGHT CAR, RIGHT COLOUR...:rofl:

The Golden rule of rust repair?

Only replace ONE Part at a time...Start with the rustiest part and the job will get easier as you go...:drama:
 
I’ve been watching Chris Birdsong’s videos on his patina LL1 69 Charger which is a pretty cool build IMHO.

I certainly ain’t no body man so others can comment if this is not a good idea for this type of repair.

Also worth noting is your passenger rail looks like its way more gone, so not an option there, but possibly the pass side.

Part 22 was the removal episode

Part 24 is the repair episode.


I have been a crash repair guy in the motor trade and ‘butt welding’ frame rails, especially front ones is highly frowned upon indeed!
This would not pass tech inspection in the UK and is dangerous in a big crash!
Fine for a show queen, but I would not want to ride in this Charger, ‘just in case’...:hitit:


Thanks for the tip. I’m not a body guy. Just trying to learn.
 
I have been a crash repair guy in the motor trade and ‘butt welding’ frame rails, especially front ones is highly frowned upon indeed!
This would not pass tech inspection in the UK and is dangerous in a big crash!
Fine for a show queen, but I would not want to ride in this Charger, ‘just in case’...:hitit:


By the way, he put some metal inside and both double walled it, plug welded that and left a gap for butt welding it.

What Would be a better way to do it?

Trying to learn.

Did you watch the whole vid of the final repair?
 
WoW Otto thats very rusty indeed!

I have spent twenty years de-rusting my 71 GTX and its NOT easy!
I started with TWO good front rails and one very bad rear rail.
A Unibody is very strong once the metal is all good, but once you start stripping back it will have to be well supported!
If you have a flat floor and a pile of jack stands then you can 'go for it'.

Only once the rails and floorpans are replaced can you consider a blasting or dipping job.
Don't waste $1000 dollars on 'full-body' blasting and then throwing most of it away...

Two things that are in your favour...
RIGHT CAR, RIGHT COLOUR...:rofl:

The Golden rule of rust repair?

Only replace ONE Part at a time...Start with the rustiest part and the job will get easier as you go...:drama:


Thanks for the info- This is all new territory for me. I believe this car spent her formative years around here (Kansas)- and they REALLY like to spread rock salt all over the roads whenever there's a possibility of wintry weather. It helps traction a little- usually, but just eats cars. As was noted- the rust forming from that exposure that is visible to someone like me is certainly not the start... I am hoping some of the rust may be shallower- the car seems to have sat dormant for a while- cup half-full: maybe a lot of that will just buff right out??!
 
My build was not as in depth as ct's is.
You can see it here.
http://www.roadrunnernest.com/forum/viewtopic.php?f=1&t=4333
You should register yourself there as well.

Thanks for the info- I believe I will. I just quickly rolled across your info (& CT's), and find that this will be immensely beneficial to me. I have no idea what the structure was supposed to look like beneath the superficial. I'm feeling a slightly more confident in taking puzzle apart. It's tough right now though- we are in the first extended winter period that we've had for a while. I know that I have no intention to lay down in the snow on that cold driveway. I believe those years are behind me (Or perhaps that I've just become wimpy in my advanced age).
 

I had the opportunity to look thru your build here, and am quite impressed. I had hoped that the series of jack-stands may get me by- at least 'til I found something that warranted much deeper surgery. Alternately, I had been looking at various frame carts, wondering of those would be a satisfactory middle-ground. I am dealing with nearly no indoor work-area (too many toys & gadgets in garage), so I had planned- hoped to achieve- a bay in the garage a little more than what a single-car garage may provide. That said, I think a roller would be highly desirable. Would a home-constructed frame jig be a preferred option to a sorta low-end frame cart?

-Also, just to tap into the knowledge bank here: This car seems pretty straight, though a couple of weird warped-appearing locations (front RH, rear LH) from certain vantage points has cause me to wonder if the geometry the car currently has may be a little "off" from what's intended. I have a few basic dimensions from a '71 chassis manual, but am wondering if there's another source for the frame/unibody geometric positions with a little more detail or content. (??)
 
Hi Otto, with severe rust issues the frames/body could be out of alignment. The only way to change framerails ‘properly’ is on a factory jig! They have pegs/supports to hold the rails in place prior to welding.
It’s like staring a jigsaw from the middle outwards...
Difficult.
Most sensible folks would say “find a rust free car”.
This kinda work is for experts with high tech equipment.
Yep it’s a Runner in a great colour BUT this is a Massive Job!

Best wishes and good luck.
 
Speaking of desirable color, what are the rest of the details on this car? Options?

Do you have the fender tag?
 
-Also, just to tap into the knowledge bank here: This car seems pretty straight, though a couple of weird warped-appearing locations (front RH, rear LH) from certain vantage points has cause me to wonder if the geometry the car currently has may be a little "off" from what's intended. I have a few basic dimensions from a '71 chassis manual, but am wondering if there's another source for the frame/unibody geometric positions with a little more detail or content. (??)

Yes, you need to check the datum measurements before removing any of the structure. See below:

9B28FC19-446B-437B-9BAF-8463DC0E274F.jpeg
 
Auto Transport Service
Back
Top