• When you click on links to various merchants on this site and make a purchase, this can result in this site earning a commission. Affiliate programs and affiliations include, but are not limited to, the eBay Partner Network.

1972 Satellite / GTX RestoMod

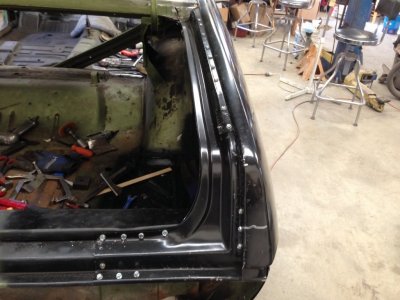
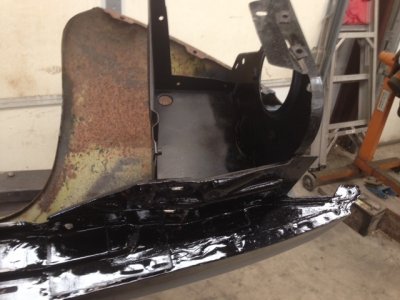
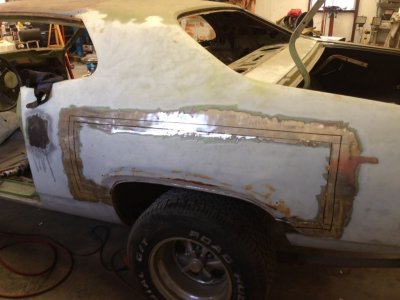
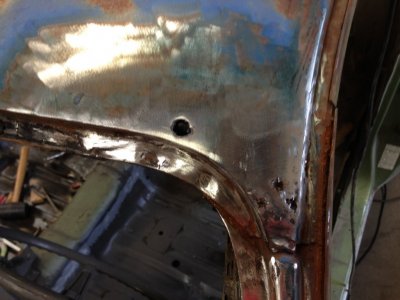
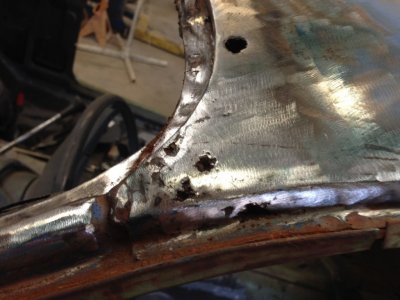
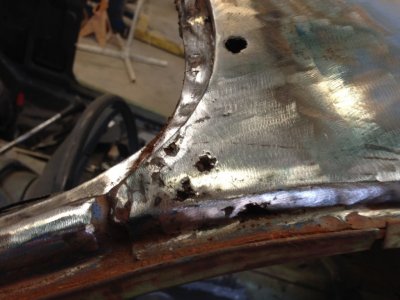
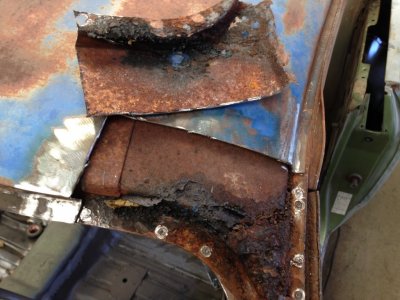
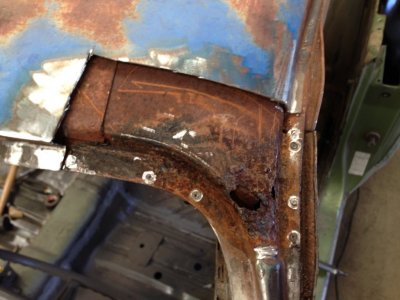
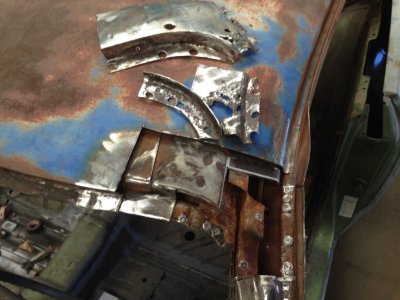
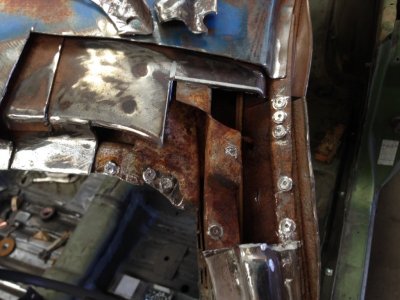
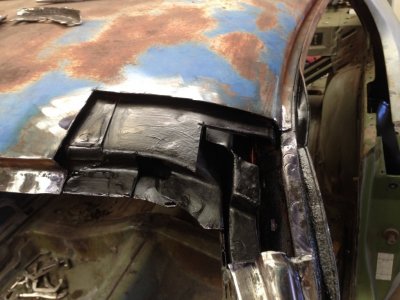
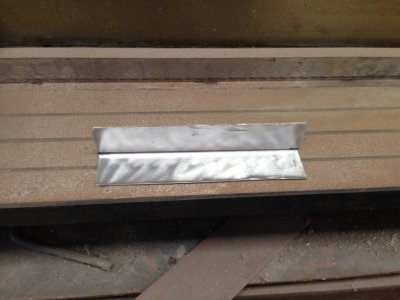
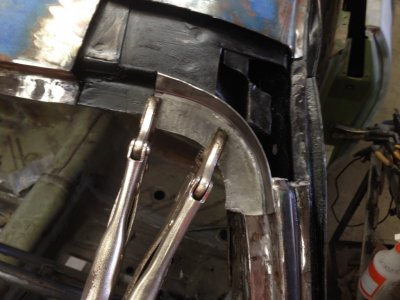
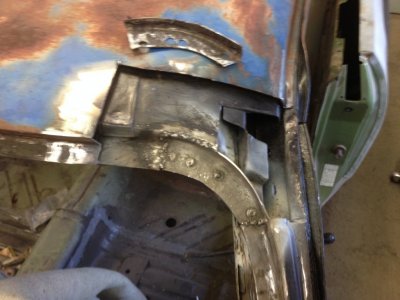
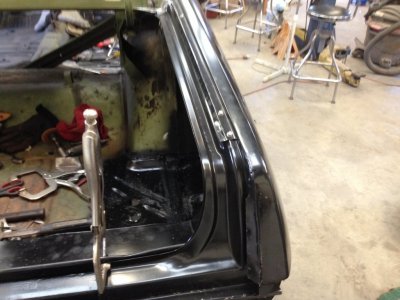
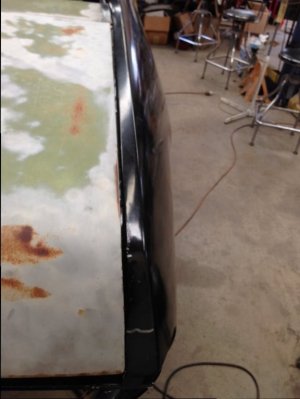
Now we temporality attached the new gutter and the new quarter to get them aligned to each other, keep in mind that these two new pieces also have to align with the deck lid. We temp re-installed the deck lid to check the overall alignment, there will be some additional body work that will have to be done but the overall alignment looks to be ok. Even modifying the new trunk gutter slightly to get it to fit under and next to the new quarter.

You have to keep in mind that the new gutter and new quarter will not fit exactly like the originals. The gutter especially is not made exactly like the original, but it is the best that is available. The bends are more rounded than the original. You have to get it lined up the best you can and then do some cosmetic body work. We still have to deal with replacing some of the forward rounded corner next to the deck lid hinge.

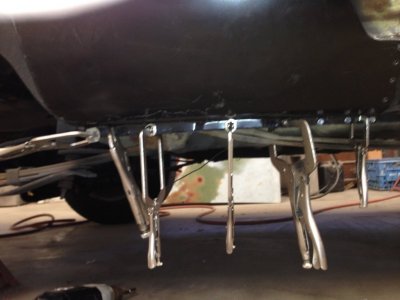
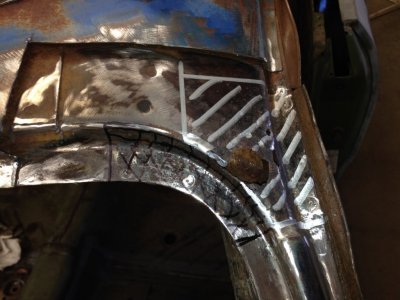
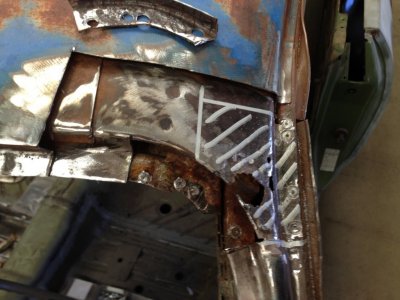
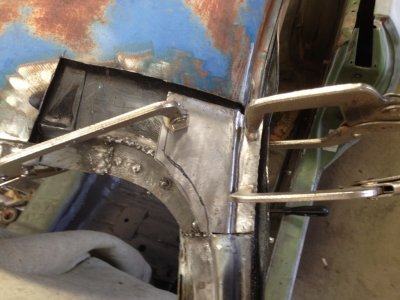
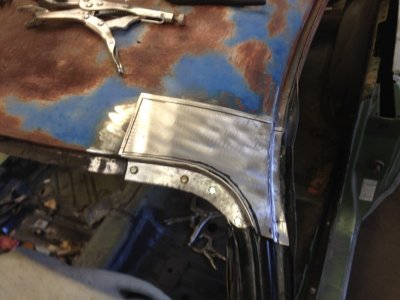
Once we got things fitted the best we could, we then started to attach the gutter to the trunk body and then to the new quarter. Also started to attach the rest of the new quarter. Down under the rocker panel was especially difficult to get the new quarter clamped to the body.

We spent a lot of time fitting these pieces together the best we could. We now have everything attached where it is going to go. All the securing screws are in all around the new quarter. next we will start to remove the screws one at a time and weld everything together.

We now have over 77 hours invested in this project. We have worked on some things that I haven't reported on yet, like work on the front fenders. We still have a lot to go.
IMG_0675.JPG IMG_0677.JPG IMG_0676.JPG IMG_0679.JPG
 
Last edited:
I found on my 69 the bends weren't crisp or 90 degrees. Had to go all the way down the gutter to get it right. Hope yours fits better.
 
I found on my 69 the bends weren't crisp or 90 degrees. Had to go all the way down the gutter to get it right. Hope yours fits better.
It wasn't too bad but yes we had to sharpen some of the bends especially where it fits against the rear body under the trunk lid. Also the forward section of the panel were it bends up around the right deck lid hinge, it wasn't round enough.
 
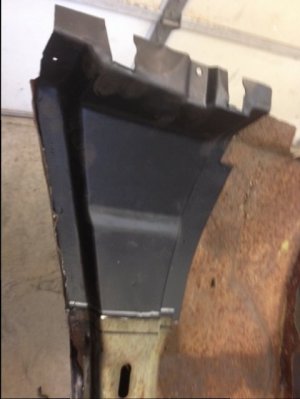
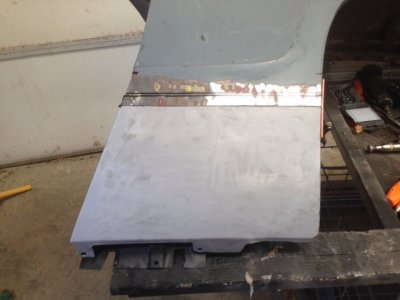
We are also working on the front fenders. The lower quarter, the inner support and a panel behind the headlight bucket had to be replaced. Also on the inner front fender, a part of lip had rusted through. In this case we had a donor front fender we could take pieces from. Also the inner fender support brace weld points had broken so we straightened and re-welded the brace. Since the support brace had broken loose the fender wheel well lip had stress cracks that had to be welded up.

We are working on multiple areas of the body at the same time. We still have some work to do on the doors and we have work to do on the left rear quarter to replace the wheel well area.

Also we are finally welding on the right rear quarter. A lot of work going on for this project.

frt left fender 1.jpg frt left fender 2.JPG frt left fender 5.JPG frt left fender 8.JPG frt left fender 2a.JPG
 
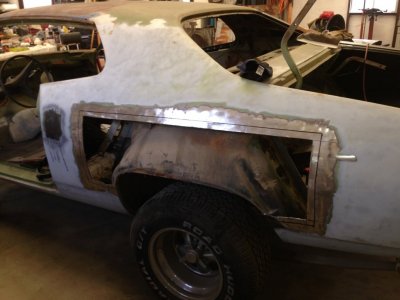
We are continuing on the GTX project with working on the left rear quarter, replacing the wheel arch. The process is basically the same as we used on the right rear quarter except that we are not replacing the complete panel.

Also we have found an area on the left front roof near the A pillar that will need a patch panel fabricated and a piece of the windshield track replaced. We will be using a shrinker / stretcher to fabricate the glass track piece. What concerns us is what kind of rust damage are we going to find once we remove the old rusted out piece.

The drip rail on a lot of older vehicles is a trouble spot for rust. The seam sealer dries and cracks and allows water to get down into rail. We will also clean out the drip rail track and seal with a rust encapsulator.

Steve C.

IMG_0694.JPG IMG_0695.JPG IMG_0692.JPG IMG_0693.JPG
 
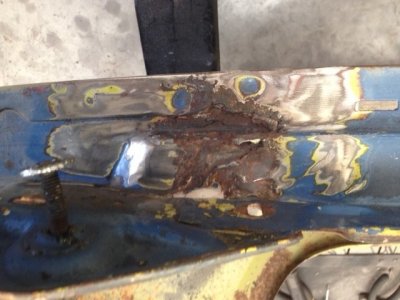
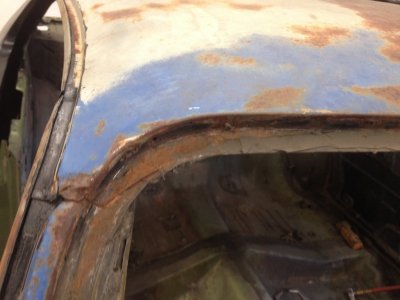
Well we have some decisions to make. we were working on the drivers side roof and A pillar. We cut out a section of the roof and look what we found underneath.
To be honest I don't know how we are going to attack this problem. New replacement A pillars don't exist for this year model, the A pillar section down near the cowl panel is also badly rusted. The only new A pillar piece we could find for this vintage car was for the E body. Don't know how close it is to the shape of the B body.

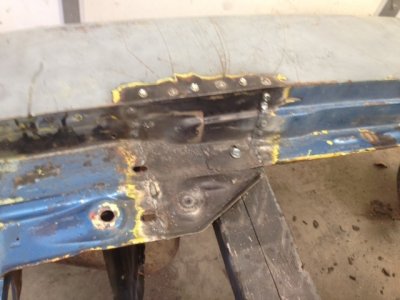
As you can see the A pillar inner section that goes up underneath the roof is rusted through, thus making the roof support compromised. We could cut out more of the roof section and fabricate a piece to weld in to the inner section corner to replace the rusted through area. We would have to cut out enough of the inner section to get back to good metal for welding.

The A pillar inner section goes up under more of the roof than you can see in the picture, probably another 2 inches. So another 2 or so inches of the roof would have to be cut out to get at it. Once fixing the inner section is done, fabricate an outer roof skin and windshield track to weld on the outside.

Or we could just stuff as much POR 15 type product as we can into the inner A pillar roof section and let it go at that, then fab a outer skin roof piece and windshield track to weld over it on the outside. Not my preferred method.

If this car was getting a complete concourse restoration I would remove the complete roof skin and fix all areas of the roof inner support structure. Boy would that be a job, keeping in mind that there are no replacement roof skins for this car. But does it need that? I don't know. You can't see what is up under the rest of the roof skin across the top of the car.

When you look at the drip rail area of this section you see 4 individual pieces of formed metal panels coming together. The roof skin, inner A pillar, roof support structure and drip rail and the interior headliner section.

What to do? What to do?

We will keep working on replacing the left rear wheel arch and think about this other roof area and come up with a game plan to attack and fix the issue.

IMG_0693.JPG IMG_0703.JPG IMG_0705.JPG
 
Last edited:
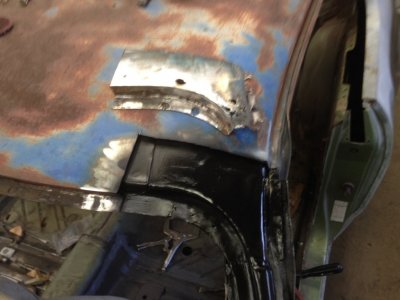
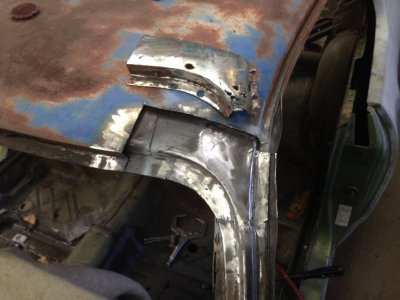
We have decided to attack the roof / A pillar problem by replacing the rusted out inner part with a fabricated piece and weld it in place. Then fabricate an outer roof skin and windshield gutter and weld them in place.
You can see in the pics where we have marked two sections of the inner support that will be cut out and replaced. You can see from the pics the two pieces we cut out as well as the larger piece of the outer roof skin.

After we had cut out the pieces we cleaned up the spot weld areas with a flap disc grinder and coated the whole thing with a rust encapsulator getting back into the structure as far as we could.

You have to be careful cutting out the old pieces, also you have to cut out enough to get back to solid metal to get good welds on the replacement pieces. We used a pick to probe the metal for rusted weak spots to figure out where to cut.

A normal air cut off tool is too large to achieve accurate cuts without over cutting the section. We also used a dremel tool with a small cut disc to fine cut the pieces.

To replace the metal sections all of it will have to be butt welded together.

You can also see in the pics the condition of the inside drip rail. All of the seam sealer is long gone and the seam has been exposed to moisture and started to rust. If you have a vehicle that has been setting for awhile I would protect the drip rail area somehow. We are going to use a rust encap to seal the drip rail and follow it up with a new coat of seam sealer.

IMG_0707.JPG IMG_0709.JPG IMG_0710.JPG IMG_0711.JPG IMG_0712.JPG
 
Last edited:
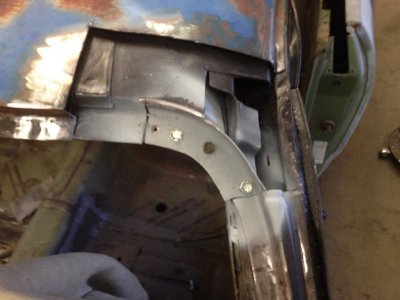
Here is how I repaired the inner section.
I fabed the windshield arc first. Always try to remove the old pieces intact, not always possible, but, that way you can use them as a template for the new pieces. Or use cardboard to make a template.
I started with a piece of sheet metal bent 90 with a brake. Then used a shrinker to create the curvature. Now I have to trim and fit the new piece. You can see in the pic the old piece I cut out and kept using it as a template.

Once I had it fitting nice I sprayed the new piece and the mating area of the body with self-etching weld through primer and welded it in. Additional trimming will have to be done when I make the other inner piece and set it in place up next to the new windshield arch / gutter.

The new mating piece to the windshield arch is more difficult to fabricate because of the compound curves it has. You can see how I started to make the other new piece that will mate up to the arch. Cut out your new pieces way larger than needed, that way you can trim them back to fit. There was a lot of trim & fit, trim & fit going on but I got it to fit dead on.


I finally got both of the new inner pieces welded in and the welds ground down and it painted for protection. Now I have repaired the rusted out inner body frame and windshield gutter and it is just as structurally sound as new. There are several layers of metal panels all coming together in this area, make sure you get them all welded in place.
Several times while I was fitting and installing these new inner pieces, I kept fitting the outer roof skin piece over it to make sure everything was mating up fine.

Now I have to make the outer roof skin piece that will cover up the inner pieces I just welded in.

IMG_0718.JPG IMG_0719.JPG IMG_0721.JPG IMG_0722.JPG IMG_0724.JPG IMG_0726.JPG IMG_0720.JPG
 
Last edited:
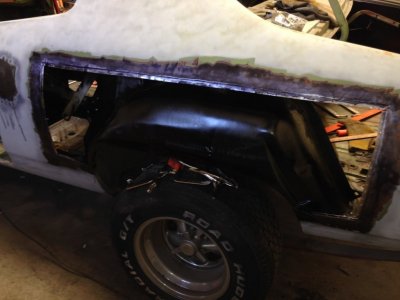
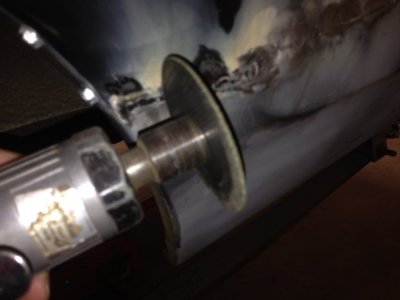
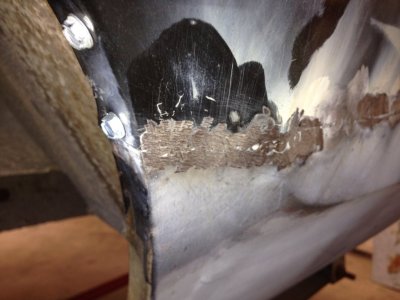
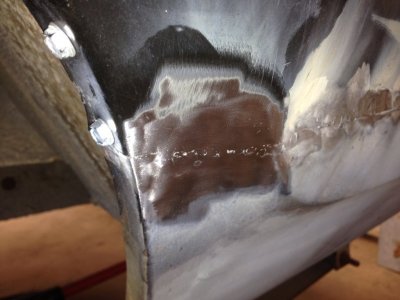
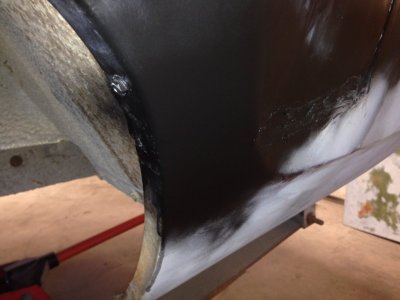
Meanwhile back on the left rear wheel arch, I finished welding in the new replacement wheel arch panel. I took some close up pics of where the body lines meet of the old and new panel down on the lower portion. In this area I had to butt weld the new to old panel, there is no room to overlap them because of the inner wheel well. A trick I learned a long time ago is to use a cutoff tool across the butt weld to smooth and spread out the weld. You have to be very careful doing this, don't let the cutoff tool dig into the metal.

Once I had the weld smoothed out I used a roll lock medium disc to finish it up. I went farther final prepping this area to show how smooth you can get it. You cant even see the butt weld as it turns over the wheel well lip.

When you do the final body work before painting, you will need very little body filler to put over the offset lap and the butt weld area.

IMG_0706.JPG IMG_0713.JPG IMG_0715.JPG IMG_0716.JPG IMG_0717.JPG
 
Last edited:
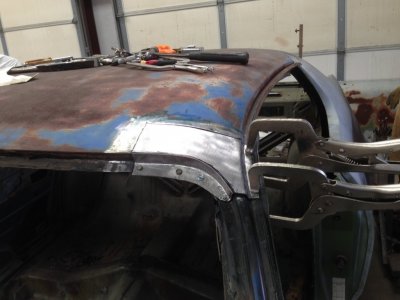
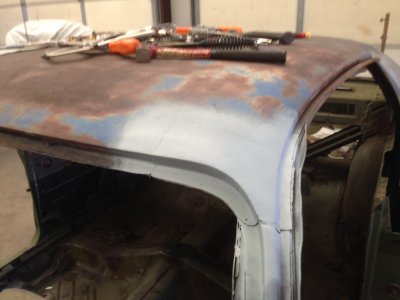
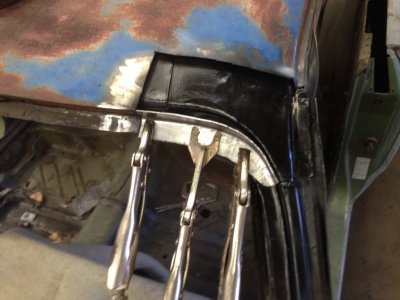
Well I am just about to finish up welding in the drivers side roof / A pillar outer pieces. Recall that I fabricated the inner pieces (under the roof skin) and welded them in place. For the outer roof skin pieces I started with fabricating the windshield arch / track. Using a piece of sheet metal bent at a 90, then using a shrinker to get the arch just right I temporality attached it to the body. I used the old piece I cut out to help make the track piece.

As a side note the shrinker / stretcher tools I have and use are from Eastwood.

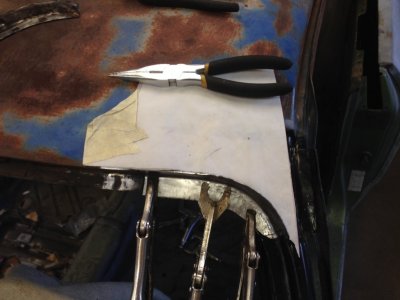
Even though I had the original roof skin piece I cut out to use as a guide, I also made a template of the arch to double check that I had the correct arch sweep. I made a template from the passenger side, then flipped it over to use on the drivers side, you can see it in the pictures. You can see that it isn't just a straight curved windshield track piece, it also turns back into the roof and then comes around to join the A pillar.

You can see that the inside arch / track I made earlier and welded in and the outside arch / track I am now making do not match exactly but that is how the factory originally did it with all of the individual panels coming together and I am trying to match what the factory did. You have to get this outside arch right or it wont match the passengers side and the windshield glass may not fit. I left this track piece height oversized so that I can trim it back to fit exactly when I place the roof skin piece.

You can see the roof skin piece I first cut out of sheet metal to start the fitting process. The sheet metal thickness I am using is 20 gage. This piece was difficult to fabricate because it rounds down toward the windshield track as well as the outside drip rail gutter and then has a rounder crown to fit the rest of the roof skin. Also you have to incorporate the drip rail off set and curvature to fit the rest of the drip rail body. A lot of trimming, fitting and bending (rounding) a slight tweak at a time went into making this piece.

To get the drip rail curvature, I bent this curved area and off set by hand using a pair of plyers then used a dolly clamped in a vice and a body hammer to form the curvature. You don't just beat on it with a body hammer, you tap it a little at a time to get the off set and curvature just right. this piece took a lot of time to make and form, heck when I compare the passengers side what the factory did to the drivers side what I did, I think mine looks better, but I'm biased. Making these pieces was a challenge and I think I did a good job duplicating the correct factory curvature. To me that is the fun part of working on these vintage vehicles.

Welding this piece in took time and patience. It is a pretty small piece and you can warp it from heat by rushing to weld it in. I did the job by skipping around while welding it in, never welding close to the same place each time. I even took a break to let the whole thing cool off before continuing. Even after you get the piece welded in you can still warp it from heat when grinding down the welds. I don't like using the word "grinding" because it isn't actually what you what to do, because it creates the visualization of "grinding" the crap out of the welds and metal. You want to trim down the welds to make them flush with the existing metal.

I still have some finishing work I need to do. It was late last night when I quit working so I just shot a couple of sweeps of primer over it.

One thing I would add, you can see in the passengers side picture the little nub that the plastic trim clip fits on that secures the windshield chrome trim. A lot of the time this is were things rust out. If you use screws instead of these nubs (if their missing) to secure the trim clips put some sealer on the screw threads to seal the hole or it will rust out there again.

We are just about done with fixing the real bad body rust. Next its off to media stripping for the body, doors, hood, and deck lid. I will be using ground glass shot with water pressure to strip the metal. The ground glass (not plastic beads) will remove the rust and old paint, the water will keep the metal cool during the process. I will have to immediately clean the body and coat it with an epoxy primer to keep the metal from flash rusting. There will no doubt be additional body rust hole areas that I will have to fix once stripped, but the real bad areas to start with are done.

I have used soda blasting (wet and dry application) to strip metal but it wont remove rust. Using black diamond (coal slag) or aluminum oxide if not done correctly can warp metal due to the heat generated.

IMG_0728.JPG IMG_0729.JPG IMG_0731.JPG IMG_0733.JPG IMG_0734.JPG IMG_0727.JPG
 
Last edited:
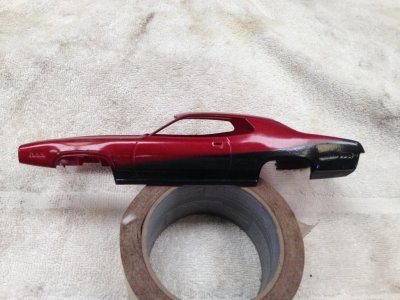
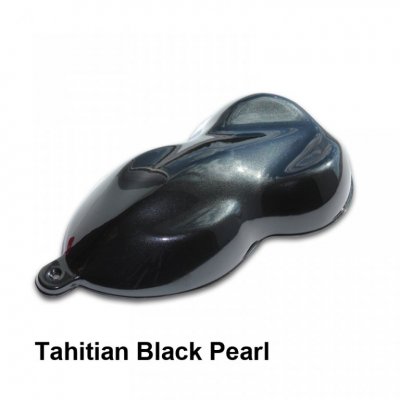
The owner of this car, Michael, and I are in the same local Mopar club (Mopar Muscle Cars of Austin, MMCA). Thought you might like to see Michael's vision of how he wants to do it his way and how he wants it to look in the end. I'll be doing the body work and Michael is doing the engine (stroker), suspension and all other necessary work. He has some of the interior done already (seats). The dash color will be the red pearl with maybe a pin stripe of the black pearl. The original side marker lights will be replaced with custom lights installed.

]The dividing line for the colors maybe a little lower than the model shows but you get the idea. Michael has had his car for a long, long time and has always dreamed of getting it done the way he wants it. Its a great fun project for us both. We hope to have the body work done and painted late October.

IMG_0666.JPG paint Cherry-Bomb-Pearl1.jpg paint Tahitian-Black-Pearl1.jpg
 
Last edited:
Update, Michael decided to go with the Lizard Skin type product for the complete interior, inside firewall and trunk area. What they did in the 71 GTX build thread. We are going to apply it before we do the media blasting of the outside body. This so if we do get any overspray on the outside body is should come off with the media blasting. We already have all the bad metal replaced in the interior (floor boards). Also it should help protect the interior metal from moisture since we are doing wet blasting.

We'll post the results of applying the Lizard Skin to the interior.
 
The owner of this car, Michael, and I are in the same local Mopar club (Mopar Muscle Cars of Austin, MMCA). Thought you might like to see Michael's vision of how he wants to do it his way and how he wants it to look in the end. I'll be doing the body work and Michael is doing the engine (stroker), suspension and all other necessary work. He has some of the interior done already (seats). The dash color will be the red pearl with maybe a pin stripe of the black pearl. The original side marker lights will be replaced with custom lights installed.

]The dividing line for the colors maybe a little lower than the model shows but you get the idea. Michael has had his car for a long, long time and has always dreamed of getting it done the way he wants it. Its a great fun project for us both. We hope to have the body work done and painted late October.

View attachment 354440 View attachment 354441 View attachment 354442

Love the concept. Can't wait to see the paint laid down.
 
Love the concept. Can't wait to see the paint laid down.
Same here!!! The Satellite(future GTX clone) is mine and Steve is working on it. I do not do body work but I will be doing everything else. I bought the car when I was 20......... I am now 49. You will see a grown man weep when the body get back!! My bank account is all ready weeping! LOL I will continue to post pics on this thread as I work on it.
 
I promised you a post when I had the "Lizard Skin" product applied. Well here you go.
I haven't worked with this product before so I read up on it and watched a few you tube videos. The product is not to be applied over bare metal or rusty metal and is not any kind of bare metal sealer or protectant / encapsulator against rust. It is strictly a sound deadener and or heat barrier, so any bare metal or rusty metal has to be addressed first before applying this product.

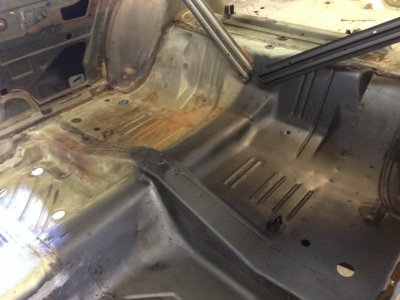
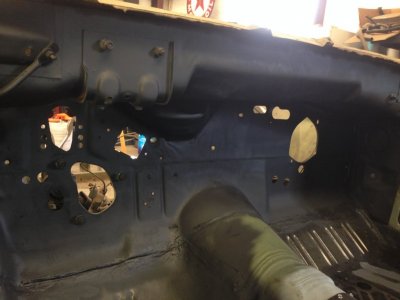
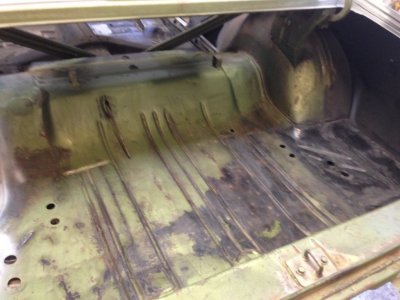
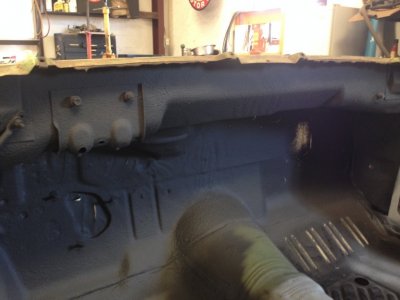
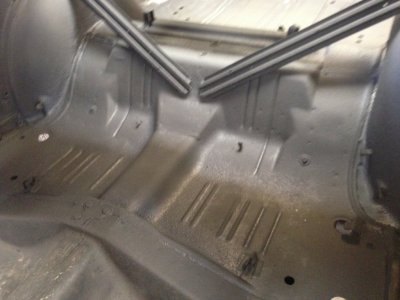
The first thing I did was clean, treat and prime all areas of bare metal and areas that had surface rust and let it dry. I took a few pics of the areas as I worked on them before applying the product. The rear floor area was completely done and primed, I took the pic as I was working on it. I also did the inside "C" pillar areas.
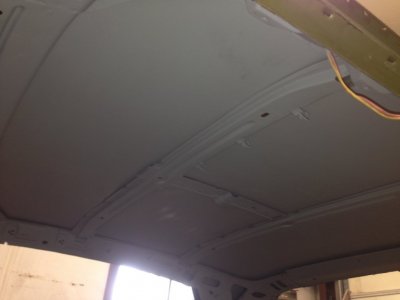
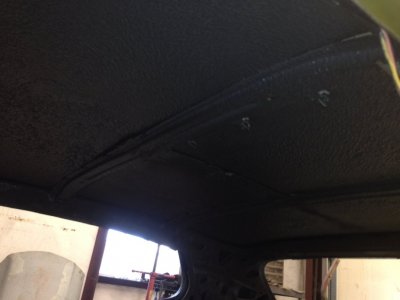
The roof had a lot of glue residue from the headliner. I scrapped the excess glue off and used a power drill with a wire brush attached to remove the rest of the residue and any surface rust, then applied a primer.
In the trunk I cleaned, treated and primed the complete trunk area. This took some time but you have to do it if you want the product to work as advertised.


floor skin 1.JPG floor skin 3.JPG floor skin 4.JPG floor skin 5.JPG
 
Last edited:
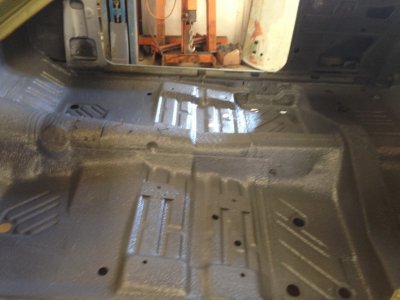
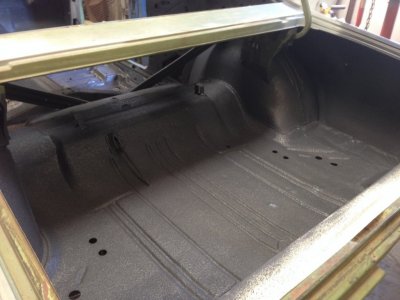
Now applying the Lizard Skin sound deadener. It does what it says. In videos you see people hitting the roof and you get a reverberation tinny sound like hitting the inside of a drum. Once you apply the product all that is gone and you get a solid rock sound.

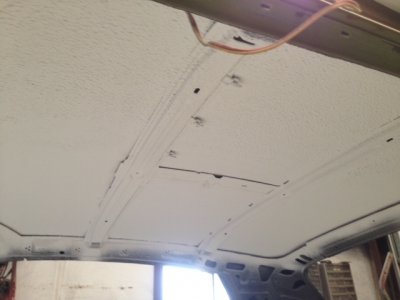
The manufacturer recommends two coats of 20 mil thickness each, they even give you a gage to measure the thickness of each coat. We had four gallons of the sound deadener to work with to coat the roof, firewall, floor, rear wheelwells, under the rear package tray and trunk area. It took every bit of the four gallons. I even coated the rear "C" pillar areas and the rear side panels.

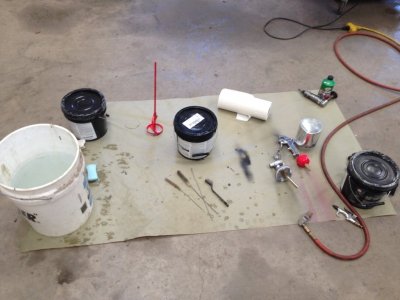
I recommend having a paint gun cleaning brush kit handy to use when cleaning the gun after each application. You have to dismantle the gun to get it completely clean of product after each application. Hot water is better for clean up and I had a bucket of water ready. You can see in the pic my set up. Also I used long sleeve rubber gloves to protect my skin and a skull cap. I used a dust mask instead of a breathing mask. The smell is very slight and is like rolling on house paint, not bad at all. The consistency is that of pancake batter, just like they tell you. It pours very easy into the gun from the one gallon containers.

You have to plan the application of the product to the individual areas as you will have to crawl around inside the car to get at all the areas, especially in the rear package tray area. Spraying the roof area over head is kind of a challenge, you don't want to bump your head into the freshly applied product. Be careful not to get too much sprayed on at one time. Remember to keep ducking. It sprays on very easy and adjust the gun spray pattern as they tell you. It will get everywhere, its like it spits out the product instead of sprays out. I found the best air pressure to spray the product was 60 PSI at the gun.

I did the roof, the firewall, package tray and trunk area at one time. Let that dry, then applied the second coat to the same area. Then did the floor boards first coat, let dry and then applied the floor second coat.
They tell you each coat should dry in about and hour. It needs to be throughlly dry before you apply the second coat. I found it took almost two hours for each coat to completely dry.

floor skin prep.JPG floor skin 7.JPG floor skin 8.JPG floor skin 9.JPG floor skin 10.JPG floor skin 11.JPG
 
Last edited:
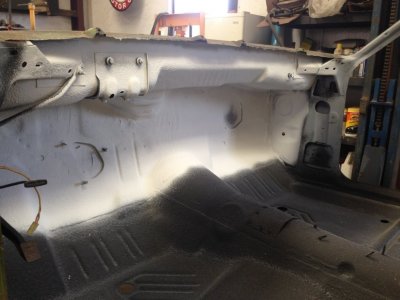
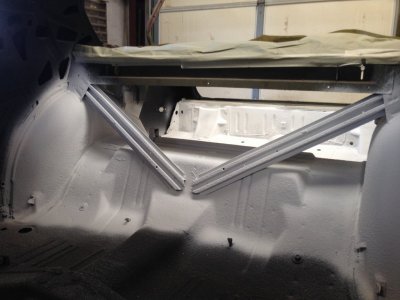
Now applying the heat barrier part of the product. You have to apply the sound deadener first and they tell you to wait at least 24 hours after applying the deadener before applying the heat barrier. So I let the sound deadener dry over night and applied the heat barrier the next day. The sound deadener the next day had dried to a rock hard coat. Even crawling around inside the car applying the heat barrier didn't harm the deadener I had applied the day before. I recommend wearing knee pads when continuing work on applying the next stage. This stuff reminds me of the non-skid that was applied on the deck of the aircraft carrier I served on in the Navy.

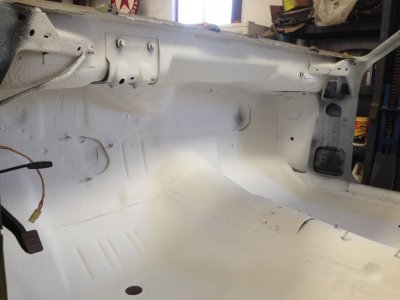
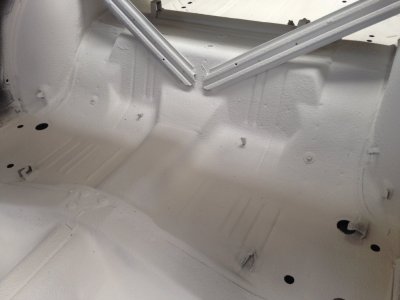
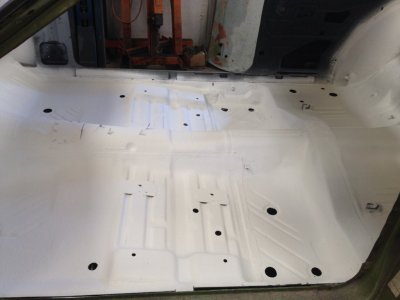
The heat barrier stuff is different from the deadener in that it is thicker. Its more the consistency of marshmallow cream after mixing and was a little more difficult to pour into the spray gun cup from a two gallon container. Michael chose a white colored heat barrier to help identify where the product was being sprayed over the grey sound deadener, this was a great idea.

We also had four gallons of heat barrier for the project in two gallon containers. It took almost all of the four gallons for the application even though I didn't apply it to all of the areas where I applied the sound deadener. I mainly concentrated on the roof, firewall, floor, wheelwell and package tray areas. Anywhere heat could be transferred into the interior. I did have enough to spray a coat inside the trunk. Not that the trunk needs a heat barrier but its nice for consistency and does add an additional layer of protection.

It is critical that you do what they tell you in protecting threaded nuts and holes in the firewall and floor, like the seat belt threaded holes. This stuff gets in there and you will have a time cleaning it out. I had taped off the holes in the firewall and once the product had dried, pulled the tape off and used a knife to trim the hole areas.

Overall I have high marks for the product, it does what they say, and the product applies just as they say. It remains to be seen however how well it eliminates heat inside the interior.

Also I was careful not to get too much product on the inside roof area where the headliner bows attach and the headliner attaches to the front and rear of the roof. You could fill up or cover up the holes for the bows. Getting too much product in this area might make it difficult to reinstall the headliner. I got enough sound deadener in this area to do the job.
The one thing you will have to recognize after applying this product is that it will be a little more difficult to get a good ground when installing a wiring harness. You may have to scrape off some product in order to get a good ground.

Let see, is there any more info I can provide on this product?

Oh yes, I have installed dynomat and other sheet type stick on heat barrier products. I have to say I like this Lizard Skin product better overall than the stick on sheet stuff. The Lizard Skin maybe a little more difficult to apply but you have more of an opportunity to get complete coverage. However, You must protect the outside body area if painted, as I said this stuff will get everywhere, I even got it on my shop wall once with an errant spray shot. The trigger on the spray gun stuck a couple times, A little spray gun lube on the plunger took care of that. Since we are going to the media blaster next any outside residue should come off during this process.
In total with the sound deadener and the heat barrier coatings we have an 80 mil thickness which is what the manufacturer recommends. This actually is thinner than applying a dynomat type product and in my estimation eliminates more of the reverberation tinny sound.

Steve Cass

heat 1.JPG heat 2.JPG heat 4.JPG heat 6.JPG heat 3.JPG View attachment 358521 IMG_0775.JPG
 
Last edited:
Thanks, this is a good product:thumbsup: I like it.
but you know, I was just thinking, picture in your mind the dash installed - painted the Cherry Bomb Pearl and eventually the black floor carpet installed. The bucket seats are black with red piping. Now even with the AC system installed under the dash, there is going to be an area where the white is going to show above the carpet and below the dash, it will not look good, so there will be a small area that we will have to paint flat black in order to hide the white heat barrier.

The white colored heat barrier was great to see where to apply it over the grey sound deadener, but if we had to do it over again, we should have switched the colors around, used a white sound deadener and a grey heat barrier.

Oh well, not a big thing to fix. You always have to think 5 steps ahead of where you are.:rolleyes:
 
Auto Transport Service
Back
Top