• When you click on links to various merchants on this site and make a purchase, this can result in this site earning a commission. Affiliate programs and affiliations include, but are not limited to, the eBay Partner Network.

3.90 Gear pattern

69superbee383

Well-Known Member
Local time
7:57 PM
Joined
Sep 28, 2011
Messages
82
Reaction score
19
Location
Nova Scotia
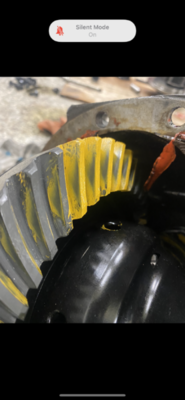
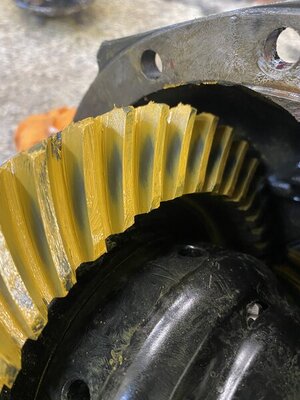
In the process of swapping 3.55s to 3.90s in my 8 3/4 489 case. Wanted to see if anyone wanted to lend there opinion on my gear pattern. I attached a picture of first mock-up with the .032 shim I took off 3.55s you can see it is very close to face of tooth. The other picture with the more centred pattern is best I have gotten this far that is after adding .014 of shim on top of the .032 I started with. I feel I’m pretty close do I call it quits here or keep playing with it? Also a little thrown off I would have expected to run a smaller shim switching to 3.90s not add.
0372E852-478B-404F-9859-B289905DFE05.png E51B28A4-7CFE-4D4C-BEB5-E01275A56070.jpeg
 
Last edited:
Well I’m a little disappointed did my final assembly and pattern isn’t as good as when I did my set up. Must have been some variance between my set up bearing and the new one I pressed on. Still nice and centred between the face and the flank but moved down. I set backlash at .008 trying to move it up some no change. What do you guys say leave it or go back to the drawing board?

9275C208-EE8A-47BC-A905-B72DB1343EC8.jpeg
 
Pinion needs to be a touch deeper
I think I might try taking race out of case and putting a shim behind it rather than toying with the pinion gear that is all pressed together now. Hard to believe it needs more depth I’m at .046 of shims now. I’m thinking try another .004?
 
If you are referring to the pattern going towards the toe I see no issue. That's not something you can control. The pinion shim looks good to me.
Doug
 
Well I left it and put it all together. Won’t be able to properly road test for a bit because of winter and road salt. I did take it for a quick spin on my subdivision road because they don’t salt it but it was completely snow covered so couldn’t go over 30 km/h. That being said on that brief drive all seemed good.
 
I have never done this task yet but are planning to rebuild my 489 rear end and change the ring and pinion with a different ratio so i am curious about the adjustment procedure, which you might share some knowledge about.
You only shim the pinion shaft for determining the proper "depth" of the tapered pinion gear, which in turn sets the contact pattern on the ring gear?
(Like some transmissions/reduction gearboxes you also have the ability to adjust the ring gear axially, but i believe these differentials do not have that)
But the position of the ring gear is set fixed between the carrier bearings right? (as you mentioned to do shimming behind it you can still re-position it in some way)
And the carrier bearing pre-load is set with the adjuster on the single side adjuster, how do you know you have the right preload?
Did you use a standard crush sleeve? I am wondering if using a crush sleeve eliminator would give any benefit, ordering 1 extra crush sleeve would give you the extra insurance as well i guess in case you had to open it again.

I’ll give you the run down on my approach. I’m sure someone else that will chime in but this is how I do them. First step buy two inner pinion bearings you are going to make one into a set up bearing. I take a little air grinder with a cut off wheel and just put a little slice on the inside of the race just deep enough that your finger nail will catch it good. Now put a flapper wheel in your air grinder and go to work hogging out your bearing evenly so it will be a slip fit on your pinion. Once you polish out the slice you put in earlier I find that is about where you will have a nice slip fit. If not keep going. Now mock everything up. Put your factory shim off your old pinion under your slip fit set up bearing. Remove and replace inner and outer pinion bearing races in case. Now install pinion and bearings don’t bother with crush sleeve for set up. Snug up pinion nut and than gradually snug it up till you feel some drag on bearings and using a beam style inch lb torque wrench check the preload on the bearings by checking reading on your torque wrench while you spin bearings. Shoot for 15-19 in lb. Once your pinion is in place and set up set your carrier in the case and snug up the caps (make sure you mark these on disassembly) and install adjusters. Spin adjuster on ring gear side in until you have zero lash and than I just snug it up a touch past. Now adjust your opposite adjuster until it’s hard to turn and check your backlash. You are shooting for .006-.010. Loosening ring gear side and tightening opposite side will give you more backlash and vice versa. When you get your backlash set I like to gradually snug both sides up equally as to set preload on carrier bearings. Now check your preload at pinion but again with your beam torque wrench again now with everything assembled you are shooting for 30-35 in lb. Now I paint 4 or 5 teeth on ring gear and put an impact gun on pinion nut to spin it make sure you don’t let the impact hammer on the but just feather it till you get it spinning and let it float. Spin it till you get a good pattern than refer to a chart to see what adjustments you may or may not need to make. I left out lots here but this is the coles notes version focused on the adjustments. Like I said also my way isn’t perfect and I’m sure others will chime in with more good info. Don’t forget if your ocd like me post your pattern when you are done to get others opinions to either help you sleep at night or keep you up depending on replies
 
I got a bit confused when you talked about 2 bearing adjusters...
Looking at the shop manual now and see that both carrier bearings have and adjuster, i was thinking all the time only 1 of them had an adjuster.
Maybe confused it in the back of my head with the single axle adjuster..

So both carrier bearing cones are press fit on the unit and both bearing cups "float" in the carrier bearing caps and can be moved around by the adjusters, that makes sense now for adjusting.
If your only option is to play with the pinion depth you could be limited on finalizing the contact pattern.

That’s right. That being said those adjusters main purpose is setting your backlash which is a relatively tight spec (.006-.010) You can play around in side that spec to adjust pattern but I have never found it has made a huge difference as far as gear pattern goes.
 
That’s right. That being said those adjusters main purpose is setting your backlash which is a relatively tight spec (.006-.010) You can play around in side that spec to adjust pattern but I have never found it has made a huge difference as far as gear pattern goes.

I understand, the tooth face angles remain same so the contact pattern would remain same.
But bringing it towards or away from the pinion centerline increases/reduces the lash.
 
Hi. Can you post an update on how you find the diff when you can go for a decent test run.
Thanks Steve
 
What brand is that ring and pinion set btw?
I was considering to buy a set from DoctorDiff, they are cheap but i am sure they will sell good quality since this is their business.
 
Auto Transport Service
Back
Top