You are using an out of date browser. It may not display this or other websites correctly.
You should upgrade or use an alternative browser.
You should upgrade or use an alternative browser.
69 Coronet 440 project
- Thread starter BigBlock61
- Start date
Great to see you plugging away again, sometimes you just have to say to hell with it and roll up your sleaves and beat it into submission. Good luck
I agree with 747Mopar . . . X2 . . . Works that way for me TOO ! ! Keep at it BigBlock61 ! !
-- Khan-vertible
BigBlock61
Well-Known Member
Atta boy!
Thanks
- - - Updated - - -
looks like the car's *** is the one getting kicked...good job!
It's still a boxing match but I'm not giving up.
- - - Updated - - -
Keep on keeping on man!!! It's not about getting knocked down brother...........we've all been there, it's about getting back up.
Eyes on the prize Padre!
One step forward and two back, That's the restoration dance! lol
- - - Updated - - -
Great to see you back at the metal work! getting the hard stuff done is the biggest challenge.
Ain't that the truth! I do love a challenge.
- - - Updated - - -
Great to see you plugging away again, sometimes you just have to say to hell with it and roll up your sleaves and beat it into submission. Good luck
I'm always doing something to the Coronet but that stuff isn't worth posting about. I'm definitely beating this car into submission I'm just doing it with a body hammer and dolly.
- - - Updated - - -
I agree with 747Mopar . . . X2 . . . Works that way for me TOO ! ! Keep at it BigBlock61 ! !
-- Khan-vertible
I've seen your work. You're good at making square pegs fit into round holes. lol Thanks
Basket case
Well-Known Member
BigBlock61
Well-Known Member
Good to see you are able to get back at it John. I would think the quarters will be the biggest challenge on your ride. Smooth sailing after that, right?
You're so right about that, the quarters are my biggest challenge. Well that and learning as I go. Like I've said before, I'm in this to far to quit now.
- - - Updated - - -
It's still a boxing match but I'm not giving up.
Eye of the Tiger (yeah I know that was from III)...
When Rocky says "Go for it!" it makes you sit up in your seat and say F*ck Yea!!!!
BigBlock61
Well-Known Member
Well I talked about learning as I go, here's a new lesson for the day. I put the deck lid back on the car so I could match up the fit on the quarter. I got the body lines as straight as possible but it wouldn't line up. As you can see from the pic the rear gap looks good.
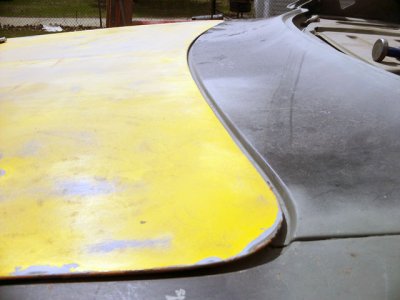
As the gap runs down the sides it gets wider near the end of the car, a 1/4" wider.
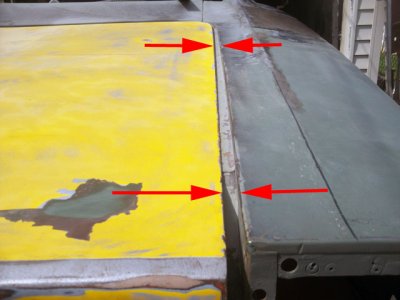
I never thought to do this before but I decided to find the center line of the car and take measurements from there. I crawl under the car and started measuring across the frame rails to mark the center of the car. From there I was able to tape a string to the first mark and line up the other marks all the way back to the bumper. Long story short my trunk floor is off to the passenger side by a 1/2". The floor fits between the frame rails perfectly and the end gap at the rear of the car looks great so I'm thinking it's a problem with the floor. At the back of the wheel well the distance is good at 11" from the frame rail to the edge of the trunk floor. The problem is between there and the end of the car. I have to move the trunk floor over 1/4". I figure I'll add some metal to the drivers side and take it away from the passenger side. The drivers side was easy because there is nothing in the way.
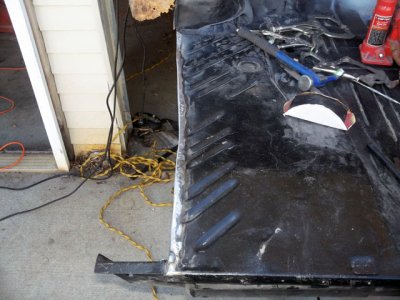
My question to you guys is what's the best way to do the passenger side? I have to cut metal out of this side and everything is welded in place. I can't see taking it all back off, so there has to be a better way.
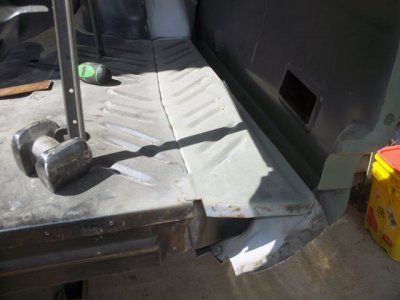

As the gap runs down the sides it gets wider near the end of the car, a 1/4" wider.

I never thought to do this before but I decided to find the center line of the car and take measurements from there. I crawl under the car and started measuring across the frame rails to mark the center of the car. From there I was able to tape a string to the first mark and line up the other marks all the way back to the bumper. Long story short my trunk floor is off to the passenger side by a 1/2". The floor fits between the frame rails perfectly and the end gap at the rear of the car looks great so I'm thinking it's a problem with the floor. At the back of the wheel well the distance is good at 11" from the frame rail to the edge of the trunk floor. The problem is between there and the end of the car. I have to move the trunk floor over 1/4". I figure I'll add some metal to the drivers side and take it away from the passenger side. The drivers side was easy because there is nothing in the way.

My question to you guys is what's the best way to do the passenger side? I have to cut metal out of this side and everything is welded in place. I can't see taking it all back off, so there has to be a better way.

BigBlock61
Well-Known Member
BigBlock61
Well-Known Member
My poor compressor, when I bought it to do this restoration I really had no idea what I was going to be doing with it. I'm figuring it out that it's really not powerful enough to do what I'm doing with it. A 1.6 hp motor and 9 cfm at 90 psi. Whenever I get around to rewiring the garage for 220 I'll get a bigger compressor.
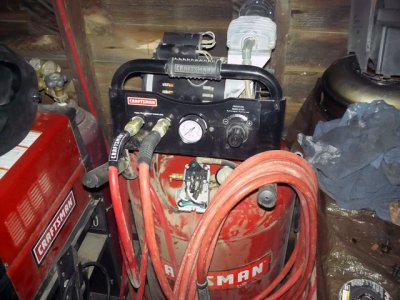
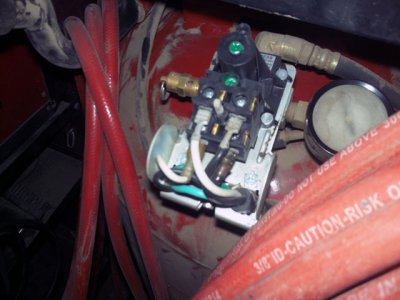
So I'm sandblasting the rear window panel (for lack of a better word) and about half way through blasting the panel the compressor stops working.
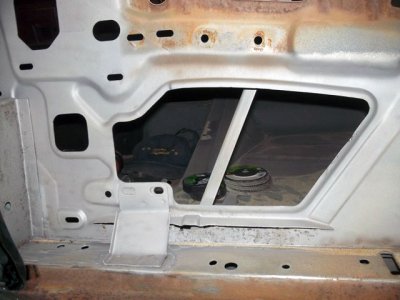
It's a little hard to tell from this pic but the bottom right connection is burnt. I ordered a new switch today, hopefully it will be here by next Wednesday.
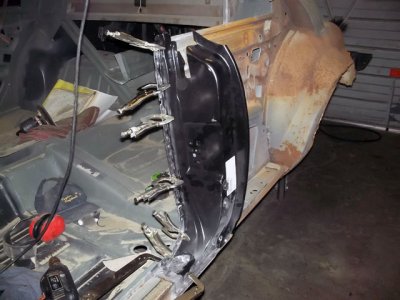
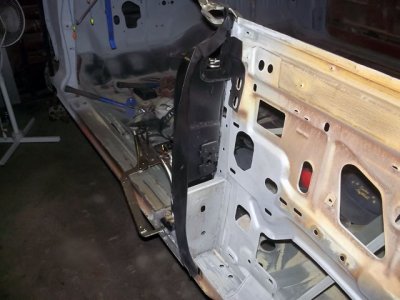
Until then, I figured I'd test fit the door jamb and get it ready to weld in place. I think I need more vice grips.

So I'm sandblasting the rear window panel (for lack of a better word) and about half way through blasting the panel the compressor stops working.

It's a little hard to tell from this pic but the bottom right connection is burnt. I ordered a new switch today, hopefully it will be here by next Wednesday.

Until then, I figured I'd test fit the door jamb and get it ready to weld in place. I think I need more vice grips.


BigBlock61
Well-Known Member
Busy, busy, busy

My boy EJ bought a Dakota back in March and we pulled the trans in a few feet of melting snow. Now that he finished high school he's been working odd jobs to get the money to fix his truck.
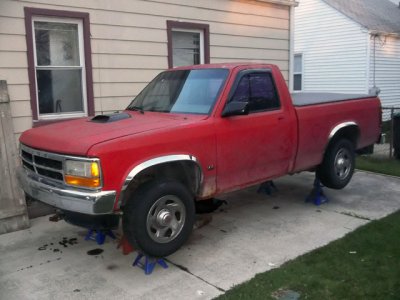
When we picked it up it was also covered in drug stickers. I have a feeling that the kid who owned it before EJ got pulled over alot. EJ spent a day removing stickers from the Dakota except for one, the Hello Kitty sticker on the hood scoop. I thought it was funny.
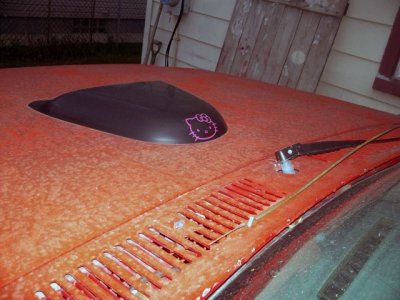
We finally got the trans rebuilt but he still needs to get a few more things before we put it back in like a trans mount and lines. He's working hard so I'm sure he'll get the parts soon. I'm really proud of him that he's doing this.
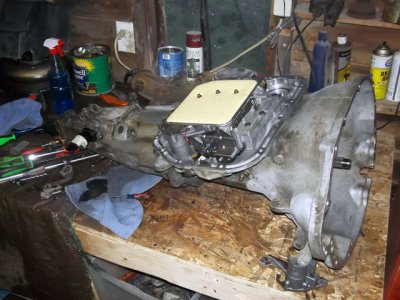
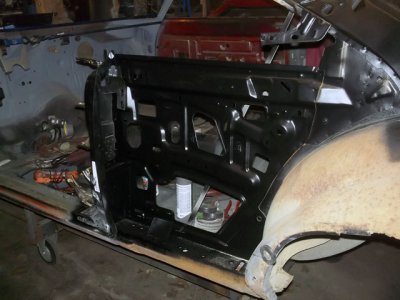
Still waiting on the parts for the compressor to arrive but until then I hand sanded the rust away, primed, and painted the rear window panel so I can get the door jamb installed and keep going on the Coronet.
In between this I still have homework and grades to keep up. This semester I have a class that teaches us how to work in groups. I can't believe this class even exists and the school wouldn't let me test out of the class so I wouldn't have to take it. I've been working in groups with others for over 20 years now. I don't think I'll learn anything from this class but hopefully it will be an easy A. The other class I'm taking is securing operating systems and this class is pretty cool. It will teach me to lock down Windows and Linux and make them more secure.

My boy EJ bought a Dakota back in March and we pulled the trans in a few feet of melting snow. Now that he finished high school he's been working odd jobs to get the money to fix his truck.

When we picked it up it was also covered in drug stickers. I have a feeling that the kid who owned it before EJ got pulled over alot. EJ spent a day removing stickers from the Dakota except for one, the Hello Kitty sticker on the hood scoop. I thought it was funny.

We finally got the trans rebuilt but he still needs to get a few more things before we put it back in like a trans mount and lines. He's working hard so I'm sure he'll get the parts soon. I'm really proud of him that he's doing this.

Still waiting on the parts for the compressor to arrive but until then I hand sanded the rust away, primed, and painted the rear window panel so I can get the door jamb installed and keep going on the Coronet.
In between this I still have homework and grades to keep up. This semester I have a class that teaches us how to work in groups. I can't believe this class even exists and the school wouldn't let me test out of the class so I wouldn't have to take it. I've been working in groups with others for over 20 years now. I don't think I'll learn anything from this class but hopefully it will be an easy A. The other class I'm taking is securing operating systems and this class is pretty cool. It will teach me to lock down Windows and Linux and make them more secure.

NZ 70 RR
Well-Known Member
Keep at it , you are doing great. I had simuilar compressor issues, media blasting sure puts the gear through its paces. Panel works looks great.
Your boy's truck looks a good one, great that you can work with him and pass on your knowledge.
Your boy's truck looks a good one, great that you can work with him and pass on your knowledge.
BigBlock61
Well-Known Member
media blasting sure puts the gear through its paces. Panel works looks great.
Your boy's truck looks a good one, great that you can work with him and pass on your knowledge.
Ain't that the truth on media blasting. My boys truck is a 30 footer. it looks good from 30 feet away lol. The whole truck is covered in bed liner and painted red.
I've seen your work. You're good at making square pegs fit into round holes. lol Thanks
Ha ha ha ha . . . BibBlock61 . . . thanks, but I really think you got me mixed up with someone else on this site . . . you haven't seen some of my welding where I make big square holes ( sigh )
But, thanks for the kind words . . . that means a lot to me ! !! !
roadrunnerman
Well-Known Member
John, you're making some good headway. Hopefully the part for your compressor will arrive soon. Looks like your son got a good deal on the truck. Hope you and him went thru it with a fine tooth comb and didn't find any "hidden" stash. We just got done moving my sister-in-law and found a small bag of weed that was thrown in a bush.
Taking a class on how to work in groups? Hopefully they don't tell you that you've been doing wrong for the last 20 years.
Taking a class on how to work in groups? Hopefully they don't tell you that you've been doing wrong for the last 20 years.
BigBlock61
Well-Known Member
John, you're making some good headway. Hopefully the part for your compressor will arrive soon. Looks like your son got a good deal on the truck. Hope you and him went thru it with a fine tooth comb and didn't find any "hidden" stash. We just got done moving my sister-in-law and found a small bag of weed that was thrown in a bush.
Taking a class on how to work in groups? Hopefully they don't tell you that you've been doing wrong for the last 20 years.
Nope no hidden stash in the Dakota but it wouldn't have surprised me if he had. Thankfully the compressor is fixed now but I have yet to even use it. I read in a post somewhere that you may be updating your project. Cant wait to see it.
- - - Updated - - -
Wow you really tore into it!
Yea I did and I hate doing trans work. Hopefully this weekend we'll be putting the trans back in the truck. I still have to find the bushing that locates the z-bar on the trans. The local Dodge dealer sells all the bushings to tighten up the shifter slop except for that one. It's been discontinued so EJ gets to go junkyard diving to try and find one.
BigBlock61
Well-Known Member
When EJ and me took the trans out of his Dakota we manhandled it out of the truck. I had a floor jack under there to try an bring it down slowly and in a controlled manner but the trans just kept slipping off the jack making more work for us. I think I came up with a good remedy for putting the trans back in. I made an adapter that will fit over the head of my jack and around the trans pan making my floor jack into more of a trans jack. We'll see how this works for putting the trans back into the truck.
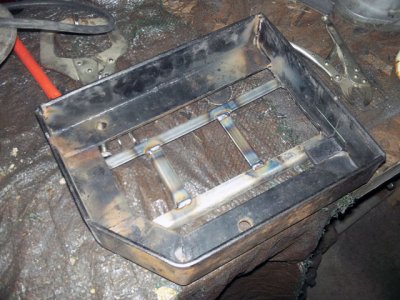

BigBlock61
Well-Known Member
Me and EJ ended up pulling the motor out of the Dakota to change the motor mounts and make putting the trans back in easier. We get it all bolted together and back in the truck and as we're bolting and plugging things back together EJ breaks the ear off the starter. I'm really not liking this truck right now, LOL. We pushed it off to the side till he can get another starter for it, so back to the Coronet for me  . I decided to remake my body jig and add features I'd really like to have. When Smythe68 built the one I have now I really liked that it came apart in sections. He built the front and rear sections and then connected the center. I want a center section that I can connect a front and back to. I also really liked the body jig on the 521 restorations site and how it located the frame. The only problem with that jig, is that it's designed for a shop as most are, and not for a one car garage with minimal room. So here's my take on a body jig, right now it's only the center section and I still want to make mounts to locate the trans cross member and the rockers. I also have some more bracing to weld in for the uprights.
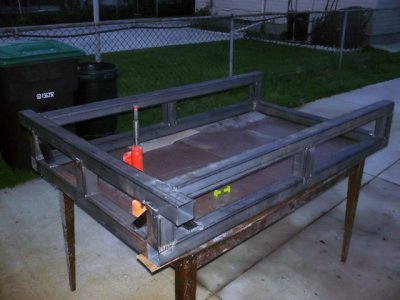
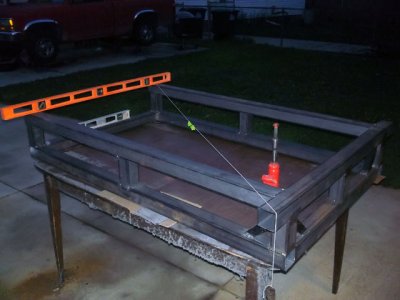
The top deck is 6 inches from the bottom of the frame so it acts like a datum line. The hard part was welding the uprights in, keeping them level and the measurements square. Lots of tacking, measuring, cutting them back out and retacking till I got it right.
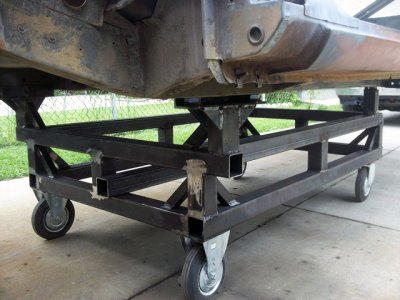
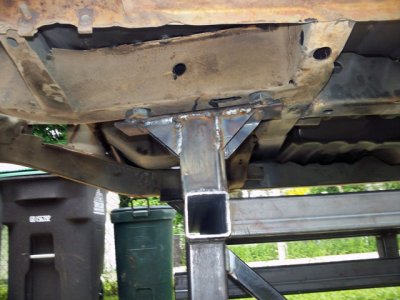
I used 1 inch nuts and bolts just like 521 for the locating holes on the frame but I also incorporated angle iron to locate the frame so if I need to replace a frame rail I'll just have to set it on the jig, double check the measurements, and weld it in place.
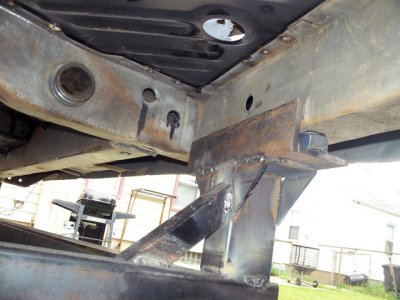
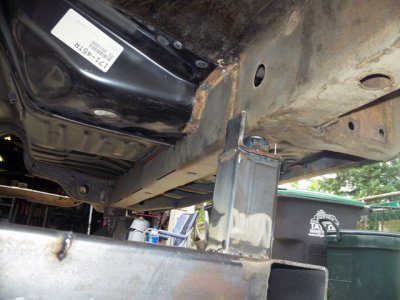
When I make the front and rear sections they will attach with 3/4 inch round pegs so everything stays level. I'm also considering trying to make some kind of leveling system so if I wheel the Coronet out of the garage to do work on it I can level the jig and in turn the car will be level. Then I can take it off the leveling jacks to move it back into the garage maximizing the area I can work on the car. I still have to figure out how to do that part.
- - - Updated - - -
Music to weld to.
[video]https://youtu.be/nvlTJrNJ5lA[/video]


The top deck is 6 inches from the bottom of the frame so it acts like a datum line. The hard part was welding the uprights in, keeping them level and the measurements square. Lots of tacking, measuring, cutting them back out and retacking till I got it right.

I used 1 inch nuts and bolts just like 521 for the locating holes on the frame but I also incorporated angle iron to locate the frame so if I need to replace a frame rail I'll just have to set it on the jig, double check the measurements, and weld it in place.


When I make the front and rear sections they will attach with 3/4 inch round pegs so everything stays level. I'm also considering trying to make some kind of leveling system so if I wheel the Coronet out of the garage to do work on it I can level the jig and in turn the car will be level. Then I can take it off the leveling jacks to move it back into the garage maximizing the area I can work on the car. I still have to figure out how to do that part.
- - - Updated - - -
Music to weld to.
[video]https://youtu.be/nvlTJrNJ5lA[/video]
moparjohnny
Well-Known Member
that man has skills!and he won't back down.fine work as usual.
BigBlock61
Well-Known Member
that man has skills!and he won't back down.fine work as usual.
Thanks Johnny
Similar threads
- Replies
- 7
- Views
- 443
- Replies
- 7
- Views
- 463
- Replies
- 26
- Views
- 3K

