• When you click on links to various merchants on this site and make a purchase, this can result in this site earning a commission. Affiliate programs and affiliations include, but are not limited to, the eBay Partner Network.

Changing oil pan gasket

Geez, i would have guessed that the 6 qrts of oil does not fit in my pan, If I ever get this pan off I'm going to fill it and see. I heard also about the filling of the dimples with JBweld, but I'm afraid someday that filler will come loose and get to the oil pan.
dose not matter what pan you have
a 402 pan is 4 qts + 1 for filter = 5 total
hemi pan like i have is 6 qts = 1 for filter = 7 total
still 1.5 inch below block
 
took the bolts out yesterday, today you see oil drips and streaks in a few areas, that must mean oil is getting to the bolts and making its way out. All of the bolts are wet also. Also found that my valve cover gasket on passenger side is wet so some oil must also be coming from there. Do you think if I put some rtv on the bolts and put them back in would help? I would think that it needs to be dry first for that rtv to seal.
PXL_20201211_191225317.jpg
 
Mine is the summit one I posted in the link.
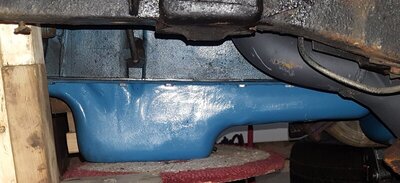
The pic is off the interweb of a mod I want to do to it.

When this thing is way up in the rpms, way up, the oil pressure drops a bit, never did before the new windage tray gasket.

Iirc, bolts I used: https://www.summitracing.com/parts/mil-85002

20180624_154851.jpg
 
In my opinion you are passed the point of trying to bandaid it. Gonna have to get the pan off and reseal it. Clean the holes with brake clean and blow them out, also clean the bolts themselves. Super light coating of RTV on the gaskets and put it back together with some loctite on the bolts. It looks like it was over torqued to me judging by the gasket. Valve cover gaskets - get some good ones, cometic or super performance come to mind. I only put sealant on the cover itself and not on the head side of the gasket to make them easy to remove and minimal to no cleaning if you change covers or have to pull the cover for something.
 
Crappy pic of the gasket installed.
It's thick, and I didn't force the bolts on, just tighten down. I believe it's crush proof around the bolts.

I did it months ago, straightened the pan, cleaned everything, a light sanding, no rtv or anything similar, painted the oil pan again.

It's still shiny new and clean, the only leak was from the drain plug, just had to tighten it after driving a bit.

When I take it off, not sure when, I'll know for sure if it leaked at all.
I thought it might at the front, after installation, as I had recently heard the timing covers are notoriously higher than the bottom of the block by the smallest amount.
I know it definitely has not leaked out from the bolts.

My oil pressure line is leaking again, tried nylon and copper, teflon tape, what's the cure for that?

20201211_151202.jpg
 
"It looks like it was over torqued to me judging by the gasket."

This ^ Orange pan picture

You can see the cork gaskets in that picture bulged out - Classic case of cork and overtighten and the silicone doesnt help because it helps SLIDE the cork gaskets out

Damn i hate silicone on certain gaskets - Especially valve covers and oil pans

Thats another reason I love those Superformance gaskets
 
In my opinion you are passed the point of trying to bandaid it. Gonna have to get the pan off and reseal it. Clean the holes with brake clean and blow them out, also clean the bolts themselves. Super light coating of RTV on the gaskets and put it back together with some loctite on the bolts. It looks like it was over torqued to me judging by the gasket. Valve cover gaskets - get some good ones, cometic or super performance come to mind. I only put sealant on the cover itself and not on the head side of the gasket to make them easy to remove and minimal to no cleaning if you change covers or have to pull the cover for something.

I am starting to agree with this. Next time in the shop I'll get it off, the worst that will happen I will need a new pan.
 
dose not matter what pan you have
a 402 pan is 4 qts + 1 for filter = 5 total
hemi pan like i have is 6 qts = 1 for filter = 7 total
still 1.5 inch below block
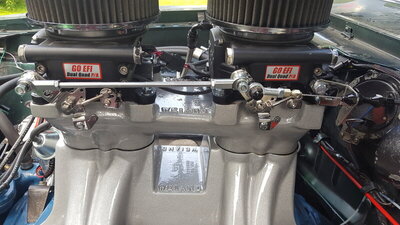
Correct. Same dipstick.
 
Ok got the oil pan off without damage, had to use a sharp putty knife and hammer and go around the pan. Now I have two questions,
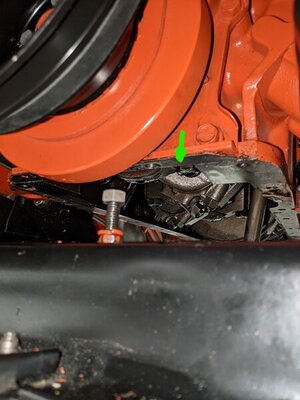
1. in the pic i posted the green line points to what appears to be a spacer, do i remove that and reseal it? or maybe it does not come off, I'ver never done this before.
2. see the bolt and nut on the kframe, the enginve builder had them in the two center holes on the front of the pan. I somehow think that is not original. Is the timing chain cover supposed to be treaded. I had a hell of a time getting those off as its behind the balancer. I'm guessing the threads are damaged so he came up with this rather than fising the cover properly. If I'm correct any suggestions on how I can fix this, I can see a lot of swearing putting those back in there.
Thanks everyone for the help so far. Like I said never done too much engine work, the two cars I restored that work was all done by someone else.

InkedPXL_20201213_204950154_LI.jpg
 
There are no spacers, just the pan gasket. The front 2 holes should be threaded in the timing cover.
 
Like mentioned by blk 68

That’s not a spacer , it’s the sealing surface of the timing chain cover for the oil pan and gasket

Anyways

He had nuts on the backside of those two threaded holes ?

Then yes , maybe those threaded holes are stripped out in the timing chain cover

How deep you want to dig in ? Like replacing the timing chain cover yes or no
 
Like mentioned by blk 68

He had nuts on the backside of those two threaded holes ?

Then yes , maybe those threaded holes are stripped out in the timing chain cover

How deep you want to dig in ? Like replacing the timing chain cover yes or no

Yep, he had nuts there, I don't want to replace the timing chain cover, just got to come up with a way to hold those nuts in place while inserting/getting the bolts started, once I get it started I think I'm good.
 
Save those bolts for last.
Can you drop the bolt in from the topside and put the nut on the bottom? Then all you have to do is get a wrench on it vs trying to hold a bolt from the bottom while trying to start a nut on the topside.
 
Yep, he had nuts there, I don't want to replace the timing chain cover, just got to come up with a way to hold those nuts in place while inserting/getting the bolts started, once I get it started I think I'm good.


It might be easier just to drill and tap those out to 3/8"
 
Just my .02 cents on pan gaskets-----------never put RTV on a cork gasket as other posters said , it will squeeze out the gasket when you tighten it up , just a tiny dab where the block and the front cover meet and where the rear seal housing meet the block----If the bolt holes are bent in from over tightening flatten em out with a ball peen hammer while backing it up with a small block of steel ----clean all surfaces and wipe off any oil with lacquer thinner---then brush on gasgacinch or contact cement on bottom of block and top of cork gasket , let dry a bit ( read the instructions) when ready put a small dab of rtv on the seams of front cover and rear seal housing ---put sticky side of gasket on engine block and press it down while lining up the holes---if your running a tray do the same thing with tray--then put on the pan --Do not over tighten
By the way Honda bond is a fantastic rtv type sealer.
 
I would love to be able to drill and tap but then engine is still in the car, no room. I will try putting the bolt in from the top, not sure if there is enough room but that would be better. I was also thinking of jb weld the nut on top of the timing cover, but I think I would have to remove the balancer to gain access in order to do it properly. I wish my engine builder would have told me about this I would have told him to change it.
 
Last edited:
Just my .02 cents on pan gaskets-----------never put RTV on a cork gasket as other posters said , it will squeeze out the gasket when you tighten it up , just a tiny dab where the block and the front cover meet and where the rear seal housing meet the block----If the bolt holes are bent in from over tightening flatten em out with a ball peen hammer while backing it up with a small block of steel ----clean all surfaces and wipe off any oil with lacquer thinner---then brush on gasgacinch or contact cement on bottom of block and top of cork gasket , let dry a bit ( read the instructions) when ready put a small dab of rtv on the seams of front cover and rear seal housing ---put sticky side of gasket on engine block and press it down while lining up the holes---if your running a tray do the same thing with tray--then put on the pan --Do not over tighten
By the way Honda bond is a fantastic rtv type sealer.

I got away from cork when someone mentioned Superformance. Mancini has them.

20200408_093841.jpg


It won't squeeze out. 1/8 bead of Permatex Gasket maker. Lightly snug then wait 12 hrs for final torque.
 
Auto Transport Service
Back
Top