• When you click on links to various merchants on this site and make a purchase, this can result in this site earning a commission. Affiliate programs and affiliations include, but are not limited to, the eBay Partner Network.

Dad's First Car - '74 Road Runner

Thanks for the good words, I can only hope to match the work going on in some of these other threads. Maybe in another 20 years. :toothy6:

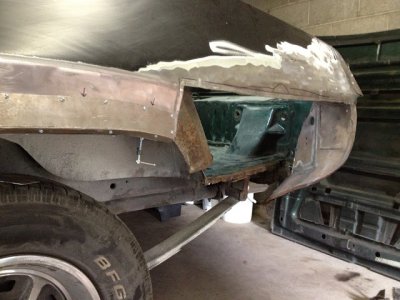
I have a pile of new metal waiting for me, I just had a new outer wheelhouse arrive on my doorstep. Hopefully some more progress updates this weekend. The rest of the car isn't as bad, the drivers side really took the brunt of Pennsylvania's worst. The floors and frame rails are all very solid, apparently the barrels of undercoating did some good. Hopefully the old girl is done throwing out surprises for the time being.
 
Hopefully the rest will be some easier.. You sure have come along way! Good luck,, looking solid as new..
 
Small progress update, I've been spending some time making room for some new sheetmetal. I cut out the old trunk extension on the driver's side. Looks like I will have a small amount of patching to do on the lip that it welds to, but overall the rest of the metal in this area doesn't look too bad.

3794C2EF-252E-415B-A40A-90B3A0805C5B.JPG

OMG Giant holes!

1A211B33-894B-4768-A305-5FCE1E4F4B63.JPG

66619F55-066F-4F39-AC63-75CB9330984F.JPG

I also tack welded the new wheel lip I am making together so that I could unscrew it from the car, then I started cutting away the old wheel lip to expose the outer wheelhouse. It was at this point that I realized the lip was no longer present, time to order more sheet metal.

Also at this point I discovered, much as I was expecting to, that my inner rocker is toast. This car has made the decision for me that I will never own another northeastern car again. Thankfully it looks like the inner rocker is going to be a pretty simple piece to make, it's just flat metal with a few bends. I'm sure rear seat passengers are going to feel a little more reassured knowing their seatbelt isn't going to run the risk of detaching from the car in an accident once this is all finished.

B257ECE6-2A3D-489D-9BED-C81049534B9F.JPG

9B73E921-0E5B-4E21-B12B-8B74ED542576.JPG

201314C9-B889-4547-859B-D497C0C069E1.JPG

There was also a small patch on the back that was hiding this, nothing too serious, I had already ordered the filler piece for the trunk extension expecting to find this.

39F4F1AD-559A-4A77-A2D6-5A3C1965BBC9.JPG

New Metal! Better make room.

98DEFB14-5453-4847-BD39-AF728C81C74F.JPG

Time to break out the angle grinder again...

A650B9E4-E4DE-43B4-B93A-79B83B7B6D2A.JPG

DAB29566-74AB-480C-9C3B-C99A32198FC2.JPG

I will need to make a few more patches before I start welding in any new metal, as some of the parts of the inner wheel house that were butted up against the rusty one are a little crunchy, but overall no new surprises.

I'm definitely not used to seeing so much of the car opened up. I'm looking forward to starting to close her back up again. Great news is that I was mocking up all of the parts back on the car, and the parts I made fit the new outer wheelhouse. Next step is making a few little patches so that I can start welding in the new metal.
 

Attachments

  • 3794C2EF-252E-415B-A40A-90B3A0805C5B.JPG
    3794C2EF-252E-415B-A40A-90B3A0805C5B.JPG
    80.8 KB · Views: 185
you're doing a fantastic job. makes me miss my '73. my'69 came from Michigan, and it's really solid.
would you be taking your to the Beaver show next year? maybe we'll run into each other.
 
you're doing a fantastic job. makes me miss my '73. my'69 came from Michigan, and it's really solid.
would you be taking your to the Beaver show next year? maybe we'll run into each other.

If the car is finished by then she will be there. Even without the car I will most likely be there. Beaver is right across the river from me.
 
It's been awhile, so I thought it would be a good idea to post an update. Life has been getting in the way, so progress over the summer has been very slow.I started taking the firewall and engine compartment down to bare metal, then things quickly progressed into dropping the subframe to allow a much more detailed job. Thankfully no additional rust has been discovered, and the framerails are clean.photo.jpg

I was very happy not to find additional rust in the firewall

photo 1.jpg


photo 2.jpg

Thankfully all of the bolts holding the old girl together gave up their hold with the help of a little bit of PB Blaster.

photo 3.jpg

I can't wait to get the suspension blown apart and begin restoring individual components, hopefully soon I will get to see the car looking better in fits and starts, not just making everything look worse as I go. :-D

photo 4.jpg

Looks like she's no longer a rolling chassis.

photo 5.jpg

- - - Updated - - -

Also it appears the internet has broken the links to the pictures on the first page, so when I get a little time I will add the progress pictures up to this point back to the thread.
 
Last edited:
yeah real life sucks. looks like you're doing a good job. mine is still in paint jail. maybe they'll be done in time for next years Hot Summer Night;s.
 
What you have there all cleaned up looks great, hopefully the frame rails will be good and looking at what you have it sure looks like they should be good! Life does have a way of slowing us down sometimes.. Good luck with the rest of it!
 
I hope reviving your own project thread 12 years later isn't a problem, because, well, here we go.

So life gets in the way. Back in late 2013 I received notice that my work location was closing. To keep my job, we had to relocate to Nashville. 5 years after that, I was in Arizona where I live today. I couldn't take the car with me on either move, so I threw it back together, and stored it in my parent's garage in early 2014.

It sat for over a decade.

Last year, my dad and I decided to pick up where I left off, and restart the project together now that my dad is retired. This is my last picture of the car in 2014 as it was hauled off to storage in my parent's garage:

IMG_5337.JPG


In 2024, she looked like this:

IMG_3295.jpeg


IMG_3296.jpeg
 
Last edited:
As a 50th birthday present to the old girl, I found a quarter panel here in Arizona. This project restarted with a cross-country drive.
IMG_3249.jpeg
IMG_3254.jpeg


Once I arrived in PA, my dad and I hauled the car out of my parent's garage (under it's own power), threw it on a tow dolly, and moved it a few miles to a bigger shop with lift access.

IMG_3342.jpeg

IMG_3341.jpeg
 
Once we had the car in the shop, the old patches I started over a decade ago came off of the car.
IMG_3362.jpeg

From there, we had to cut a fair bit deeper. The quarter I brought wasn't perfect, but it was solid and had all of the under structure we needed.
IMG_3386.jpeg

IMG_3416.jpeg


At this point, we are seriously questioning what we've gotten ourselves into. Time to start disassembling the donor quarter and take everything could off of the thing.
IMG_3400.jpeg
IMG_3398.jpeg

Thankfully, all of the structure in the donor quarter was in great shape, so I dug in and drilled out all of the spot welds holding it together. I don't have pictures of everything, but by the time we were done there was pretty much nothing left of the donor quarter. The inner rocker, seatbelt brackets, lower part of the door opening, and big chunks of the support structure around the inner fender all came off the donor panel and found their way into our old Plymouth.

When I left PA at the end of my visit in June of 2024, we had cut all of the rusty metal out of the back of the car, started welding in the under-structure, and had the replacement quarter panel patched (it also had some rust) and mocked up on the car.
IMG_3420.jpeg


What did we get ourselves into.
 
Last edited:
In February of this year, I made a return trip. Kicking the project off with a big push meant my (now retired) dad could putter on weekends, and while I was gone, he started welding the rear quarter panel and all of the associated internal structure into the car. This is what I came back to:

IMG_5571.jpeg
IMG_5573.jpeg


From here, we tag-teamed the car over the next week.
IMG_5576.jpeg


My dad did metalwork, and I handled grunt work and started stripping all of the work areas down to bare metal.

IMG_5592.JPG
IMG_5579.jpeg
IMG_5578.jpeg


It was.. a lot. By the time I left PA this time, most of the welding was done on the car, and the door jambs and remaining areas in the front end that I hadn't been able to finish in 2013 were down to bare metal.
IMG_5615.jpeg
IMG_5640.jpeg


IMG_5584.jpeg


IMG_5586.jpeg
 
Fast forward to June of 2025 and it is time for another trip.
IMG_6353.jpeg

My dad had been doing some more projects while I was back home in AZ, so when I arrived the car looked like this:
IMG_6363.jpeg

The agenda for this trip was to finish up the welding on the car, and start finish bodywork. While he worked on skimming the quarter panel, I worked on stripping the backsides of the doors and doing some more rust repair. First up, some cracks in the passenger side door.
IMG_6367.jpeg
IMG_6369.jpeg
IMG_6370.jpeg

Next up, the driver's door needed a little love. My grandfather put door bottoms on this car 45 years ago. It was an interesting feeling to revisit some of his work. Because of the history, we opted to leave his door bottoms in the car, but do a little bit of cleanup work on the backside. I trimmed the portion of the door bottom that folds over the backside of the door to match the rest of the door skin, then folded it back to repair some rust underneath it.
IMG_6396.jpeg
IMG_6397.jpeg
IMG_6398.jpeg
IMG_6399.jpeg

Didn't grab more pics, but after this I ground down the welds, repaired a little more rust, and then folded the door skin back over and welded it up. My grandfather's door bottom patch is still in the car.
 
We accomplished a lot on this trip. After welding up both doors, we prepped and primed them.

IMG_6411.jpeg


Reworked some prior patches to get the body lines even:

IMG_6410.jpeg


Welded up the inner wheelhouse to the outer wheelhouse, as well as the seatbelt brackets that had been replaced:
IMG_6412.jpeg

IMG_6414.jpeg

It was a very busy week, and we weren't done.
IMG_6435.jpeg
 
Last edited:
The other big project was the passenger side upper rail. This one wasn't as bad as the driver's side was 10 years ago, but I needed to dig in and make some patches to wrap up the structural welding on the car.
IMG_6429.jpeg


Time to bring out the old CAD (cardboard-aided design) skills and design another patch.
IMG_6423.jpeg

An 18 gauge steel patch was cut and folded:
IMG_6424.jpeg

Then that patch was primed with some weld through primer and drilled for spot welds.
IMG_6427.jpeg

The old rusty metal was cut out of the upper rail:
IMG_6425.jpeg

And the new patch was clamped and screwed into place:
IMG_6428.jpeg

Then I welded it into the car to wrap up the last of the major rust repair.
IMG_6438.jpeg

By this point we were FINALLY done cutting pieces off of the old girl. Only took 13 years to get there.
 
Our last project this month was to mount all of the panels back onto the car, and start getting everything lined up for finish bodywork. Everything will come off again for paint in a few months, but this is where we sit today:
IMG_6449.jpeg

IMG_6450.jpeg

IMG_6454.jpeg

IMG_6455.jpeg

IMG_6453.jpeg

IMG_6452.jpeg

IMG_6456.jpeg

IMG_6458.jpeg

We still have a lot to do, but it feels good. For the first time in my living memory this car is rust free. It has taken 13 years to get to this point, but we are getting there!

This weekend I flew back to AZ feeling a huge sense of accomplishment, and I know my dad is feeling it too. In the late summer I will make a return trip, and our goal is to put the car in paint.

Lets hope it doesn't take me another 12 years to make my next post.

IMG_6471.jpeg
 
Until then, here are a few pictures of this same car in 1981 when my dad and grandfather got the car on the road before I was born:
IMG_5602.jpeg
IMG_5601.jpeg
IMG_5599.jpeg
IMG_5598.jpeg
 
Great progress! Keep at it.
Thanks, It feels good finally moving it along again!

I was 30 years old when I started this thread and thought I'd restore my dad's Road Runner. Now I'm going on 43 and my dad is retired. The old Road Runner is now a reason for us to spend some quality time together working on a project while he has his health.

Next trip out should be paint. I set him up with all the body supplies he needs to fine tune everything before I left. When I go there the next time we will take everything apart again, pull the engine, finish up some detail work, and start spraying.
 
Auto Transport Service
Back
Top