• When you click on links to various merchants on this site and make a purchase, this can result in this site earning a commission. Affiliate programs and affiliations include, but are not limited to, the eBay Partner Network.

Looking at "cam degreeing" on youtube... What a pain in the ***...

I degree my cams, but my complaint is the quality of the cheap "kits" that make it difficult to get consistent and repeatable measurements.
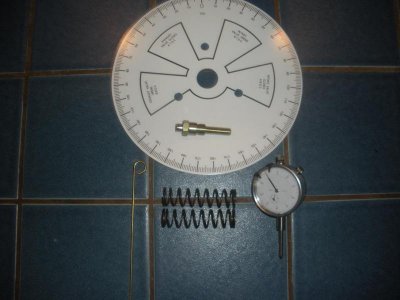
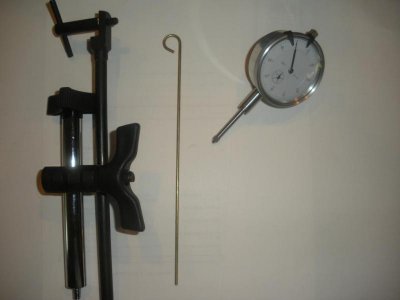
I am usually building about two engines a year, so I bought some of the items that make the job easier, like the crank turning socket that also holds the degree wheel, and the cam checking tool that replaces the lifter and holds the dial indicator. I got those parts from Powerhouse products, but that's $110 for just the two items, you still need a degree wheel and dial indicator. The smaller the degree wheel, the harder it is to read because the degree marks are closer together, but they can often be used when the engine is in the car. The large diameter degree wheels are easier to read and what I use when the engine is on the engine stand. I use the Comp/Powerhouse 16" pro degree wheel ($200) because the 1/4" thick aluminum has little run out. The thin steel wheels tend to get bent/distorted and wobble in/out where the pointer has to be spaced further away.

The Altronics DIGICAM digital degree system looks nice ($300), but I have not used one yet. If it has a data output?, and you used a digital indicator with data output, it would be easy to capture the entire cam lobe profile (and installed position) on a computer.
 
Because understanding the quality vs price can be hard if this is your first high performance engine build. If you have built a basic stock engine the "off the shelf" parts work well so logic kicks in of "there is no difference" when there is. I always try to put a quality double roller in even in a stock build. Thats why sites like this are a great asset when doing things for the first time.

Thomas

When I see the super high dollar stuff I have to weigh the cost/benefit aspect. If I race and do not get 10/10ths out of it, no BFD. If a competitive racer loses races by a few hundredths of a second due to inacurrate parts, that is another matter.
In all reality, this engine is in a street legal, registered and insured STREET car. That doesn't mean that I should be a hack, but I'm not going to be racing for pinks ar anything...
 
There's a way to degree the cam or check a BB Mopar cam that involves two 17 mm deep sockets, a straight edge, and a feeler gauge. Nothing else. Sounds wacky but it actually seems more straight forward than using a degree wheel once you read the directions for how to do it.
 
Gregory, you've gotten a lot of ppl saying to degree it. There is a simple reason. With the issues you have had, a couple degrees could easily cause problems. So, you've spent a ton of money on parts, why the Hell would you not spend $100 to get a degree kit. Or borrow one. Or get someone to do it for you. You built a stroker, yet you ran a 509 with stamped rockers. Its obvious that you haven't built too many engines, otherwise, you wouldn't be questioning checking the cam.
 
From the May 1997 issue of High Performance Mopar - how to check cam timing using nothing more than:

One Feeler Gauge
One Straight Edge
Two 3/8" drive Craftsman 17mm deep sockets

They claim cam timing can be checked in five minutes this way (I guess five minutes once all the tools are out and everything is opened up).

1. Rotate #1 piston to TDC exhaust stroke, make sure you are at the center of dwell.
2. Pull out both lifters for cylinder #1 and replace with the 3/8" drive Craftsman 17mm deep sockets (which are two-thousands shy of the diameter of a Chrysler lifter).
3. Lay a short straightedge across the top of both sockets. If your cam is installed "straight up", there will be no gap between the two sockets in terms of height.
4. If you find the socket in place of the exhaust lifter is higher than the intake, the camshaft is retarded.
5. If you find the socket on intake side higher than exhaust side, this means the cam is advanced.
6. To measure the amount in degrees how much the cam is either advanced or retarded, use the feeler gauge to measure the distance between whichever socket is lower and the straightedge (with the straightedge placed across both sockets).
7. Six thousands of an inch difference in lifter height is equal to one degree of cam timing.
8. Make some measurements and calculations to find out how advanced or retarded the cam timing is.
9. If you want to advance the cam, remove the timing chain (being careful the crankshaft doesn't move), then rotate the camshaft slightly in the direction of engine rotation until you see the socket on the intake side rise higher than the exhaust side.
10. Measure again using the straightedge and feeler gauge (six thousands of an inch = one degree) and choose the correct offset dowel or key.

This method can also be used to check the condition of the cam.

1. Rotate #1 piston to TDC compression
2. Check cylinder #6 to make sure you have the same timing you found when cylinder #1 was on TDC exhaust.
3. If the specs are different, the cam is probably bad.

Disclaimer: I haven't tried this method but it seems easier than using a degree wheel. Just thought it seemed like a cool, easy way to do it and was posting to see if anyone has done it this way or may find it helpful.
 
Satty, that is interesting! I may try that on a junker engine on a stand first, just to try it out!

- - - Updated - - -

You built a stroker, yet you ran a 509 with stamped rockers. Its obvious that you haven't built too many engines, otherwise, you wouldn't be questioning checking the cam.

My optimistic nature tells me that you posted to help, but this post comes across as an insult.
You are wrong, I actually have built several engines. The majority of them have been stock or close to it. This is the third engine I bult for this car. The first was pulled to use in a car that I sold. The second 440 snapped a rod at 846 miles. THAT one was a 9.7 to one .030 440 with six pack pistons and These Edelbrock heads. The sole reason I thought the '509 cam and stock rockers were acceptable for my engine is because the Mopar Performance Crate 440/500 was built with those exact parts. You dont like it? Well, I simply followed what I thought was a proven winner.
 
It wasn't meant to be an insult. It is an honest observation. You have a good start in experience, they ran-seriously, be proud of that, I know some ppl that can't get that to happen.
But you've built 'several' engines. And you seem to be saying that you don't need to do things that others are trying to help you understand need to be done. Cam degree-if you didn't check the 509 that you had, it could have been built with a 4 degree advance, thereby helping your detonation happen because the valves closed earlier in the process. And yeah, stamped rockers, not to be trusted above .480 in my experience.
My experience-several dozen engines of my own, from full builds to searching to shave 1/10th of a second off. From stock to race. Oh, and I worked as a machinist at trivalley machine in Pacheco, Cali for several years. All brands, all levels of builds. From teardown to assembly. No matter where you worked there, you learned what everyone else did, and how to do it, so you could take care of stuff. And we always degrees the cams. Even for a station wagon rebuild. Or a dealership job. Or one of Meep's Damn orange blocks....if it got the cam put in, we used a degree wheel.
By no means do I think I have the answers. Nor the most experience. But my answers, and others answers come from doing this, not some articles we read, nor something we heard.
 
I have found alot of timing chain and gears to be off a little. Thats one reason I always degree my cams. It helps to read as much as you can so you understand just how everything works and that makes it easier to understand how to degree cams. The straight edge method mentioned above uses the center point between overlap on the exh stroke to determine where the cam is at. Myself I prefer the dail indicator method on the intake lifter to set the centerline (full lift) of the intake lobe as I feel thats much more accurate then the straight edge method. I basically used the straight edge method years ago on an old Datsun truck as I could find no marks on the cam and crank gears so I set it up as I let the cam center itself in overlap on the intake and exh lifters and set that to TDC on the exh stroke. But that was in the shop I worked in for my everyday living. On engines I plan to race I like the dail indicator method better. Good luck with it. Ron
 
Thanks, Ron.
I went to Sears today, looking for those deep sockets. Well, sometime since that tech tip was published, the sizes changed. I checked several sockets i had here, then went to an auto parts store, then Sears. ALL of them showed .85 for the 5/8 and 16 mm sockets, both 3/8 and 1/2" drive. The 11/16" and 17 mm came in at .93-.94 inches. The Mopar lifter of .904 makes this little trick impossible unless I were to stumble upon some N.O.S. Craftsman sockets!
I ended up going to the local speed shop and bought a dial indicator kit. Check it out.

- - - Updated - - -

Here are some pictures.
I ordered EDM lifters, they sure look different from any other lifter I have seen. Check the pencil line to see the tiny oil hole in the recess. This hole runs into the body of the lifter and exits at the base, squirting oil to the lobes.

- - - Updated - - -

The degree kit came with almost everything. The wheel will have to be hogged out in the center to allow the fatter Mopar bolt to pass through. The kit came with a piston stop, light checking springs, a dial indicator and a pointer...
 

Attachments

  • DSCN1719.jpg
    DSCN1719.jpg
    49.4 KB · Views: 222
  • DSCN1723.jpg
    DSCN1723.jpg
    26.1 KB · Views: 192
  • DSCN1735.jpg
    DSCN1735.jpg
    50.8 KB · Views: 228
  • DSCN1737.jpg
    DSCN1737.jpg
    25.5 KB · Views: 249
Thats actually the same kit I bought from Mancini's. I do have a few other magnetic base dail indicators also. I also use the EDM solid lifters that have the small oil hole on the bottom of the lifters. Been over 2 years with that solid cam in my eng and no troubles at all. Here is a pic of my eng when I was degreeing the cam. Ron

100_1326.jpg
 
Hey Ron...
Did you have to hone out the center hole in that wheel? Mine looks smaller than the crank/dampner bolt.
 
Hey Ron...
Did you have to hone out the center hole in that wheel? Mine looks smaller than the crank/dampner bolt.


Actually no I did not. Its a little tricky getting it tight right on TDC but I get it to work. Then I set my intake lobe centerline (highest lift) which is 106 ATDC on the cam in my eng now. Then I can check all the rest of the cam timing to make sure its right. Ron
 
From the May 1997 issue of High Performance Mopar - how to check cam timing using nothing more than:

One Feeler Gauge
One Straight Edge
Two 3/8" drive Craftsman 17mm deep sockets

They claim cam timing can be checked in five minutes this way (I guess five minutes once all the tools are out and everything is opened up).

1. Rotate #1 piston to TDC exhaust stroke, make sure you are at the center of dwell.
2. Pull out both lifters for cylinder #1 and replace with the 3/8" drive Craftsman 17mm deep sockets (which are two-thousands shy of the diameter of a Chrysler lifter).
3. Lay a short straightedge across the top of both sockets. If your cam is installed "straight up", there will be no gap between the two sockets in terms of height.
4. If you find the socket in place of the exhaust lifter is higher than the intake, the camshaft is retarded.
5. If you find the socket on intake side higher than exhaust side, this means the cam is advanced.
6. To measure the amount in degrees how much the cam is either advanced or retarded, use the feeler gauge to measure the distance between whichever socket is lower and the straightedge (with the straightedge placed across both sockets).
7. Six thousands of an inch difference in lifter height is equal to one degree of cam timing.
8. Make some measurements and calculations to find out how advanced or retarded the cam timing is.
9. If you want to advance the cam, remove the timing chain (being careful the crankshaft doesn't move), then rotate the camshaft slightly in the direction of engine rotation until you see the socket on the intake side rise higher than the exhaust side.
10. Measure again using the straightedge and feeler gauge (six thousands of an inch = one degree) and choose the correct offset dowel or key.

This method can also be used to check the condition of the cam.

1. Rotate #1 piston to TDC compression
2. Check cylinder #6 to make sure you have the same timing you found when cylinder #1 was on TDC exhaust.
3. If the specs are different, the cam is probably bad.

Disclaimer: I haven't tried this method but it seems easier than using a degree wheel. Just thought it seemed like a cool, easy way to do it and was posting to see if anyone has done it this way or may find it helpful.
First, you have to find true TDC and this system doesn't do that. The balancer may not be right you you need the proper tools to get it there.

- - - Updated - - -

- - - Updated - - -

Actually no I did not. Its a little tricky getting it tight right on TDC but I get it to work. Then I set my intake lobe centerline (highest lift) which is 106 ATDC on the cam in my eng now. Then I can check all the rest of the cam timing to make sure its right. Ron
I just get the degree wheel close tighten it up and adjust the temporary pointer to zero if needed.
 
Not a great photo, but this is what I usually use when the heads are off. Really can't see the dial indicator tool that is in the lifter bore.
degree1.jpg
 
Crap! That is a huge degree wheel. With that thing, the degrees have degrees!

I went out and checked my degree wheel and a crank bolt. I was surprised to see the bolt was actually smaller. No additional work needed.

I'm hoping that once I get into all of it, it will make sense. I was nervous when I built my first house and was with my first woman. It sure gets easier when you know what you are doing.
 
First time I did it, I put it in the wrong hole. LOL, couldn't resist.
What I mean is, I forgot the first lifter bore is the Exhaust lobe and I tried to degree the cam to the intake center line number. Took me awhile to figure out I was measuring the wrong cam lobe.
 
First time I did it, I put it in the wrong hole. LOL, couldn't resist.
What I mean is, I forgot the first lifter bore is the Exhaust lobe and I tried to degree the cam to the intake center line number. Took me awhile to figure out I was measuring the wrong cam lobe.

Haha 451

This reminder probably saved me 20 mins of dicking around tomorrow, when I will be degreeing a Lunati Voodoo 268 in my 413. I would not build any engine without degreeing the cam, measuring CC's and calculating CR, and measuring piston/valve clearances....
 
I started the job yesterday. The engine was torn down after setting it to TDC for #1 cylinder. The '509 cam came out, then I found trouble when installing the Lunati cam. It bound up and got tight in the last 1/2 inch. I tapped it into the block with a cam sprocket and ball peen hammer. It was very hard to turn. I couldn't turn it even with a rag over the cam sprocket. I was able to turn it with a ratchet, but it took about 25 lns of torque to do it. I pulled the cam back out and measured the journals. #s 1, 4 and 5 were all .01 bigger than the '509. That didn't seem like enough to cause a problem, so I looked at the cam bearings to see if I'd nicked one. They were all okay. I put the 509 back in to see how it fit. I was able to spin it by hand with a sprocket on it, but it still had some resistance.
I read some archive threads on tight cams. Apparantly it is a common problem. Rick Ehrenberg even wrote that the factory did a lousy job on line boring the cam journals. he wrote that they did a rudimantary job on the casting, then pressed in the cam bearings and align honed the bearings! I read about taking an old cam and cutting grooves in the journals, then installing the cam and spinning it. The grooves cut into any high spots in the cam bearings and in theory, loosen up the fit.
I did that, but I put bearing grease in the grooves to collect the shavings. I spun the cam 6 times, then pulled and cleaned it, then put it back in for round 2. Afterwards, the Lunati cam spun as easy as the 509 did, so I figured it was good.
Degreeing the cam has been a pisser. I've bent 2 piston stops and had to fab up another. Cranking on this engine takes some grunt, and it is hard to tell if the resistance I feel is from the compression or when I hit the piston stop. NOW I have read that the spark plugs should be out for all of this. I wish I read THAT one before. With the plugs out, I'll guess that the engine will spin over much easier, easy enough to feel the piston stop when I hit it.
I returned the dogbone style Lunati lifters. I was concerned about the size of the deep cutout in the middle. a guy at Lunati said that in some cases, the lifter couls rise up or down enough to uncover that area, causing a serious drop in oil pressure. I decided to return them and buy a set of Howards Direct oiling. Same principal, but with a thinner and shallower oil band.
I'm back at it tomorrow but I don't have much time, since I'm busy elsewhere in the afternoon. Maybe by Monday or Tuesday I'll be ready to break in the cam...
 
Speaking as a relative newbie to internal engine workings..... ;)

Going back to the actual title of this thread....I found it painful but interesting and informative to watch several YouTube demonstrations of cam degreeing prior to attempting it myself. While most videos differ slightly in technique, I found that the end result and theory is basically the same - and can apply to any engine. I also run the Cloyes 3-bolt timing gear with double roller and adjustable timing - makes life a lot easier when changing cams.

It is useful to learn about this process, as it also helps to understand how your engine works. I ended up using the Comp Cams wheels and a dial indicator. Would have liked one of those extra large cam degree wheels....but couldn't get hold of one in time. Guess what I'm getting from Santa this year :)
 
Call me a tight arse, but the $20 11" Summit degree wheel did me just fine. Made the piston stop at work and also borrrowed their dial indicator and stand (not pictured)...

P1010467.jpg
P1010466.jpg
 
Auto Transport Service
Back
Top