• When you click on links to various merchants on this site and make a purchase, this can result in this site earning a commission. Affiliate programs and affiliations include, but are not limited to, the eBay Partner Network.

My 1965 Coronet 440 ongoing modification.

Coronet1965SWE

Active Member
Local time
5:03 PM
Joined
Jun 21, 2012
Messages
44
Reaction score
1
Location
Västmanland
Hello from Sweden. I thought id share some pictures and text about my car wich i have owned since 1991 together with my brother.
It is a 1965 Coronet 440 four door sedan that originally had a 318 bigblock, when we bought it it had a 1978 400 with 727 automatic.
As you can see on the before pic. below it wasnt in good shape when we got it, it was chrashed in the right front area pretty bad but it was cheap and we were enthusiastic :)

Before.
dodge-vit1.jpg
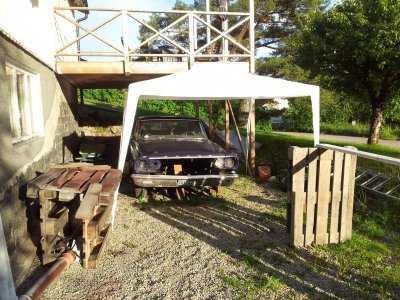
Present day. (summer 2012)
DSCN1095.jpg

Under the first years after we fixed it it was just some minor repairs just to keep it running and I had it as a daily driver for a couple years also.
Then 1996 or so i crashed it up a bit also by driving out from an intersection and not seeing a car that came from the left, luckily i managed to accelerate enough to get hit on the back tire/fender instead of the drivers door.
That resulted in a broken rear leafspring, bent rear axle, damaged slip yoke and a seriously flattened rear fender.
So after that it stood for a few years before fixing it again.
Then in 2005 i started converting it to electronic fuelinjection with Megasquirt wich was very interesting, especially the mapping part after all the fabrication was done, I had never mapped a car before and back then there was no autotune and such :)
Then in 2009 i was doing some high rpm mapping a connection rod bearing gave up (probably due to filling the whole engineblock with gasoline during startupattempts with a incorrectly soldered EFI box wich caused the injectors to stay open all the time doh..) So after that it stood for almost three years and then the fun began by ordering a 512cui strokerkit from 440source and a lot of other fun stuff :)
So i will put up some pics from old days up to present activities, to be continued :)
 
Beautiful car, good luck!
 
Beautiful transformation from before to after.
 
Sure turned out great! Nice ride...
 
A little update in present time. I finally have a garage to work in :)
It is not very big but it works, my house was built with a garage in the basement but the guys who built it in 1950 probably had no car so they just put a regular walking door. I used the holidays to put a proper garagedoor in with help from my brothers.
I just need to get rid of some junk and clean it out then i can bring the car home, i have also ordered some parts so work is in progress :)
More to come later.
20130102_135538.jpg
This is how i worked last year (temperature permitting).
 

Attachments

  • 20120626_195425.jpg
    20120626_195425.jpg
    134.8 KB · Views: 363
It will be nice for you to work on your car all year round. I've done that cold weather repairs ( mechanical only). It's not fun. Show us when you get the car inside.
 
Have you ever thought about coverting it into a 2door?
 
Coolt med andra svenskar på forumet. Jag håller på med en Belvedere 1963.. Krockad och rostig. Men jag ska bygga om till 2d från 4d som den är nu.. Det är goa bilar! Lycka till! //Peter
 
Here are some pics from the super hightec paintjob we did :)
20130323_102601.jpg
The "paint booth"
20130323_102625.jpg20130323_102534.jpg

In 2005 i converted it to EFI with a Megasquirt 1 kit (fuel only).

Fabricated 1 piece fuelrails with integrated AN fittings
bil2.jpg
Making a throttlebody using a Holley 780 plate.
Bild(104).jpgBild(109).jpg
Finished.
bil6.jpg

It took some time to get the car to run properly after the conversion, including faulty injectors, a fire when i got the new injectors (remember to tighten the AN fittings before you start..) and a very troublesome mapping process due to little knowledge.
I also filled the entire engine with gasoline due to one missed soldering in the ECU wich made the injectors stay open all the time as long the ignition was on. (this probably caused the bearing failure later on mentioned in the first post)

But after a while it ran pretty smooth and all was good for a few years until mentioned bearing gave up and i parked it for about 3 years.
This is how it looked in february 2012 when i started buying parts to get it running again.
DSCN0698.jpg

To be continued :)
 
Hi Swede , and welcome. Good work so far !
And yes, there are a few more Swedes around here, but I know there are so many Mopar-freaks in Sweden, so here's to you who just poke around: JOIN THIS GREAT SITE !!
 
Here are some pics from last spring.

Cleaning up the engine compartment, unfortunately some previous owner has replaced the inner fenders with tubes.
20120406_152134.jpg

All painted and exessive holes in the firewall welded, also mounts for the radiator plate welded in place.
A question; now that i have an internally balanced engine, should i remove the weights on the torque converter?
20120430_144228.jpg

Reconstruction of the radiator plate to fit the new airfilter and electric fan.
20120506_133640.jpg
20120513_144944.jpg

Making some inner fenders in aluminum to keep the dirt out.
20120519_142708.jpg

- - - Updated - - -

At the same time i was working to fit a fuelcell in the back.
DSCN0703.jpg
20120415_174516.jpg20120606_183052.jpg20120609_164224.jpg20120613_191652.jpg20120613_192255.jpg20120619_194246.jpg
Unfortunately i dont have any pictures of it finished, ill add some later.

In retrospect it would have been easier to get a new stock tank and modify or buy a new sender unit with bigger tube and a return tube. But i didnt know / think of that at the time.
 
I also bought a 400-512 stroker kit from 440source and had my motorbuilder fix it.
Stuff i bought:

Stroker Kit w/ .035 Dished Pistons

H Beam Connecting Rods w/ ARP 8740 Bolts

Platinum Series Pistons - 4.375 -24 Dished

Chevy Size H Series Rod Bearings STD

Total Seal Moly File Fit Rings

Precision Final Balance

CHAMFERED Main bearings STD - "B"

Comp Cam Xtreme Energy .488/.491"

ARP Bolt Kit - 3 Bolt Camshaft

Comp Cams High Energy Hydraulic

Comp Cams Engine Break In Oil Additive

Billet 3 Bolt 3 Way Adj. Timing Chain Set

1/4" Main Girdle Setup with Billet Steel Main Caps "Package"

Oil Pan - Center DEEP 7" Sump - Black

Oil Pan Gasket

Magnetic Drain Plug

Melling M-63HV High Volume Oil Pump

High Strength Bolt Kit for High

Oil Filter

Intermediate Shaft Bushing - Bronze

Windage Tray - Stroker - New

Oil Dipstick and Tube - Chrome

Alternator Bracket kit - Factory

Alternator Bolt Kit

Engine Block Pipe Plug Kit

Freeze Plug Kit - Brass

Intake "Facing" gaskets - Set of 4

ARP Bolt Kit - Intake Manifold - Black Oxide

Fluid damper - SFI Certified - Chrome - New

ARP Damper bolt - Socket Drive head

ARP Bolt Kit - Cylinder Head 12pt

Bolt Kit - Engine Support Brackets to Block

Exhaust Studs - Set of 6

Cam Bearings - Set of 5

Complete Engine Gasket Kit

Viton Rear Seal

Viton Rear Seal End Strips Kit

Valve Cover Gaskets (pair) Rubber with Steel Core

Intake Valley Pan Gasket - "B" - New

Timing cover - Chrome Plate - New

Timing tab - Chrome Plate - New

Timing Cover Bolt Kit

Billet Aluminum Valley Pan Holddown Bars "B" engine- New

ARP Bolt Kit - VP Holddowns - Black Oxide 12pt

SFI APPROVED Solid Flexplate - 6 bolt - Neutral balance

ARP Bolt Kit - 6 bolt Flexplate to Crank

ARP Bolt Kit - Torque Converter 5/16

Rear Main Seal Cap - Used

Rear Seal Cap Bolts - Set of 2 - New

Stroker Oil Pickup Tube - 3/8"


The cam was chosen to work with stock rockers and springs because my budget didnt allow to replace the heads at this point.

20120323_163913.jpg
20120323_163456.jpg
20120323_162704.jpg
Linehoned.
20120530_111500.jpg
20120619_102641.jpg
Main girdle being installed.
20120619_102504.jpg
Stock 902 heads with new springs and minor valvejob done to get them tight.
20120621_171454.jpg
20120620_184652.jpg
20120621_172750.jpg
Finished :)
20120628_211600.jpg
 
Motor looks great and that damper pulley is awesome. Yes, internally balanced engines you don't need the weights on the TC.
 
How did I miss this thread? Looks awesome.
 
Auto Transport Service
Back
Top