Do you have the small AC water pump pulley? This will help speed up the fan at idle to pull air in. Also make sure your fan shroud is sealed tight to radiator, it will pull air through the least resistance gaps. Also the composite carb spacers help keep the carb cooler.
You are using an out of date browser. It may not display this or other websites correctly.
You should upgrade or use an alternative browser.
You should upgrade or use an alternative browser.
My 69 Coronet project
- Thread starter CoronetDarter
- Start date
CoronetDarter
Well-Known Member
I was looking at it today - it looks like the smaller pulley but I need to measure. And I checked the shroud and it's not sealed to the top of the radiator. It's tight on the sides so I'm going to have to lay down some insulation on top. Any recommendations what to use?Do you have the small AC water pump pulley? This will help speed up the fan at idle to pull air in. Also make sure your fan shroud is sealed tight to radiator, it will pull air through the least resistance gaps. Also the composite carb spacers help keep the carb cooler.
Can't use a spacer with the flat hood - have less than 1/2" clearance as it is.
While looking over things I noticed that I must've left half of the lower air dam attaching bolts off because it was hanging down below the bumper. Secured the dam; should have proper airflow on the bottom now.
Re-reading the FiTech install instructions, it says a filter isn't EDIT {talked to an FiTech today - the FCC install instructions conflict with the throttle body instructions - a filter is required before the FCC} The filter goes back on tonight. required between the mechanical pump and FCC. So I replaced the filter with a 5/16" to 3/8" barbed adaptor and raised the fuel line off the engine.
But the biggest culprit I found was the #2 spark plug wire arcing to the header.
 No excuse - the plug wires are plenty long enough to route a safe distance. Re-routed and what a difference! That misfiring cylinder must've been playing havoc with the O2 sensor. Taking the car out tomorrow - we'll see if the various fixes make a meaningful impact.
Thanks for the comments.
Last edited:
I just used foam for the gaps.
That's what I was thinking, the stuff they sell for door seals with an adhesive on one side?I just used foam for the gaps.
You have to be careful with the adhesive, tends to let loose when hot.
Also the phenolic spacers are only about a 1/4 thick. Helps a lot with heating fuel bowls.
I thought that the phenolics were only for carb cars. Mine is 1/2 inch. Also, my factory 26 shroud has a small gap to the radiator. By design. Fuel lines are wrapped with the DEI mentioned above, and routed to coolest available areas.
Last edited:
To my thinking, and I could be all wrong a gap would allow the fan to pull air around the radiator instead of through it. I didn't realize we were talking FI here. But I would think it would have some benefit on the throttle body unless it's port injection. The spacers I got for my 6 bbl only raised the carbs about .3. I have always wondered if a guy were to use a small electric fuel pump to create 2-3 lbs of pressure at the rear axle if it would help on a carb car to keep it from vapor locking. I put heat shielding on my fuel lines from the tank to the rocker & again from the tranny crossmember to the fuel pump to help. Also hoping the ceramic coating on the TT headers helps as well. Just my thoughts I could be all wrong though.
I would be surprised if it is vapor locking, as you are running fuel through the throttle body constantly. It may be coming from a small tank, but that still seems unlikely.
As far as overheating: I agree with many of the things stated above. I cut out a great article on cooling a couple of months ago by Ray Bohacz. He is truly an expert in this area, and the article had a lot of good advice. Some suggestions made by the article:
Hawk
As far as overheating: I agree with many of the things stated above. I cut out a great article on cooling a couple of months ago by Ray Bohacz. He is truly an expert in this area, and the article had a lot of good advice. Some suggestions made by the article:
- Radiator: Be sure it is in good shape and flows properly. You have a new radiator, so no worries there.
- Coolant: Have a 50/50 mixture. Too much antifreeze actually limits the fluid's ability to remove heat from the engine.
- Thermostat: The temperature rating of a thermostat is the "crack open" rating. So a 160 degree thermostat may run a car at 170 to 180 degrees.
- Fan and shroud: The fan should be positioned about half way into the shroud to most effectively pull air.
- Water Pump: The water pump should spin between 24 and 33% faster than the crank. Many old muscle cars used 1:1 ratios and were known for poor cooling at low speed. Ideally you should have a ration of 1.25 to 1.33 to 1 (Water pump to crank).
Hawk
CoronetDarter
Well-Known Member
Drove the car yesterday morning and it didn't go over 174* - but it's been cool in the mornings and there was no traffic. The test will be later this week; it's going to be close to 100*.
Hawk - item #5 is the wild card. This weekend I will measure the diameters of the crank and water pump pulleys. And I still want to install a clutch fan - have to find one that's only about 1 3/4" max height.
Hawk - item #5 is the wild card. This weekend I will measure the diameters of the crank and water pump pulleys. And I still want to install a clutch fan - have to find one that's only about 1 3/4" max height.
Drove the car yesterday morning and it didn't go over 174* - but it's been cool in the mornings and there was no traffic. The test will be later this week; it's going to be close to 100*.
Hawk - item #5 is the wild card. This weekend I will measure the diameters of the crank and water pump pulleys. And I still want to install a clutch fan - have to find one that's only about 1 3/4" max height.
Cool. Maybe it might be something as simple as changing one of the pulleys to get the right ratio.
I honestly don't know what the ratio is for my car - I just put it together and went. I did get extra cooling when my radiator was restored, but I have been fortunate and not had any problems. My crank and water pump pulleys, as well as fan, clutch, shroud and overall radiator (minus re-core) are all OEM.
Good Luck!
CoronetDarter
Well-Known Member
Pretty much the same here - new radiator but factory sized specs. I keep going back to my a/c compressor install. I had to use spacers for the fan to clear and now there's no room for a clutch. But several FBBO members, you and Dennis H to name two, have the same system as me with no clearance issues. But everything looks to be lined up correctly, belts are straight, no squealing from being mis-aligned.Cool. Maybe it might be something as simple as changing one of the pulleys to get the right ratio.
I honestly don't know what the ratio is for my car - I just put it together and went. I did get extra cooling when my radiator was restored, but I have been fortunate and not had any problems. My crank and water pump pulleys, as well as fan, clutch, shroud and overall radiator (minus re-core) are all OEM.
Good Luck!
Darius
Well-Known Member
Are you planning on Hot Aug Nites in Reno?
CoronetDarter
Well-Known Member
Not this year. The cooling system needs to be fine tuned first.Are you planning on Hot Aug Nites in Reno?
CoronetDarter
Well-Known Member
It's been a couple of weeks since my last post - about the same amount of time my car was in the shop having tranny work. I originally took it in to have the TransGo shift kit installed and have the kickdown adjusted because it wasn't shifting crisply. There was debris at the bottom of the pan so, since the VB was coming out anyway, went ahead and had the tranny rebuilt. They used hi-po bands relined in "Racing Red" along with a solid kickdown band, info that I got out of the Torqueflite A-727 handbook by Carl Munroe. It took them over a week - headers suck for tranny removal even if you're a pro. I warned them beforehand. Big difference in the shifting; didn't budget for a tranny rebuild but it was worth it.
CoronetDarter
Well-Known Member
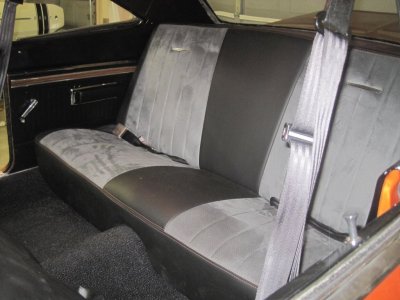
Never posted pics of the interior after the seats were installed. Learning experience: the rear seat goes in LAST, after the inside quarter panels, sail panels, rear window trim. Last month when we went to Mopars at the Park we thought there'd be two additional passengers so I installed the rear seat cushions before finishing the interior. No big deal, just pop the seat cushion back out. Problem was, the cushion was so firm (comfortable when you're sitting on it) it has no give, no matter how much downforce I applied it would not pop out of the bracket. You can see wrinkling on the quarter panels from having to shove them under the trim.

The 3pt seat belts are from XV Engineering - direct bolt in.

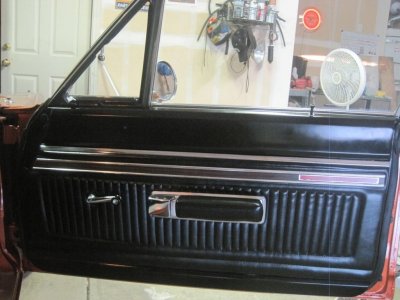
All four panels were dyed black, along with 3 armrests; armrest bezels were painted silver. The car came with only the 3; if you have a sharp eye you can tell which armrest and bezel is different.

Kept the faux wood trim with reflector; retained some of the old school.

BTW, It's the passenger rear - no ashtray.

The 3pt seat belts are from XV Engineering - direct bolt in.

All four panels were dyed black, along with 3 armrests; armrest bezels were painted silver. The car came with only the 3; if you have a sharp eye you can tell which armrest and bezel is different.

Kept the faux wood trim with reflector; retained some of the old school.

BTW, It's the passenger rear - no ashtray.
Last edited:
CoronetDarter
Well-Known Member
I mentioned several posts ago that the engine was experiencing temp creep in stop-n-go traffic. Last Monday when I drove the car home from the tranny shop it was over 100* and the temp stayed at 185* the entire time on the freeway. In the 10 minutes from the freeway to my house, with light traffic, climbed to 197* as I was parking in the garage.
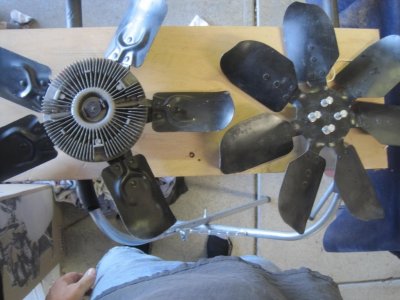
This weekend I installed a new fan with thermal clutch. Don't know what make of car the fan was from, just know that it fit. (Hawk - once again, Randy to the rescue with his 30+ years stash of parts). Idled the engine in the garage, over 100*, with a t-shirt in front of the radiator to block air flow. It took over 20 minutes to get to 205*; removed the shirt and the temp dropped to 195* within a couple of minutes. Let it sit for about 10 minutes, fired it up and it idled at 186* for another several minutes before shutting her down. I believe the problem is solved! Besides the added clutch, this fan is 18 1/2" vs. 18" for the Mopar; fan blade tips come within 1/2" of the shroud.
Original Mopar fan on the right; 5 bladed fan from unknown source on the left

A little more than 1/2" clearance on top; less than 1/2" at the bottom. Engine is angled slightly.


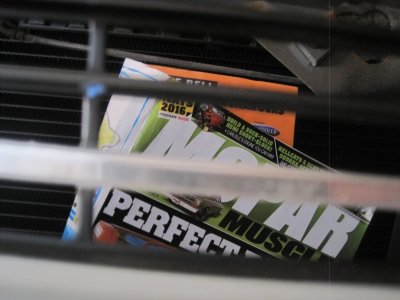
The say if the fan can hold a paper towel against the radiator then you've got good airflow. This setup is holding up a Mopar Muscle mag in front of the a/c condenser and rad. Good enough!

This weekend I installed a new fan with thermal clutch. Don't know what make of car the fan was from, just know that it fit. (Hawk - once again, Randy to the rescue with his 30+ years stash of parts). Idled the engine in the garage, over 100*, with a t-shirt in front of the radiator to block air flow. It took over 20 minutes to get to 205*; removed the shirt and the temp dropped to 195* within a couple of minutes. Let it sit for about 10 minutes, fired it up and it idled at 186* for another several minutes before shutting her down. I believe the problem is solved! Besides the added clutch, this fan is 18 1/2" vs. 18" for the Mopar; fan blade tips come within 1/2" of the shroud.
Original Mopar fan on the right; 5 bladed fan from unknown source on the left

A little more than 1/2" clearance on top; less than 1/2" at the bottom. Engine is angled slightly.


The say if the fan can hold a paper towel against the radiator then you've got good airflow. This setup is holding up a Mopar Muscle mag in front of the a/c condenser and rad. Good enough!

Last edited:
I mentioned several posts ago that the engine was experiencing temp creep in stop-n-go traffic. Last Monday when I drove the car home from the tranny shop it was over 100* and the temp stayed at 185* the entire time on the freeway. In the 10 minutes from the freeway to my house, with light traffic, climbed to 197* as I was parking in the garage.
This weekend I installed a new fan with thermal clutch. Don't know what make of car the fan was from, just know that it fit. (Hawk - once again, Randy to the rescue with his 30+ years stash of parts). Idled the engine in the garage, over 100*, with a t-shirt in front of the radiator to block air flow. It took over 20 minutes to get to 205*; removed the shirt and the temp dropped to 195* within a couple of minutes. Let it sit for about 10 minutes, fired it up and it idled at 186* for another several minutes before shutting her down. I believe the problem is solved! Besides the added clutch, this fan is 18 1/2" vs. 18" for the Mopar; fan blade tips come within 1/2" of the shroud.
Original Mopar fan on the right; 5 bladed fan from unknown source on the left
A little more than 1/2" clearance on top; less than 1/2" at the bottom. Engine is angled slightly.
The say if the fan can hold a paper towel against the radiator then you've got good airflow. This setup is holding up a Mopar Muscle mag in front of the a/c condenser and rad. Good enough!
Sweet! Nothing like getting a problem solved - overheating issues can really take the fun out of driving the car. I have a clutch fan as well - I forget what my fan looks like but it is at least close to what you put in. Glad it is working well for you!
Funny, I can't help but think about that both of us have had to fix transmission gremlins when we got our cars on the road. On the positive note, maybe that means you are now done!!!
Please say hi to everyone from the crazy cross country guy!!!

themechanic
Oklahoma is OK
- Local time
- 6:59 PM
- Joined
- Nov 11, 2012
- Messages
- 22,178
- Reaction score
- 28,686
- Location
- Moore, Oklahoma
It probably would run cooler with the 7 blade fan and clutch. That 5 blade clutch setup looks like the one Summit sells. I've forgotten what they call it.
I like your way of illustrating the air flow with he Mopar Mag.
I like your way of illustrating the air flow with he Mopar Mag.
Similar threads
- Replies
- 7
- Views
- 457
- Replies
- 35
- Views
- 4K
- Replies
- 0
- Views
- 209


