• When you click on links to various merchants on this site and make a purchase, this can result in this site earning a commission. Affiliate programs and affiliations include, but are not limited to, the eBay Partner Network.

Project Unicorn - 1968 Charger Restoration

I did the drill bit thing for awhile then I bought a Blair spot weld cutter off eBay a couple years ago and it's great, does a ton of welds per cutter and is quick and easy. You are going awesome work here. I wish I had some floors or structure left to match panels to. Mine is all educated guessing.
 
E0AFCDFD-33AC-4EDD-B12F-EEC88B480F6B.jpeg
A8F11B9A-304D-4945-9DC5-DEFD764C9FB4.jpeg
4129B13A-F0B2-442F-856A-E271E20FA84A.jpeg
04ED4E90-F34C-43D5-8810-B62D4C507E7C.jpeg
A141D695-8666-4192-BEDB-7435474646AF.jpeg
ADF7A413-6359-4FD9-9563-C57E435E69B6.jpeg
04C23D0A-C7C0-4966-A778-0E80D8808A46.jpeg
A91071AB-EDB2-4431-B27F-218122DC19A8.jpeg
image.jpg


New inner and outer wheelhouses on both sides now welded in. Next up is to cut out the rear valence to make room for the new full trunk floor to go in.
 
Last edited:
I don't know but I have this feeling you have done this before...... My Coronet was not in bad shape so I got away with little metal work. Out of my whole build I disliked the metal work the most because I did not really have the right tools. This is making me think I could tackle something worse than my Coronet was....:popcorn2:
 
While I’m waiting for the new rear valence and corner pieces I decided to repair the left and right rear inner section of the rockers. So far on the passenger side:

CB8C3539-DEA2-4DA2-BDDC-31AEA4DCA005.jpeg
0A138A3B-6A8F-459F-A24F-C419838CA8CF.jpeg
3E0E3F28-6EAF-442D-BF03-22449B45677D.jpeg
CA92CDD0-C5D3-4BC1-ADED-FBAE5AD732E5.jpeg
 
Great thread. Thanks for posting your work. I have a similar amount of work to do to my charger so this thread is a good source of information!

Thanks.
 
Have you decided what color you are going? vinyl top? Progress looks great!

Thanks! Black vinyl top is a for sure. Colour is narrowed down to black, red, purple or silver... haha ... having a hard time deciding. My wife wants it black, but I’ve had a black car before and it’s so hard to keep clean and shows the scratches. I have time to figure it out, still about a year away from paint. Lots more metal work to do and then on to body work and panel fit and mock up...have to put the tremec in and cut the tunnel and mock all that up, and the list continues ... won’t list it all because it can be overwhelming!
 
Thanks! Do you have a restoration thread going?
I did start a thread 2 or 3 yrs ago but the project stalled due to lack of work space.
I've built a garage now although it's a bit on the small side. I then had to do some major work to my wife's car and then my sons car.
The charger will hopefully move into the garage in the next few days but I need to work on the house as well. I'm keen to get it done though.
Here's some pics.
image.jpeg
image.jpeg
image.jpeg
image.jpeg
 
A lot of nice work going on here, keep it up:thumbsup:.
 
I did start a thread 2 or 3 yrs ago but the project stalled due to lack of work space.
I've built a garage now although it's a bit on the small side. I then had to do some major work to my wife's car and then my sons car.
The charger will hopefully move into the garage in the next few days but I need to work on the house as well. I'm keen to get it done though.
Here's some pics.

looks like you have your work cut out for you too! hope you can get back at it, update your thread if you do and I'll follow along.

cheers
 
This is someone that knows how to replace metal properly......

Great work!
 
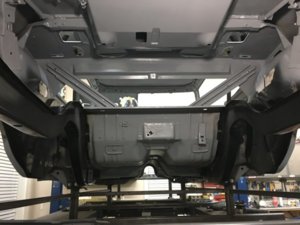
A lot of progress over the past few weeks. Here is one part. Needed to replace the rear cross member brace (the one that runs along the back of the frame rails and perches). Couldn’t bring myself to spend the $400+ on a new piece - by the time it’s shipped to me in Canada. So, I made my own ... pics below. I did put a new AMD valance on, and AMD corner pieces - all that fit very well. It’s almost finished being welded in now.

24B0BCDA-E6AB-43C1-8DD1-5B1F131F77CF.jpeg
23662150-410C-4877-8877-7906625CEC7C.jpeg
34851BBC-903B-4273-8060-117110FC4E72.jpeg
E047E0B5-E7CD-4A19-BE60-5EB619BCBA79.jpeg
2E656133-9FEE-4853-A3B0-E65E7CAFF1AC.jpeg
9A40D244-FDE4-4389-9F2A-3C1138F08F0A.jpeg
A407113F-78C5-4457-9B99-E3D54620322F.jpeg
67411B61-61FA-4BFC-99BD-77D7E8A81FEC.jpeg
 
I finished rebuilding both the driver and passenger rear section of the rockers. Really pleased with how they turned out, strength is restored and looks better.

Passenger side...


09BF2B66-6DEC-4D78-AA2F-D2A1AE510CC2.jpeg
56A04A48-03B9-425B-9059-313E5F162497.jpeg
0332B8A0-6D49-438D-91F6-198456184AB1.jpeg
41F603D4-70CC-4322-87E3-5F63C38884B6.jpeg
ED4C6A25-34C3-4541-802F-7A80DA695F4D.jpeg
5D83EC31-E3F8-4F3E-990B-A82370E82502.jpeg
569064DE-40B9-44B5-9086-F6AF99DB0B0C.jpeg
9938502A-EE98-402A-AB59-9D00804FB805.jpeg
119DD4CC-1EA2-4006-A021-C337CD9DB215.jpeg
0F3C020D-6FC2-4C9D-87A6-598E92CB19BA.jpeg
 
Auto Transport Service
Back
Top